深入理解 Sentinel 中的限流算法
Sentinel 版本
1.8.0
固定窗口算法
先介绍一下最简单的限流算法

每个窗口都有一个计数器(counter)用于统计流量,如果 counter + 本次申请的请求数 > 预设的 QPS,则拒绝请求。
固定窗口很简单,但是也有很大的问题
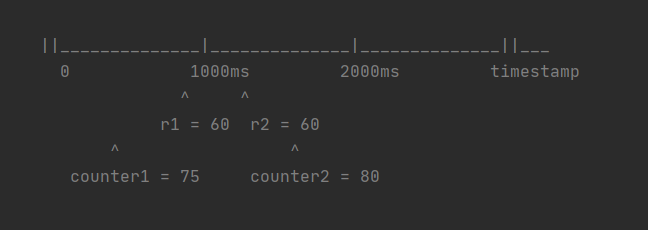
假设我们规定 QPS 不能超过 100,如上图所示 r1 和 r2 两个时间点分别来了 60 个请求, QPS 已经大于 100 了。此时应该触发限流了,但是固定窗口算法傻傻的只关注自己窗口的流量,感知不到 QPS 已经超了
滑动窗口算法
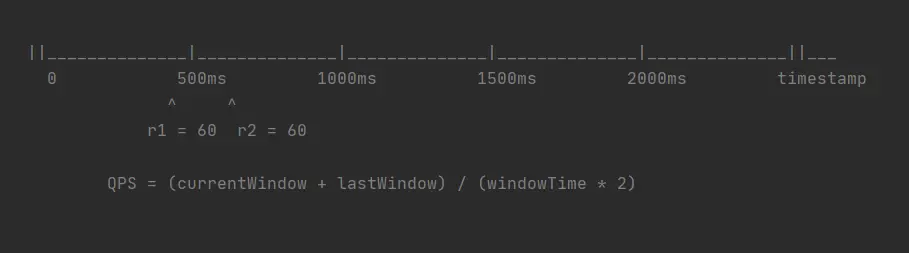
该算法将单位时间切成了多个窗口,每次计算 QPS 时,计算 当前窗口 + 过去几个窗口 的流量总和,这样就避免了固定窗口的问题 (具体使用几个窗口,取决于窗口大小和单位时间大小。例如上图,每个窗口大小为 500 ms,以 1 s 为单位时间做限流,每次使用 current + last 即可)
算法实现细节思考
理解算法思路之后,接下来要思考如何实现这个算法了
- 首先我们需要有一个上图中的时间轴,来记录时间窗口,可以通过数组来实现这个时间轴。
- 时间轴有了,我们再来考虑一下时间窗口。
每个时间窗口肯定要有一个线程安全的计数器以及当前窗口对应的时间
// 时间轴
List<Window> timeline = new ArrayList<>();
// 每个窗口的大小
int windowTime;

// 时间窗口
class Window {
    Timestamp startTime;
    AtomicInteger counter;
}
但是如果仔细一想,还是存在一些问题的
- 由于时间是会一直增长的,那我们的数组怎么办?也要跟着时间无限的增大吗?
- 旧的时间窗口(例如几秒之前的)在之后的计算不会再用到了,如何清理这些无用的窗口?
Sentinel 中滑动窗口算法如何实现的
带着上述的问题与思考来看下 Sentinel 中是如何实现的
LeapArray
Sentinel 中滑动窗口算法的核心类,首先来了解一下他的核心成员变量
public abstract class LeapArray<T> {
 // 要统计的单位时间大小,例如计算QPS时,为1000
    protected int intervalInMs;
 // 样本数量
    protected int sampleCount;
 // 窗口大小 该值 = intervalInMs / sampleCount
    protected int windowLengthInMs;

 // 存储时间窗口的数组
    protected final AtomicReferenceArray<WindowWrap<T>> array;

    public LeapArray(int sampleCount, int intervalInMs) {
        AssertUtil.isTrue(sampleCount > 0, "bucket count is invalid: " + sampleCount);
        AssertUtil.isTrue(intervalInMs > 0, "total time interval of the sliding window should be positive");
        AssertUtil.isTrue(intervalInMs % sampleCount == 0, "time span needs to be evenly divided");

        this.windowLengthInMs = intervalInMs / sampleCount;
        this.intervalInMs = intervalInMs;
        this.sampleCount = sampleCount;

        this.array = new AtomicReferenceArray<>(sampleCount);
    }

}
单机限流在统计 QPS 时,默认 sampleCount = 2,intervalInMs = 1000,windowLengthInMs = 500
LeapArray#calculateTimeIdx
大体思路相同,同样是利用一个数组实现时间轴,每个元素代表一个时间窗口
Sentinel 中 数组长度是固定的 ,通过方法 LeapArray#calculateTimeIdx 来 确定时间戳在数组 中的位置 (找到时间戳对应的窗口位置)

怎么理解这个方法呢?
我们把数据带入进去,假设 windowLengthInMs = 500 ms (每个时间窗口大小是 500 ms)
如果 timestamp 从 0 开始的话,每个时间窗口为 [0,500) [500,1000) [1000,1500) ...
这时候先不考虑 timeId % array.length() ,也不考虑数组长度。假设当前 timeMillis = 601,将数值代入到 timeMillis / windowLengthInMs 其实就可以确定出当前的 timestamp 对应的时间窗口在数组中的位置了
由于数组长度是固定的,所以再加上求余数取模来确定时间窗在数组中的位置
LeapArray#currentWindow
先来看一下 Sentinel 中 Window 的结构,基本和我们上面想的一致,计数器使用了泛型,可以更灵活
public class WindowWrap<T> {

    /**
     * Time length of a single window bucket in milliseconds.
     */
    private final long windowLengthInMs;

    /**
     * Start timestamp of the window in milliseconds.
     */
    private long windowStart;

    /**
     * Statistic data.
     */
    private T value;

 // 省略。。。
}
继续说 currentWindow,该方法根据传入的 timestamp 找到 或者 创建 这个时间戳对应的 Window
这个方法源码中注释很多,我删除了部分注释
    public WindowWrap<T> currentWindow(long timeMillis) {
        if (timeMillis < 0) {
            return null;
        }

        int idx = calculateTimeIdx(timeMillis);
        // Calculate current bucket start time.
        long windowStart = calculateWindowStart(timeMillis);

        /*
         * Get bucket item at given time from the array.
         *
         * (1) Bucket is absent, then just create a new bucket and CAS update to circular array.
         * (2) Bucket is up-to-date, then just return the bucket.
         * (3) Bucket is deprecated, then reset current bucket and clean all deprecated buckets.
         */
        while (true) {
            WindowWrap<T> old = array.get(idx);
            if (old == null) {
                WindowWrap<T> window = new WindowWrap<T>(windowLengthInMs, windowStart, newEmptyBucket(timeMillis));
                if (array.compareAndSet(idx, null, window)) {
                    // Successfully updated, return the created bucket.
                    return window;
                } else {
                    // Contention failed, the thread will yield its time slice to wait for bucket available.
                    Thread.yield();
                }
            } else if (windowStart == old.windowStart()) {
                return old;
            } else if (windowStart > old.windowStart()) {
                if (updateLock.tryLock()) {
                    try {
                        // Successfully get the update lock, now we reset the bucket.
                        return resetWindowTo(old, windowStart);
                    } finally {
                        updateLock.unlock();
                    }
                } else {
                    // Contention failed, the thread will yield its time slice to wait for bucket available.
                    Thread.yield();
                }
            } else if (windowStart < old.windowStart()) {
                // Should not go through here, as the provided time is already behind.
                return new WindowWrap<T>(windowLengthInMs, windowStart, newEmptyBucket(timeMillis));
            }
        }
    }
方法逻辑分析如下:
首先要做的两件事
- 计算 timestamp 在数组中的位置,就是我们上文说的
calculateTimeIdx - 计算 timestamp 的
windowStart(窗口开始时间),通过timeMillis - timeMillis % windowLengthInMs,这个值在后边会用到
然后进入一个 while(true) 循环, 通过 WindowWrap<T> old = array.get(idx) 找出对应的窗口,接下来就是三种情况了
- old == null
这个时候代表数组中还没有这个 window,创建这个 window 加入到数组中(由于此时可能会有多个线程同时添加数组元素,所以一定要保证线程安全,所以这里使用的数组为AtomicReferenceArray),添加成功后返回新建的 window - windowStart == old.windowStart()
window 已经存在了,直接返回即可 - windowStart > old.windowStart()
代表数组中的元素已经至少是 25s 之前的了,重置当前窗口的 windowStart 和 计数器,这个操作同样也是一个多线程操作,所以使用了updateLock.tryLock()。
仔细看了代码后,我提出了一个问题。我觉得这个地方并不能一定保证能 锁住 。会不会出现两个线程同时判断需要更新,由于一个线程很快执行成功并释放了锁,第二个线程也成功获取到 Lock,会执行多次 resetWindow。我认为需要再 tryLock 之后再判断一下执行条件,目前已经给 Sentinel 提交了 Issue - windowStart < old.windowStart()
通常情况下不会走到这个逻辑分支,上面源码的注释也是这样解释的
LeapArray#values
上文中提到过,计算流量时具体使用几个窗口,取决于窗口大小和单位时间大小
该方法的作用通过传入一个时间戳,找出本次计算所需的所有时间窗口
    public List<T> values(long timeMillis) {
        if (timeMillis < 0) {
            return new ArrayList<T>();
        }
        int size = array.length();
        List<T> result = new ArrayList<T>(size);

        for (int i = 0; i < size; i++) {
            WindowWrap<T> windowWrap = array.get(i);
            if (windowWrap == null || isWindowDeprecated(timeMillis, windowWrap)) {
                continue;
            }
            result.add(windowWrap.value());
        }
        return result;
    }

    public boolean isWindowDeprecated(long time, WindowWrap<T> windowWrap) {
  // intervalInMs 在单机限流计算QPS时默认为 1000(ms)
        return time - windowWrap.windowStart() > intervalInMs;
    }
values 的逻辑没什么可说的,遍历数组将时间符合的窗口加入到 List 中
重点看一下 isWindowDeprecated 这个方法
还是像上面那样把数值带进去。每个窗口大小为 500 ms,例如 timestamp 为 1601,这个 timestamp 对应的 windowStart 为 1500,此时 (1601 - 1500 > 1000) = false 即这个窗口是有效的,再往前推算,上一个窗口 windowStart 为 1000 也是有效的。再往前推算,或者向后推算都是无效的窗口。
intervalInMs 我是这样理解的, 以多长的时间段作为单位时间来限流 。即可以以 1s 为一个时间段来做限流,也可以以 60s 为一个时间段来限流。
Sentinel 限流思路
在理解了 LeapArray#currentWindow 和 LeapArray#values 方法的细节之后,其实我们就可以琢磨出限流的实现思路了
首先根据当前时间戳,找到对应的几个 window,根据 所有 window 中的流量总和 + 当前申请的流量数 决定能否通过
- 如果不能通过,抛出异常
- 如果能通过,则对应的窗口加上本次通过的流量数
Sentinel 限流实现
Sentinel 基本也是这个思路,只不过逻辑复杂一些,这里贴出几处代码,感兴趣的同学可以自己 debug 一下
Sentinel 限流检查
根据 Sentinel 文档中的解释,我们可以知道负责限流的类为 FlowSlot,FlowSlot 会使用 FlowRuleChecker 来检查当前资源是否需要限流
FlowSlot#entry
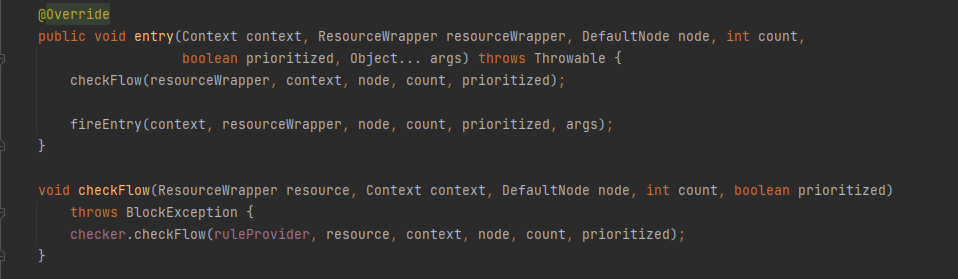
FlowRuleChecker#checkFlow

根据 FlowRule 的设定来做限流检查,这中间我省略了几段代码,默认情况没有设置 ControlBehavior 会使用 DefaultController#canPass 做限流检查。如下图,通过判断 当前流量数 + 申请的数量 是否大于预设的数量,来决定是否限流
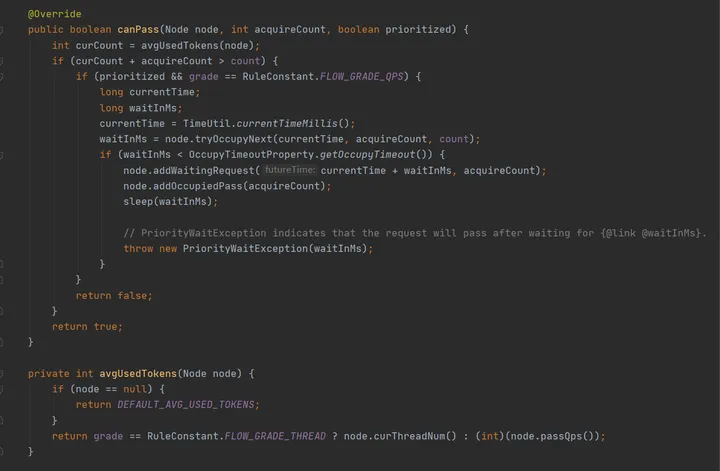
注:当使用
SphU.entry时 prioritized = false,使用SphU.entryWithPriority时 prioritized = true。node.tryOccupyNext的含义:如果想占用未来的时间窗口令牌,需要等待多久(上图中的waitInMs)。 如果小于规定的超时时间,则记录正在等待的请求数,然后执行sleep(waitInMs),外层捕获到PriorityWaitException会自己处理掉,然后执行用户逻辑,用户完全无感知。
通过上图 avgUsedTokens 可以看到,当 Rule 的 grade 为 FLOW_GRADE_QPS 时,会调用 node.pass()。这里调用的具体实现为 StatisticNode#passQps,如下图

rollingCounterInSecond.getWindowIntervalInSec()计算 QPS 时为 1 秒rollingCounterInSecond.pass()计算 QPS 时,最多返回两个窗口的通过请求数(currentWindow + lastWindow)
rollingCounterInSecond#pass

首先先尝试是否需要创建当前的时间窗口,然后找到相关的窗口,计算流量总和。
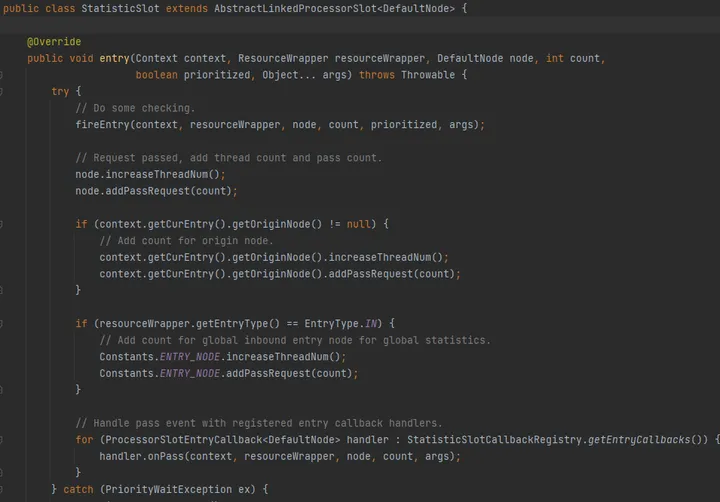
Sentinel 请求记录
代码位置 StatisticSlot#entry,fireEntry 会根据我们配置的规则进行检查(例如上述的限流)。
如果检查没有抛出异常,则记录线程数和申请的请求数(限流检查依赖的数据就是这里记录的)。
集群限流
集群限流有什么用
在没有集群限流之前,如果想把整个服务的 QPS 限制在某个值。举个例子现在某 Server 有十个实例,我们希望总 QPS 不超过 100,这时我们的做法是把每个实例的 QPS 设置为 10。
在理想情况下,这样做可以将 QPS 控制在 100。但是如果每台 Server 分配到的流量不均匀。这可能会导致总量在没达到 100 的时候,某些 Server 就开始限流了。
这种情况就需要 Sentinel 的集群限流出场了。
集群限流原理
由于篇幅限制,我们这里不讨论如何搭建集群限流,只是来说说 Sentinel 如何在这一基础上做的集群限流。
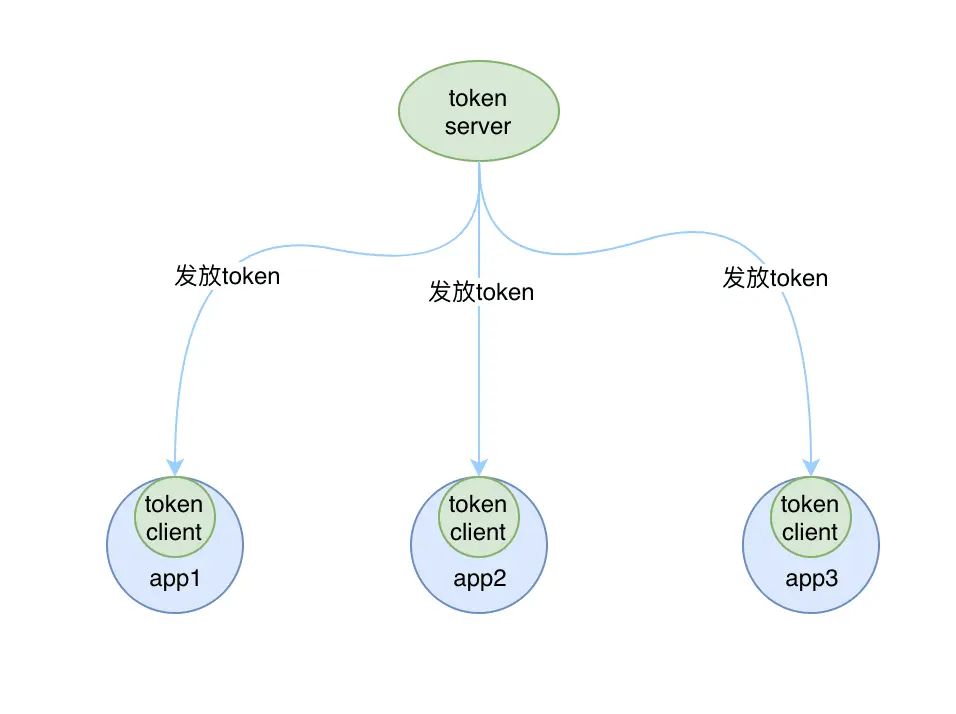
思路很简单,选出一个 Token Server。在开启集群限流后,所有的 Client 在需要限流时,询问 Token Server,Server 决定当前请求是否限流。具体的实现细节与单机限流略有不同,但是核心的算法还是使用的 LeapArray
这里也是给出几处源码位置,感兴趣的同学自行阅读一下
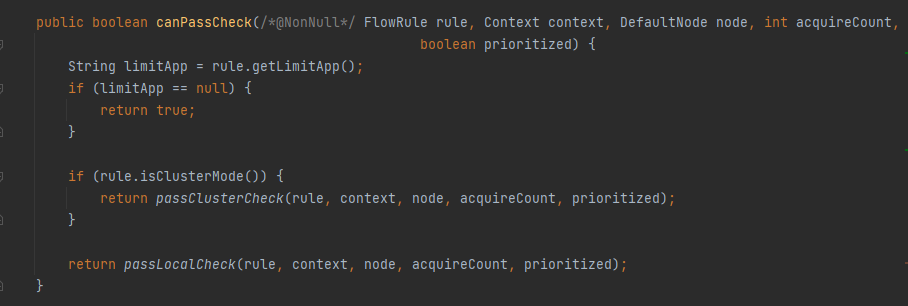
Client 端根据 Rule 决定本次使用本地限流还是集群限流,FlowRuleChecker#canPassCheck
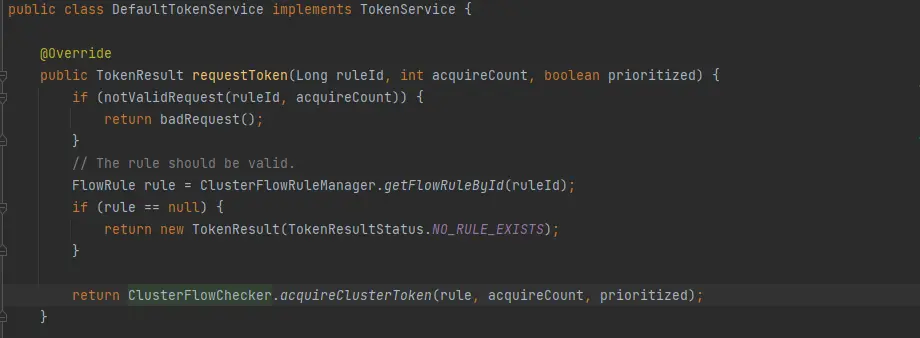
Server 端,DefaultTokenService#requestToken
并发下限流的问题
在完整的阅读完单机和集群的限流代码之后,发现了一个问题,限流流程可以简化为如下
// 伪代码

// 最大QPS
int maxCount;
// 当前申请的流量数
int aquireCount;

int passQps = getPassQPS();

if (passQps + aquireCount <= maxCount) {
 addPass(aquireCount);
} else {
 // 限流处理
}
由于没有并发控制,并发场景下会出现,多个线程同时满足 passQps + aquireCount <= maxCount,然后增加流量统计,这样的话,没法保证一定将 QPS 控制在 maxCount,并发的情况下会出现实际流量超出预设 QPS 的情况。
这肯定不是个Bug。这里没有并发控制可能是出于性能考虑,在性能和准确度可以接受的情况下做了一个折中
所以在使用时,如果实际 QPS 高于预设值,可能是并发导致的。
原文https://zhuanlan.zhihu.com/p/383064126
标题:深入理解 Sentinel 中的限流算法
作者:michael
地址:https://blog.junxworks.cn/articles/2024/02/20/1708407839135.html