如何在Spring Cloud中使用SkyWalking做链路追踪
摘要: 原创出处 http://www.iocoder.cn/Spring-Cloud/SkyWalking/ 「芋道源码」欢迎转载,保留摘要,谢谢!
- 1. 概述
- 2. SpringMVC 示例
- 3. 忽略部分 URL 的追踪
- 4. Feign 示例
- 5. Spring Cloud Gateway 示例
- 6. Zuul 示例
- 7. Dubbo 示例
- 8. MySQL 示例
- 9. Redis 示例
- 10. MongoDB 示例
- 11. Elasticsearch 示例
- 12. RocketMQ 示例
- 13. RabbitMQ 示例
- 14. Kafka 示例
- 15. ActiveMQ 示例
- 16. 日志框架示例
- 17. 自定义追踪方法
- 18. OpenTracing 示例
- 19. Spring 异步任务示例
- 20. 抽样收集示例
- 666. 彩蛋
本文在提供完整代码示例,可见 https://github.com/YunaiV/SpringBoot-Labs 的 labx-14 目录。
原创不易,给点个 Star 嘿,一起冲鸭!
1. 概述
本文我们来学习如何在 Spring Cloud 中使用 SkyWalking 作为链路追踪组件,实现服务调用的链路追踪、依赖的拓扑图、调用请求量的统计等等功能。
SkyWalking 是一款针对分布式系统的国产 APM(Application Performance Monitoring,应用性能监控)产品,主要针对微服务、Cloud Native 和容器化(Docker、Kubernetes、Mesos)架构的应用。
SkyWalking 的核心是一个分布式追踪系统,目前已经完成 Apache 孵化,成为 Apache 顶级项目。
在开始本文之前,胖友需要对 SkyWalking 进行简单的学习。可以阅读《SkyWalking 极简入门》文章,将第一二小节看完,在本机搭建一个 SkyWalking 服务。
因为 SkyWalking 是基于 Java Agent 实现,所以和使用 Spring Boot 或 Spring Cloud 关联度不高。因此,本文会和《芋道 Spring Boot 链路追踪 SkyWalking 入门》有蛮多重合的地方。
一旦有重合的地方,艿艿会暂时不写,会引导胖友去阅读该文章的对应小节,不会存在任何影响哈~🙂
2. SpringMVC 示例
示例代码对应仓库:
labx-14-sc-skywalking-springmvc。
本小节,我们来搭建一个 SkyWalking 对 SpringMVC 的 API 接口的链路追踪。该链路通过如下插件实现收集:
我们来新建一个 labx-14-sc-skywalking-springmvc 项目,最终如下图所示: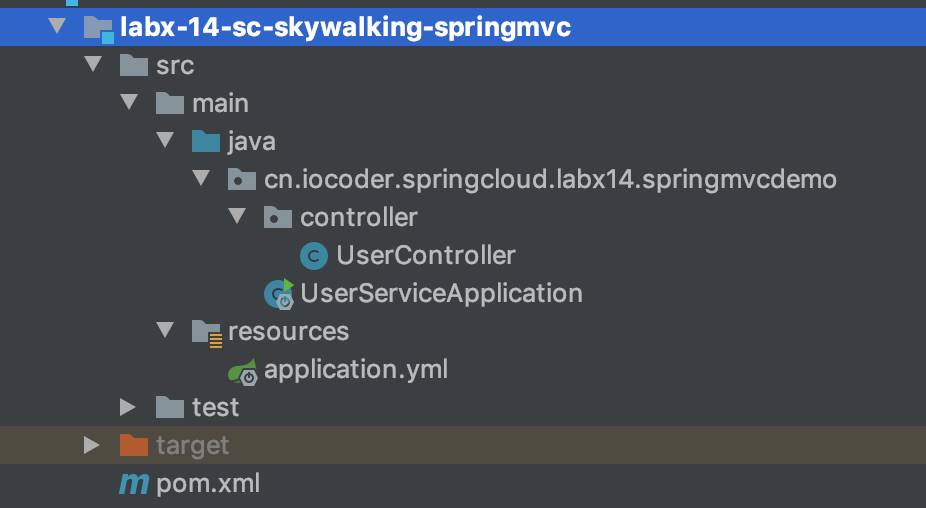
2.1 引入依赖
在 pom.xml 文件中,引入相关依赖。
|
<?xml version="1.0" encoding="UTF-8"?>
<project xmlns="http://maven.apache.org/POM/4.0.0"
         xmlns:xsi="http://www.w3.org/2001/XMLSchema-instance"
         xsi:schemaLocation="http://maven.apache.org/POM/4.0.0 http://maven.apache.org/xsd/maven-4.0.0.xsd">
    <parent>
        <artifactId>labx-14</artifactId>
        <groupId>cn.iocoder.springboot.labs</groupId>
        <version>1.0-SNAPSHOT</version>
    </parent>
    <modelVersion>4.0.0</modelVersion>

    <artifactId>labx-14-sc-skywalking-springmvc</artifactId>

    <properties>
        <maven.compiler.target>1.8</maven.compiler.target>
        <maven.compiler.source>1.8</maven.compiler.source>
        <spring.boot.version>2.2.4.RELEASE</spring.boot.version>
        <spring.cloud.version>Hoxton.SR1</spring.cloud.version>
    </properties>

    <!--
        引入 Spring Boot、Spring Cloud、Spring Cloud Alibaba 三者 BOM 文件,进行依赖版本的管理,防止不兼容。
        在 https://dwz.cn/mcLIfNKt 文章中,Spring Cloud Alibaba 开发团队推荐了三者的依赖关系
     -->
    <dependencyManagement>
        <dependencies>
            <dependency>
                <groupId>org.springframework.boot</groupId>
                <artifactId>spring-boot-starter-parent</artifactId>
                <version>${spring.boot.version}</version>
                <type>pom</type>
                <scope>import</scope>
            </dependency>
            <dependency>
                <groupId>org.springframework.cloud</groupId>
                <artifactId>spring-cloud-dependencies</artifactId>
                <version>${spring.cloud.version}</version>
                <type>pom</type>
                <scope>import</scope>
            </dependency>
        </dependencies>
    </dependencyManagement>

    <dependencies>
        <!-- 引入 SpringMVC 相关依赖,并实现对其的自动配置 -->
        <dependency>
            <groupId>org.springframework.boot</groupId>
            <artifactId>spring-boot-starter-web</artifactId>
        </dependency>
    </dependencies>

</project>
| |
| -- |
- 具体每个依赖的作用,胖友自己认真看下艿艿添加的所有注释噢。
2.2 配置文件
在 application.yml 中,添加服务器端口配置,如下:
|
server:
  port: 8079

spring:
  application:
    name: user-service # 服务名
| |
| -- |
- 设置服务器的端口为 8079 ,避免和 SkyWalking UI 占用的 8080 冲突。
2.3 UserController
创建 UserController 类,提供示例 API 接口。代码如下:
|
@RestController
@RequestMapping("/user")
public class UserController {

    @GetMapping("/get")
    public String get(@RequestParam("id") Integer id) {
        return "user:" + id;
    }

}
| |
| -- |
2.4 UserServiceApplication
创建 UserServiceApplication 类,应用启动类。代码如下:
|
@SpringBootApplication
public class UserServiceApplication {

    public static void main(String[] args) {
        SpringApplication.run(UserServiceApplication.class, args);
    }

}
| |
| -- |
2.5 IDEA 配置
通过 IDEA 的「Run/Debug Configurations」配置使用 SkyWalking Agent。如下图所示: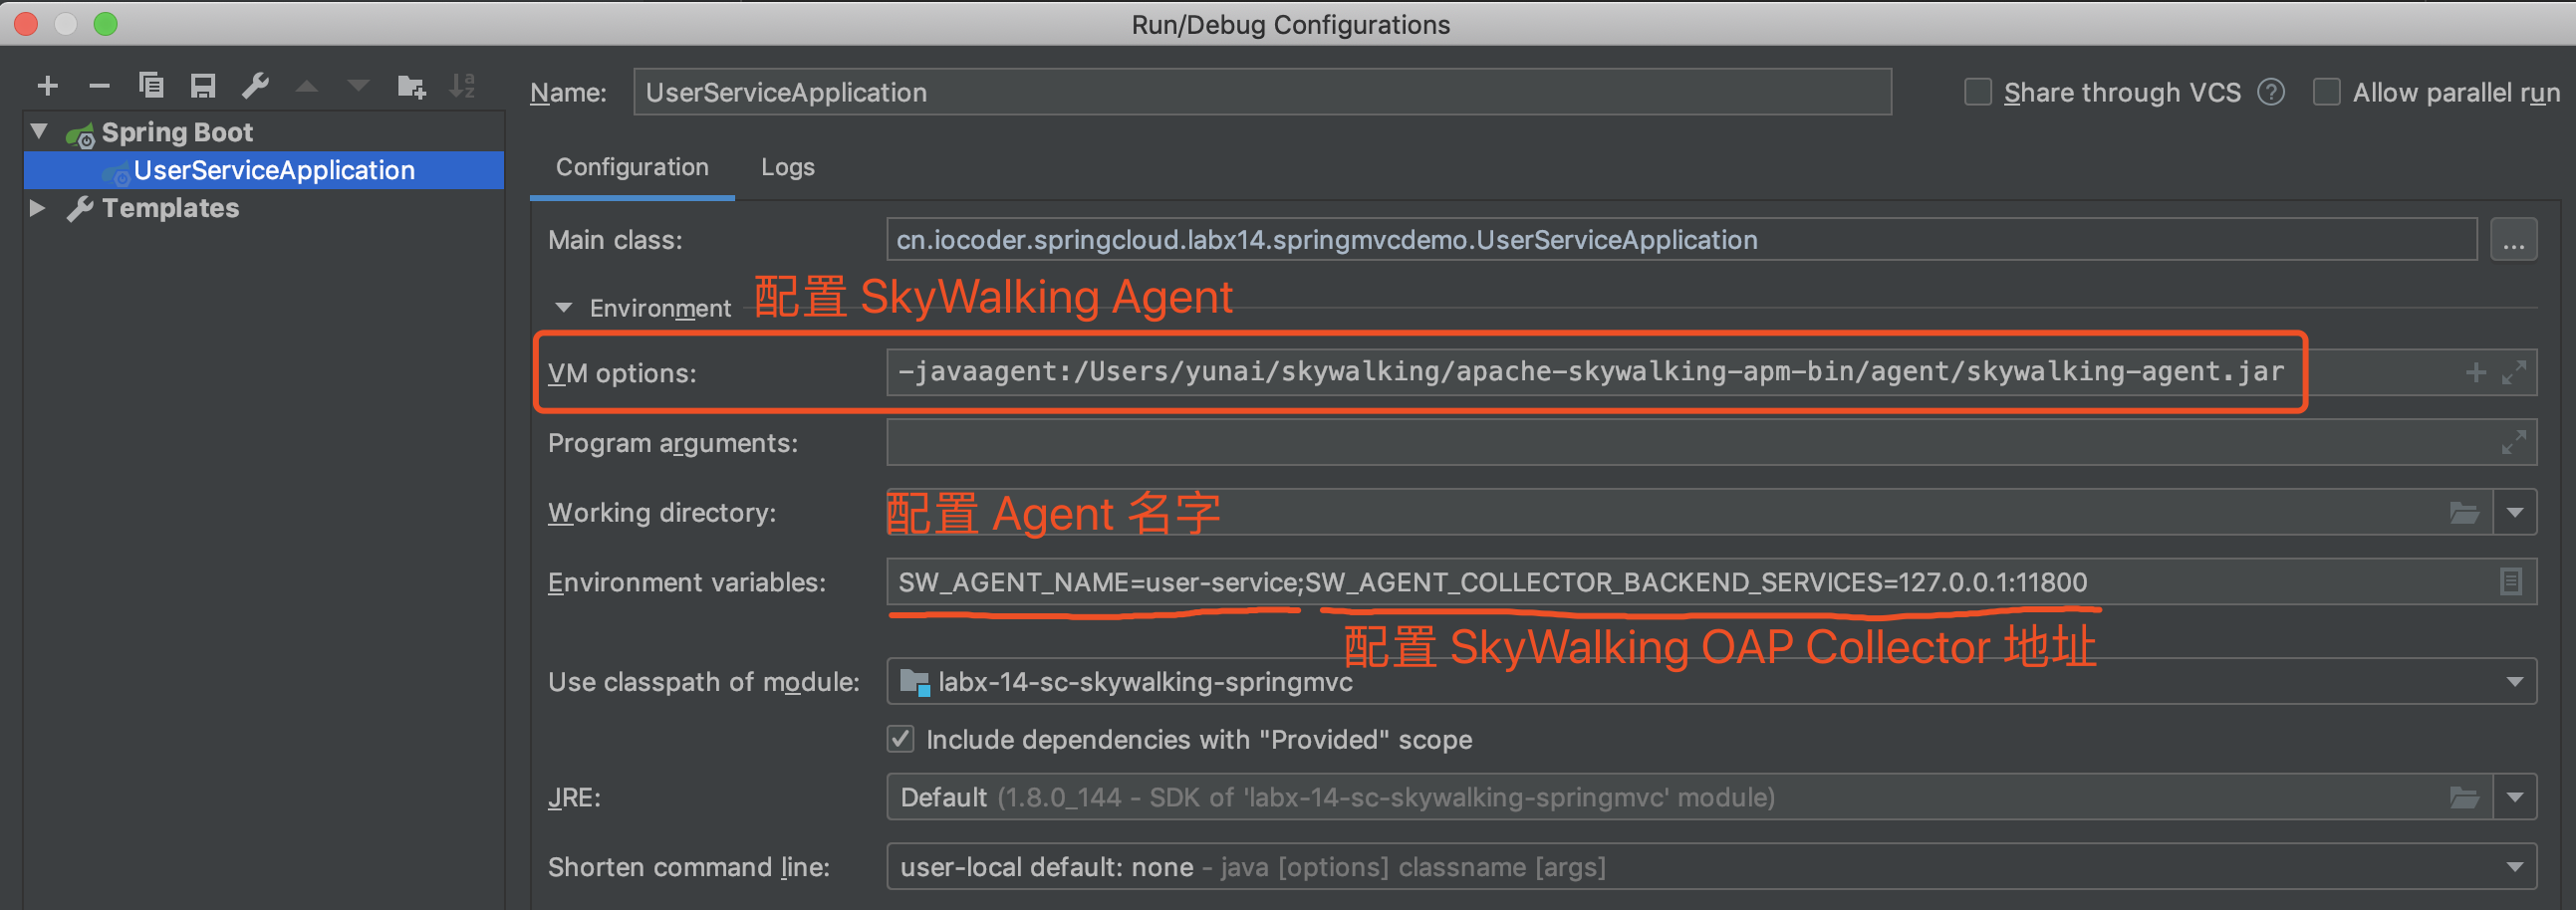
然后,执行 UserServiceApplication#main(String[] args) 方法,启动该 Spring Cloud 应用。如果说控制台打印如下日志,说明 SkyWalking Agent 基本加载成功:
|
# 加载 SkyWalking Agent
DEBUG 2020-03-22 19:35:59:463 main AgentPackagePath : The beacon class location is jar:file:/Users/yunai/skywalking/apache-skywalking-apm-bin/agent/skywalking-agent.jar!/org/apache/skywalking/apm/agent/core/boot/AgentPackagePath.class.
INFO 2020-03-22 19:35:59:465 main SnifferConfigInitializer : Config file found in /Users/yunai/skywalking/apache-skywalking-apm-bin/agent/config/agent.config.
| |
| -- |
2.6 简单测试
① 首先,使用浏览器,访问下 http://127.0.0.1:8079/user/get?id=1 地址,请求下 Spring Cloud 应用提供的 API。因为,我们要追踪下该链路。
② 然后,继续使用浏览器,打开 http://127.0.0.1:8080/ 地址,进入 SkyWalking UI 界面。如下图所示: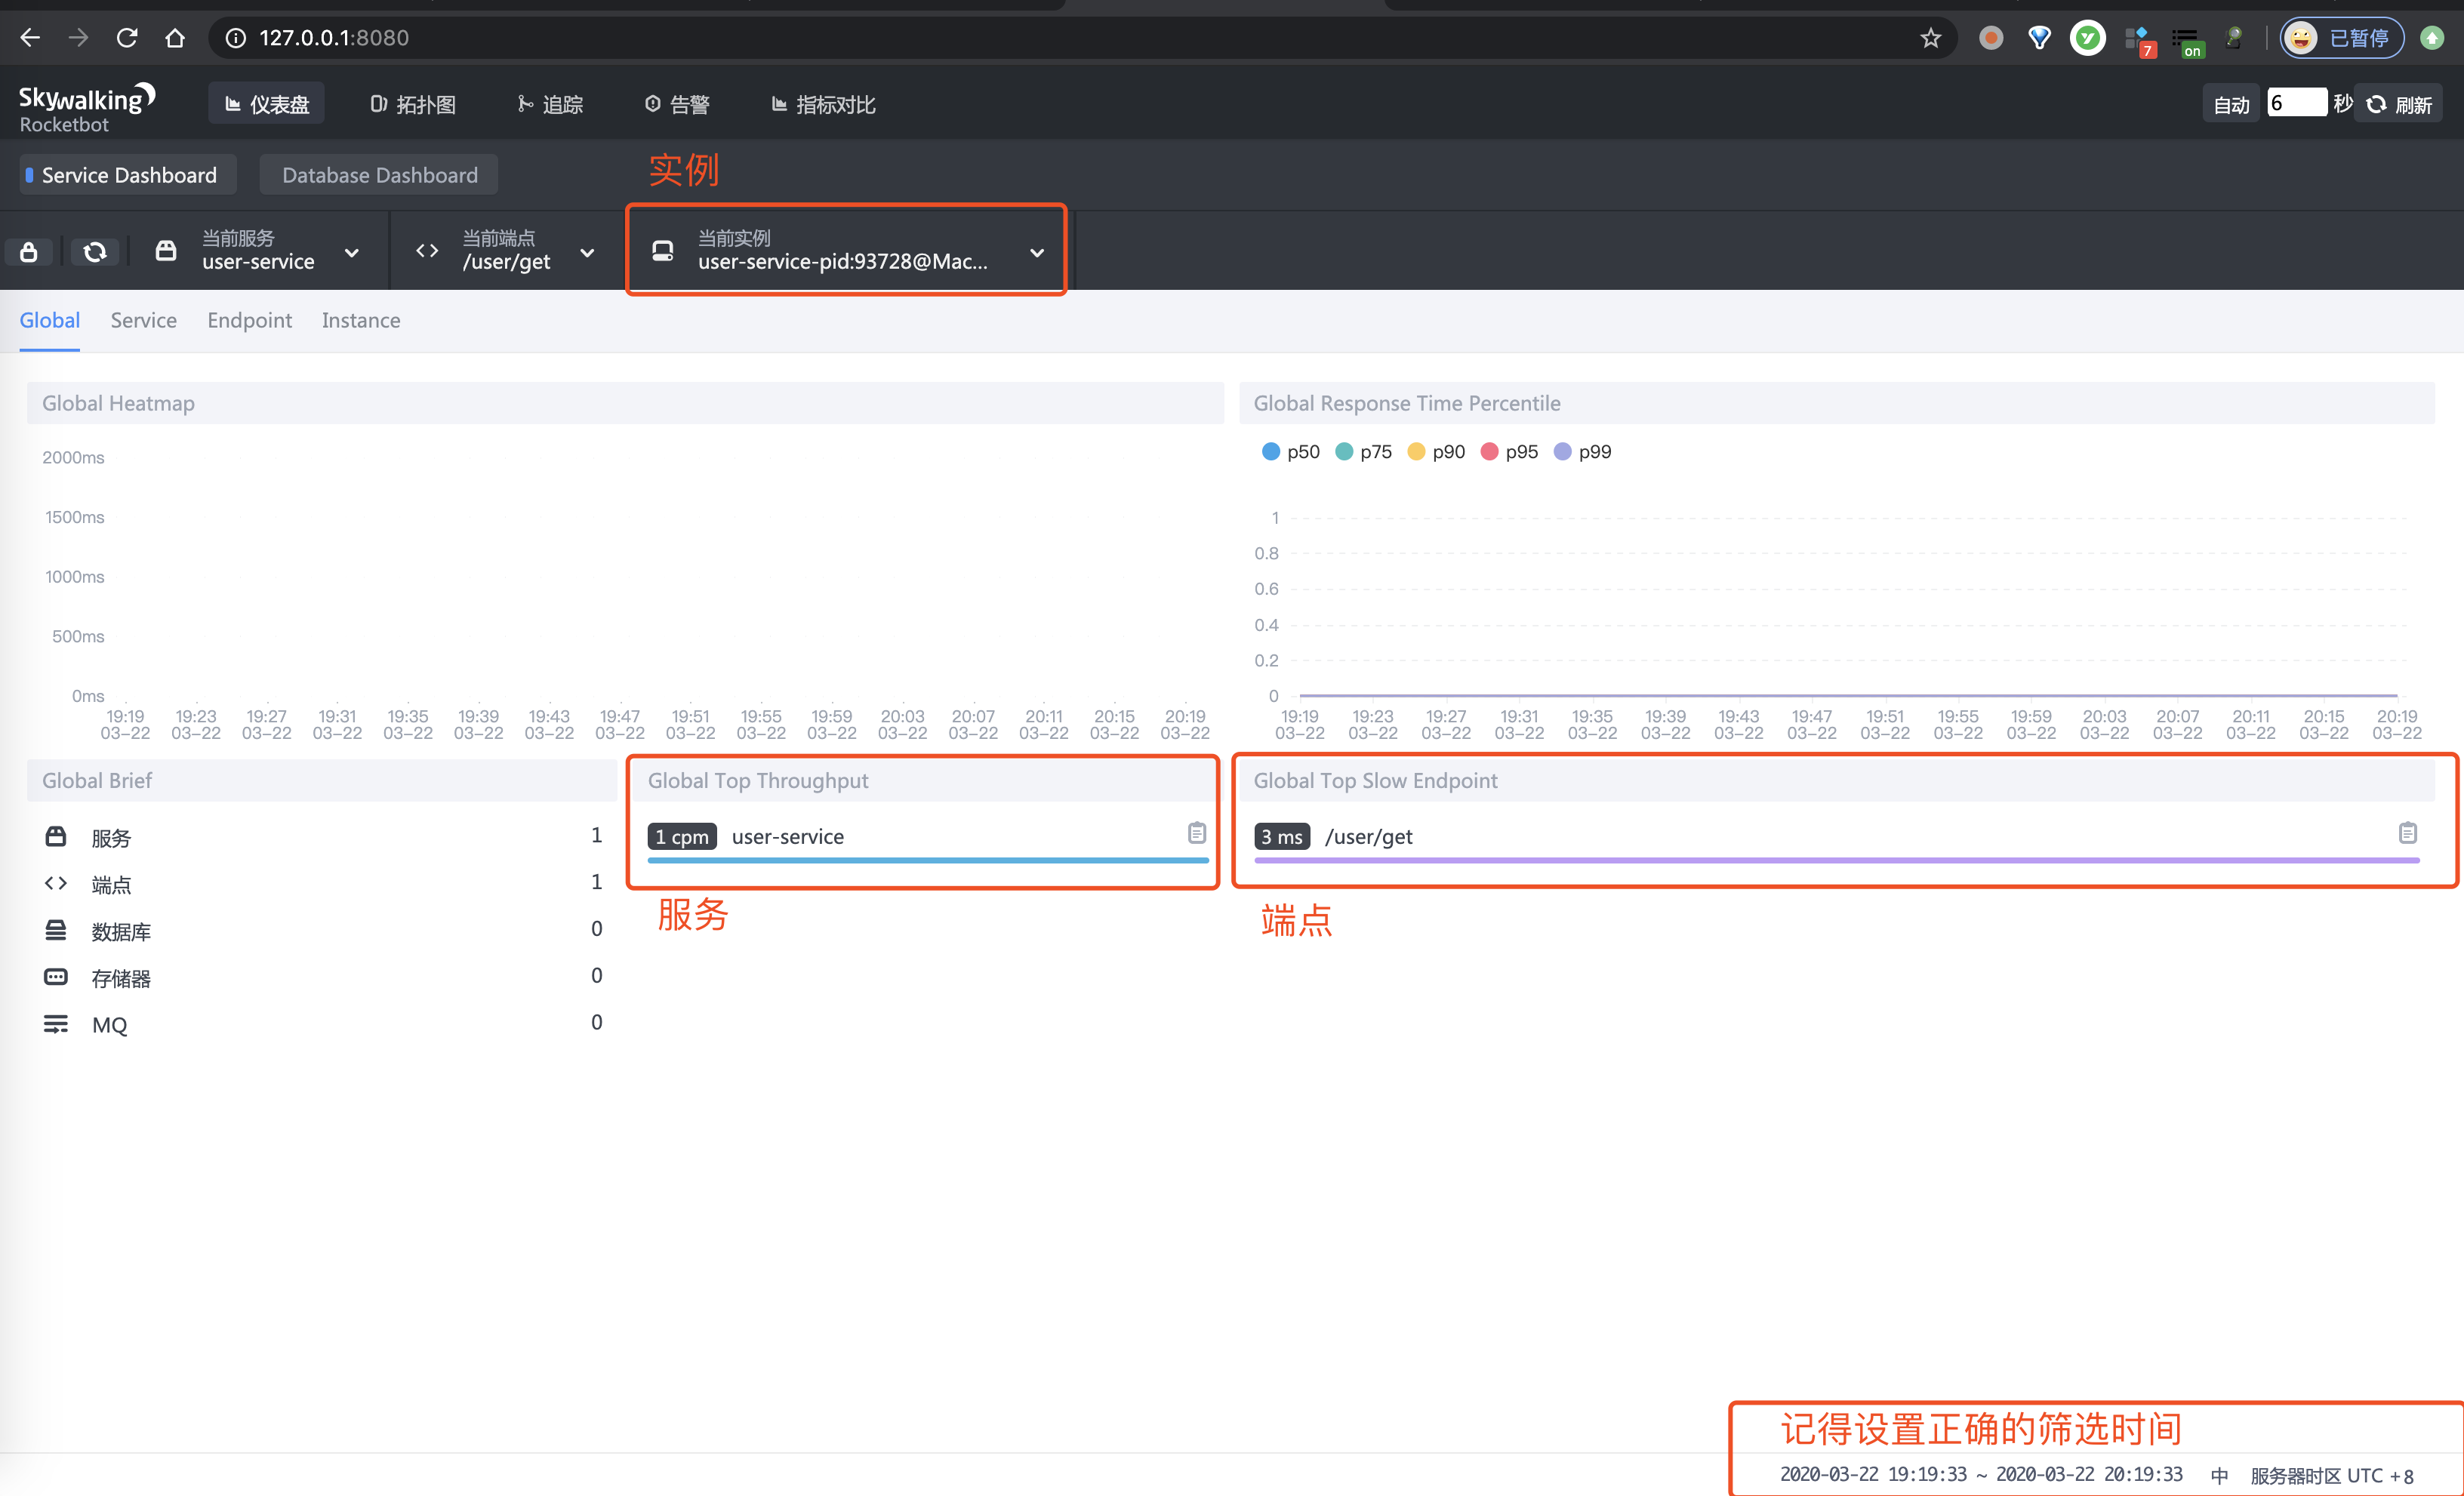
③ 之后,点击「拓扑图」菜单,进入查看拓扑图的界面,可以看到 SpringMVC 小方块。如下图所示: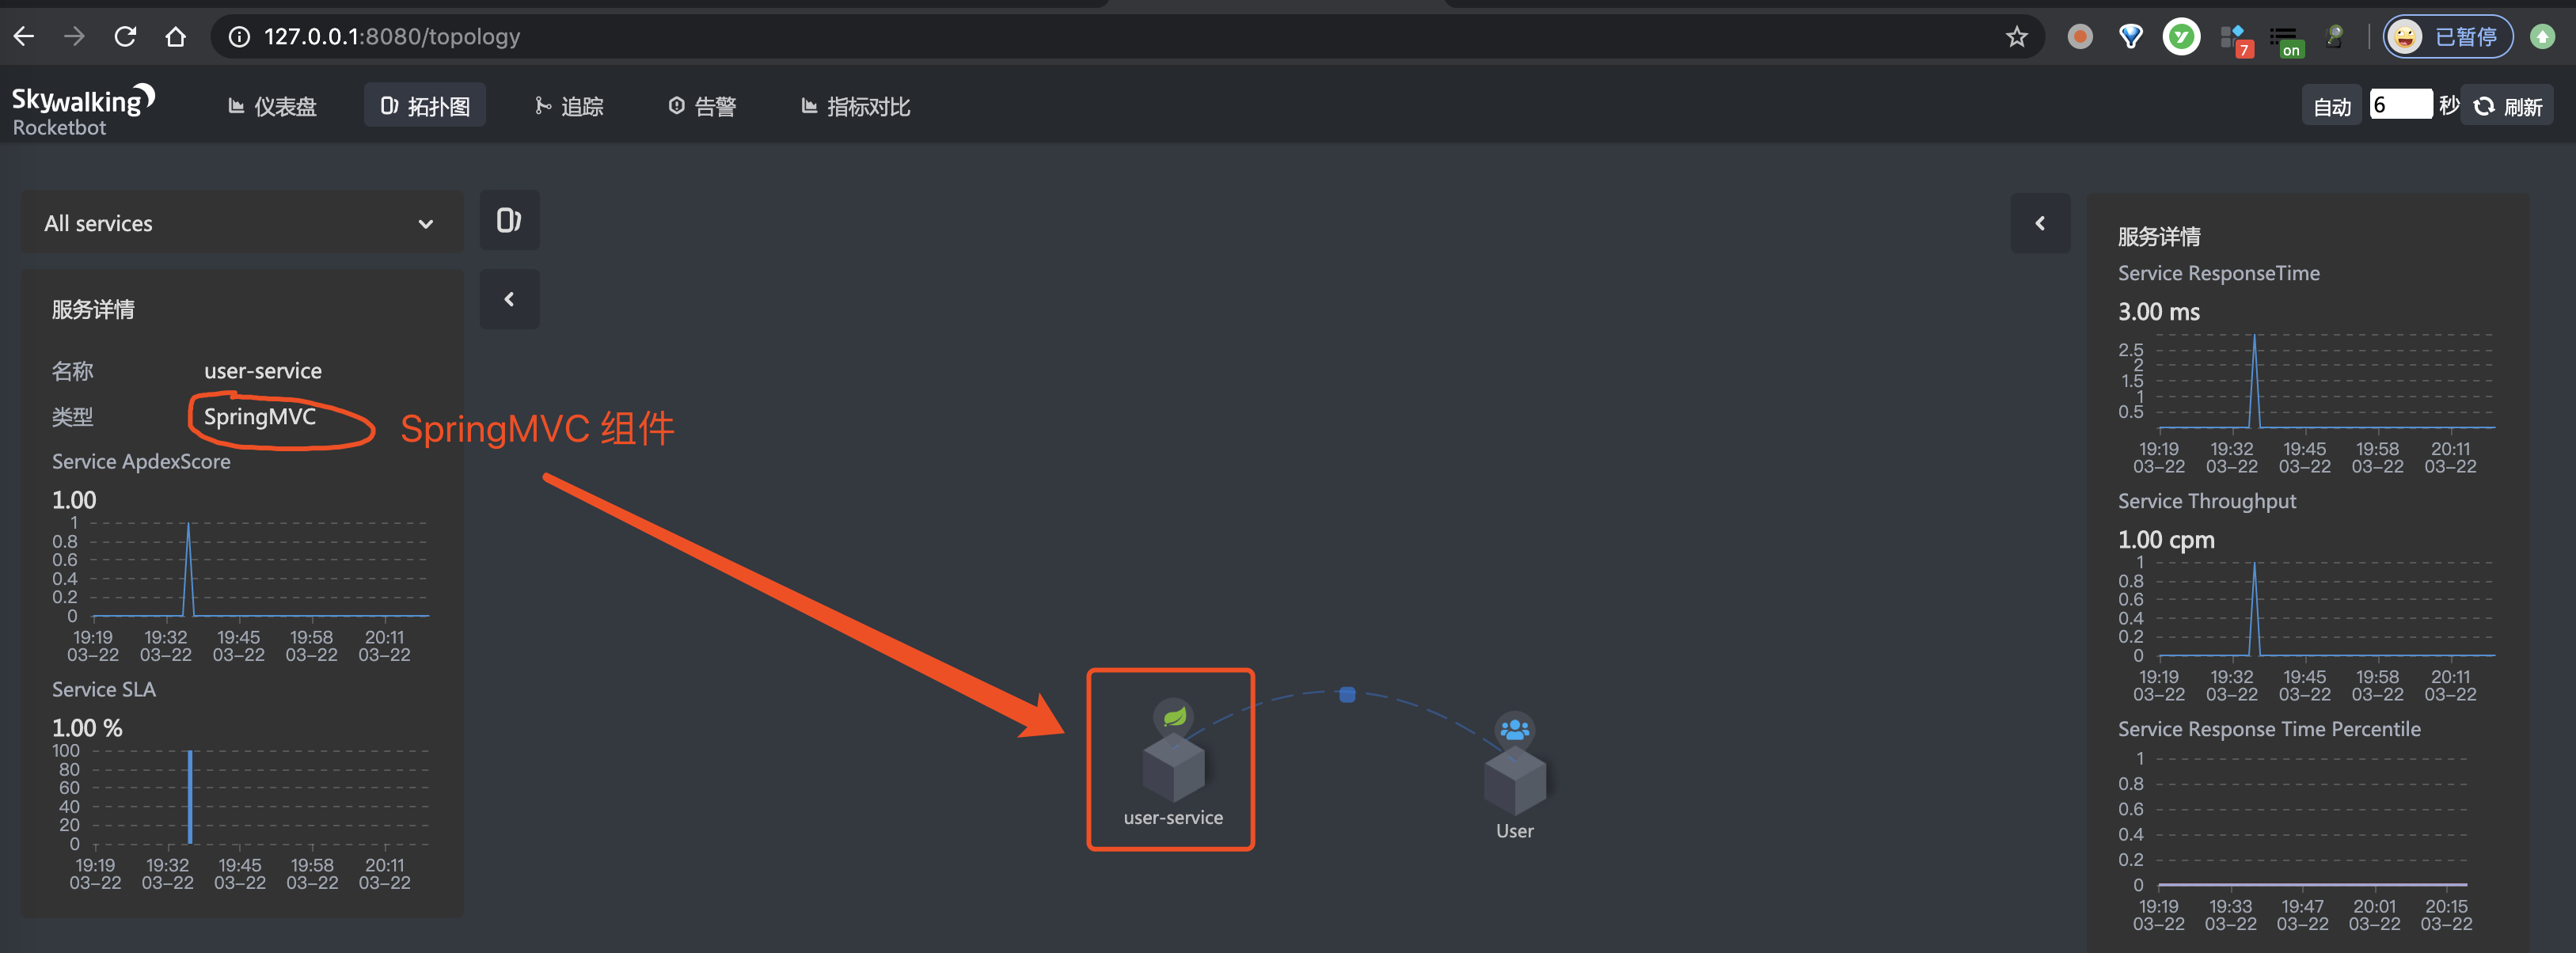
④ 再之后,点击「追踪」菜单,进入查看链路数据的界面。如下图所示: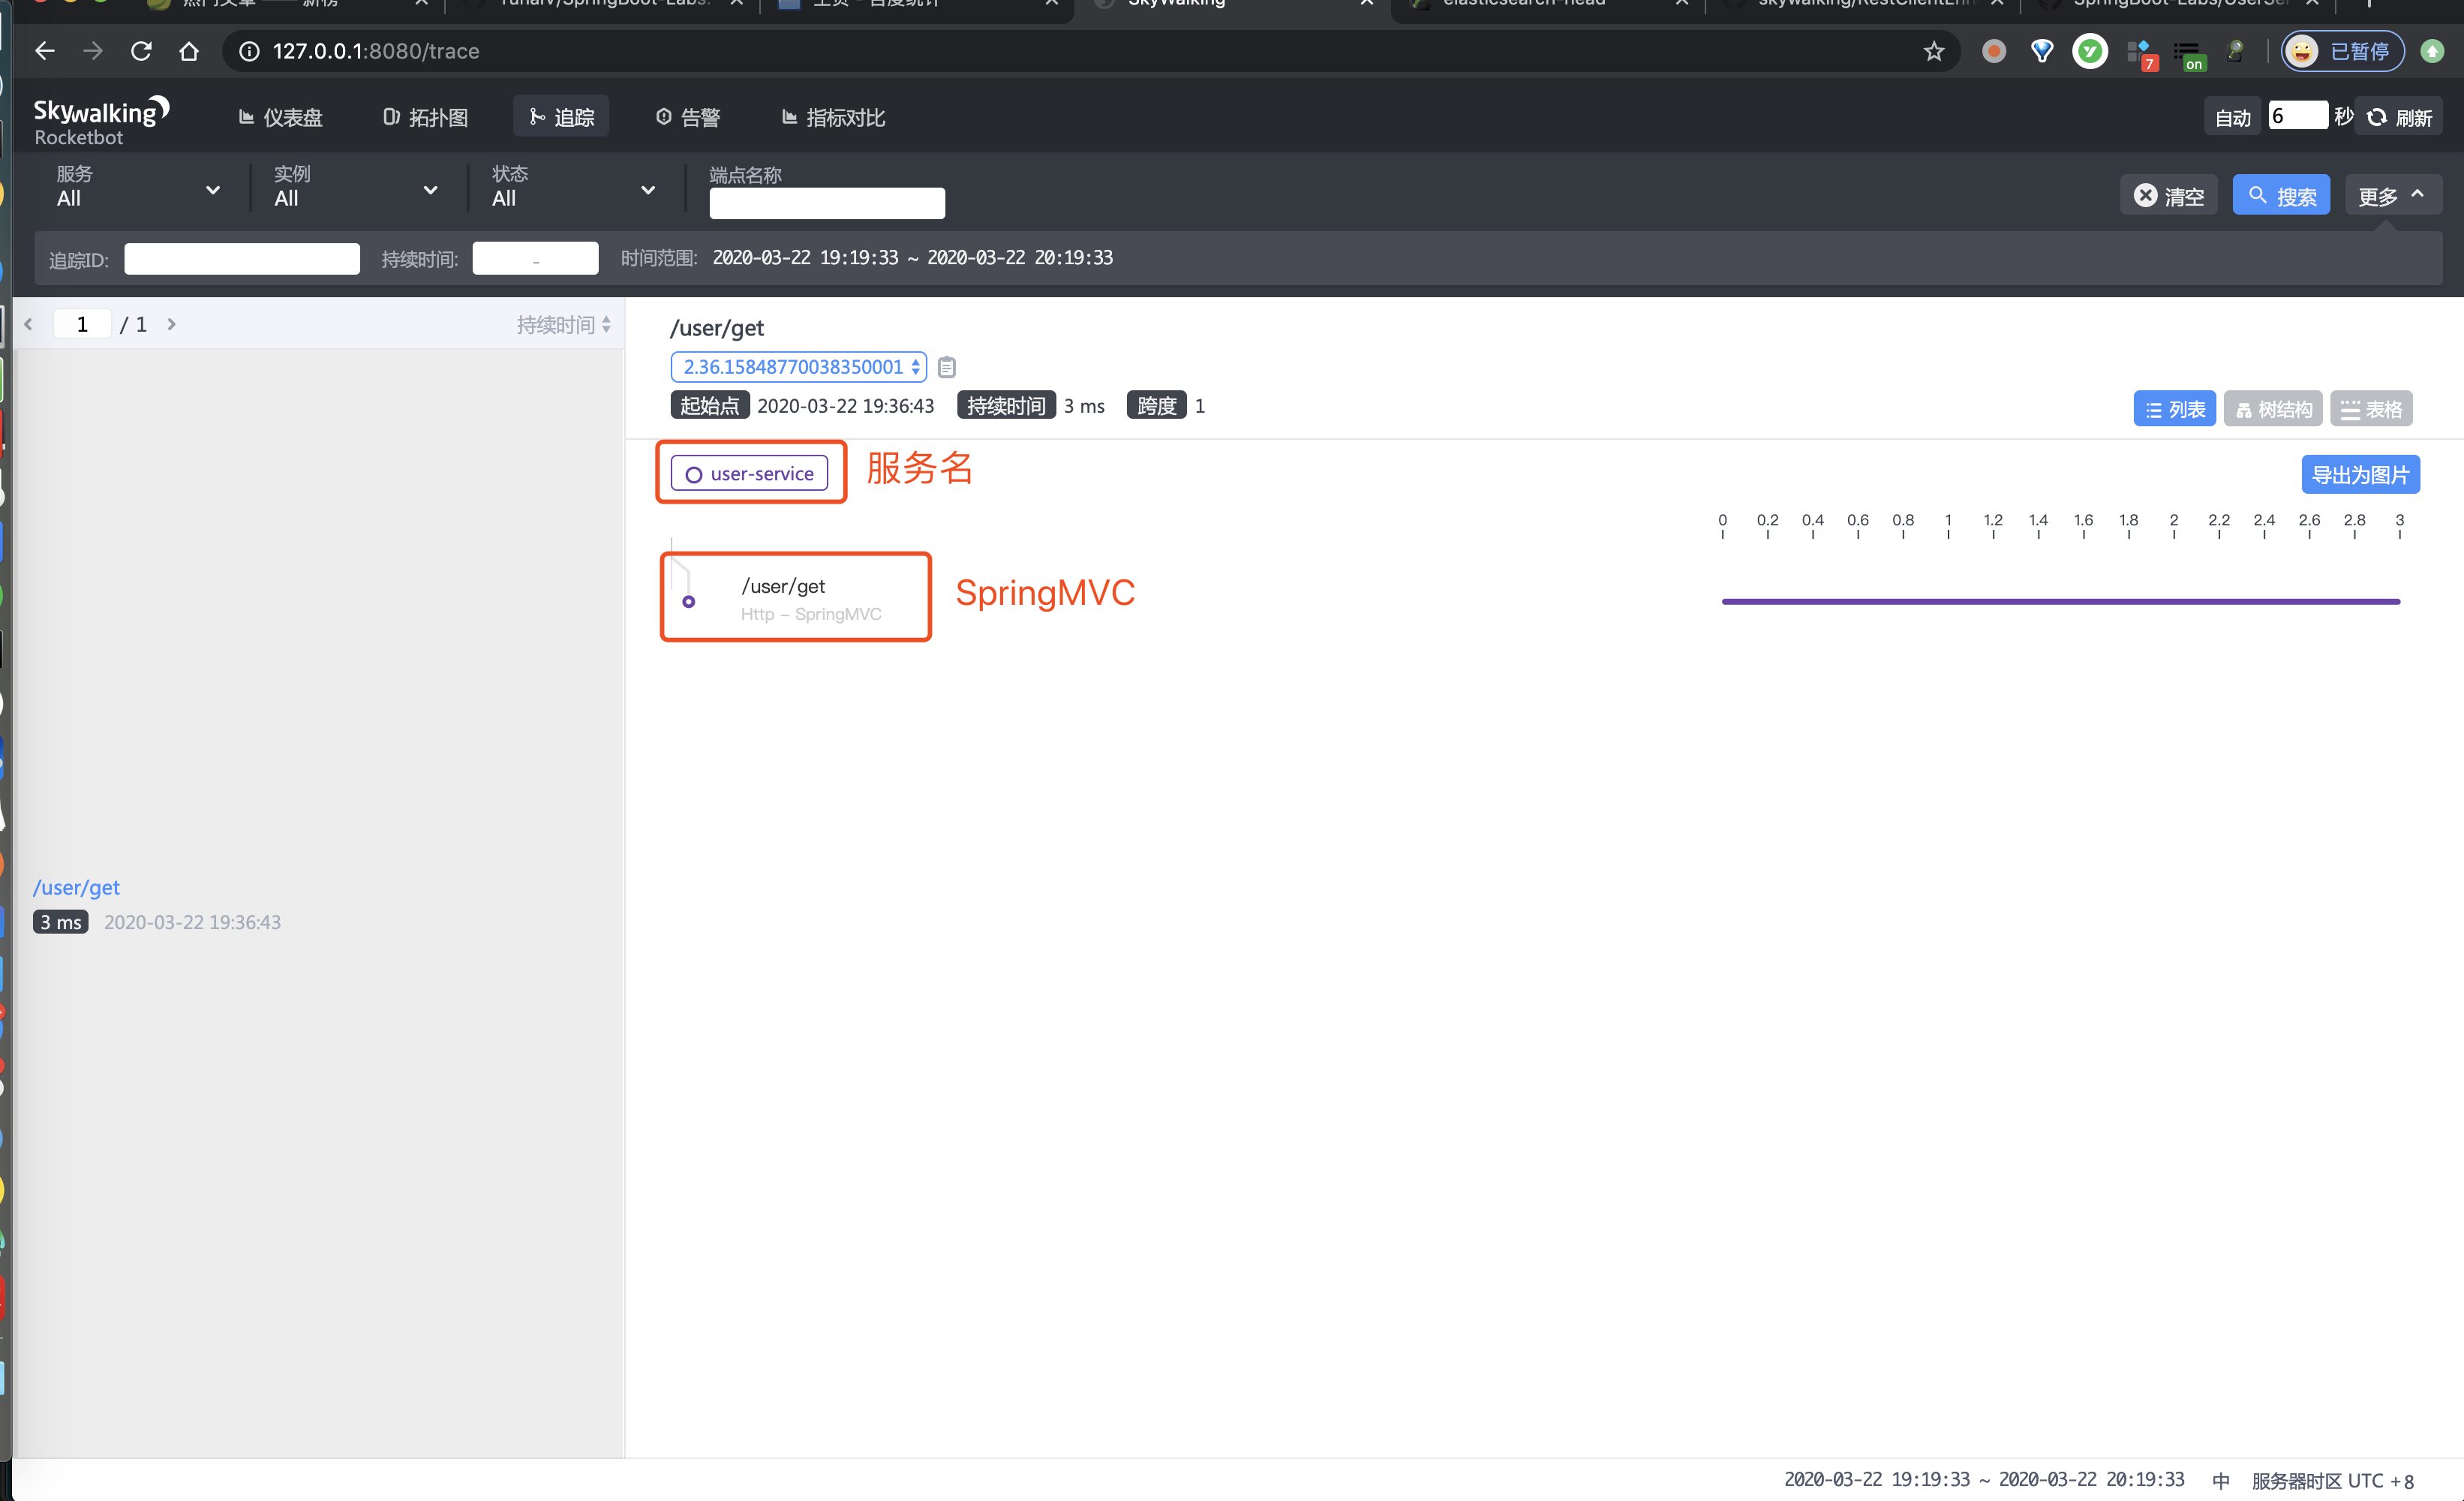
3. 忽略部分 URL 的追踪
详见《芋道 Spring Boot 链路追踪 SkyWalking 入门》文章的「3. 忽略部分 URL 的追踪」小节。
4. Feign 示例
示例代码对应仓库:
本小节,我们来搭建一个 SkyWalking 对 Feign 的远程 HTTP 调用的链路追踪。该链路通过如下插件实现收集:
我们来新建一个 labx-14-sc-skywalking-feign 项目作为消费者,使用 Feign 调用 「2. SpringMVC 示例」的 labx-14-sc-skywalking-springmvc 的 /user/get 接口。最终如下图所示: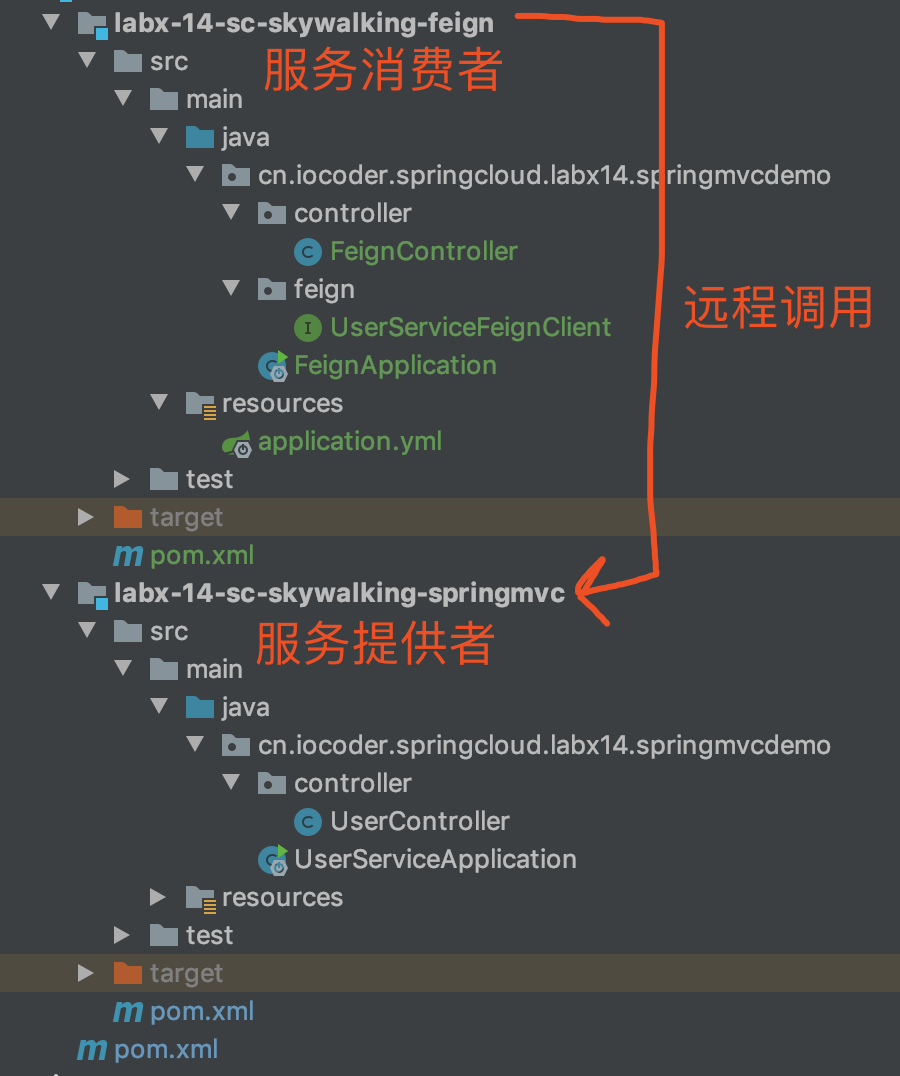
4.1 引入依赖
在 pom.xml 文件中,引入相关依赖。
|
<?xml version="1.0" encoding="UTF-8"?>
<project xmlns="http://maven.apache.org/POM/4.0.0"
         xmlns:xsi="http://www.w3.org/2001/XMLSchema-instance"
         xsi:schemaLocation="http://maven.apache.org/POM/4.0.0 http://maven.apache.org/xsd/maven-4.0.0.xsd">
    <parent>
        <artifactId>labx-14</artifactId>
        <groupId>cn.iocoder.springboot.labs</groupId>
        <version>1.0-SNAPSHOT</version>
    </parent>
    <modelVersion>4.0.0</modelVersion>

    <artifactId>labx-14-sc-skywalking-feign</artifactId>

    <properties>
        <maven.compiler.target>1.8</maven.compiler.target>
        <maven.compiler.source>1.8</maven.compiler.source>
        <spring.boot.version>2.2.4.RELEASE</spring.boot.version>
        <spring.cloud.version>Hoxton.SR1</spring.cloud.version>
    </properties>

    <!--
        引入 Spring Boot、Spring Cloud、Spring Cloud Alibaba 三者 BOM 文件,进行依赖版本的管理,防止不兼容。
        在 https://dwz.cn/mcLIfNKt 文章中,Spring Cloud Alibaba 开发团队推荐了三者的依赖关系
     -->
    <dependencyManagement>
        <dependencies>
            <dependency>
                <groupId>org.springframework.boot</groupId>
                <artifactId>spring-boot-starter-parent</artifactId>
                <version>${spring.boot.version}</version>
                <type>pom</type>
                <scope>import</scope>
            </dependency>
            <dependency>
                <groupId>org.springframework.cloud</groupId>
                <artifactId>spring-cloud-dependencies</artifactId>
                <version>${spring.cloud.version}</version>
                <type>pom</type>
                <scope>import</scope>
            </dependency>
        </dependencies>
    </dependencyManagement>

    <dependencies>
        <!-- 引入 SpringMVC 相关依赖,并实现对其的自动配置 -->
        <dependency>
            <groupId>org.springframework.boot</groupId>
            <artifactId>spring-boot-starter-web</artifactId>
        </dependency>

        <!-- 引入 Spring Cloud OpenFeign 相关依赖,使用 OpenFeign 提供声明式调用,并实现对其的自动配置 -->
        <dependency>
            <groupId>org.springframework.cloud</groupId>
            <artifactId>spring-cloud-starter-openfeign</artifactId>
        </dependency>
    </dependencies>

</project>
| |
| -- |
4.2 配置文件
创建 application.yml 配置文件,添加相应配置项如下:
|
server:
  port: 8081

spring:
  application:
    name: feign-service # 服务名
| |
| -- |
4.3 UserServiceFeignClient
创建 UserServiceFeignClient 接口,调用 user-service 服务的 Feign 客户端,即「2. SpringMVC 示例」的 labx-14-sc-skywalking-springmvc。代码如下:
|
@FeignClient(name = "user-service", url = "http://127.0.0.1:8079")
public interface UserServiceFeignClient {

    @GetMapping("/user/get")
    String get(@RequestParam("id") Integer id);

}
| |
| -- |
4.4 FeignController
创建 FeignController 类,提供 /feign/get 接口,使用 UserServiceFeignClient 调用 user-service 服务。代码如下:
|
@RestController
@RequestMapping("/feign")
public class FeignController {

    @Autowired
    private UserServiceFeignClient userServiceFeignClient;

    @GetMapping("/get")
    public String get(@RequestParam("id") Integer id) {
        return userServiceFeignClient.get(id);
    }

}
| |
| -- |
4.5 FeignApplication
创建 FeignApplication 类,feign-service 服务启动类。代码如下:
|
@SpringBootApplication
@EnableFeignClients
public class FeignApplication {

    public static void main(String[] args) {
        SpringApplication.run(FeignApplication.class, args);
    }

}
| |
| -- |
4.6 IDEA 配置
通过 IDEA 的「Run/Debug Configurations」配置使用 SkyWalking Agent。如下图所示: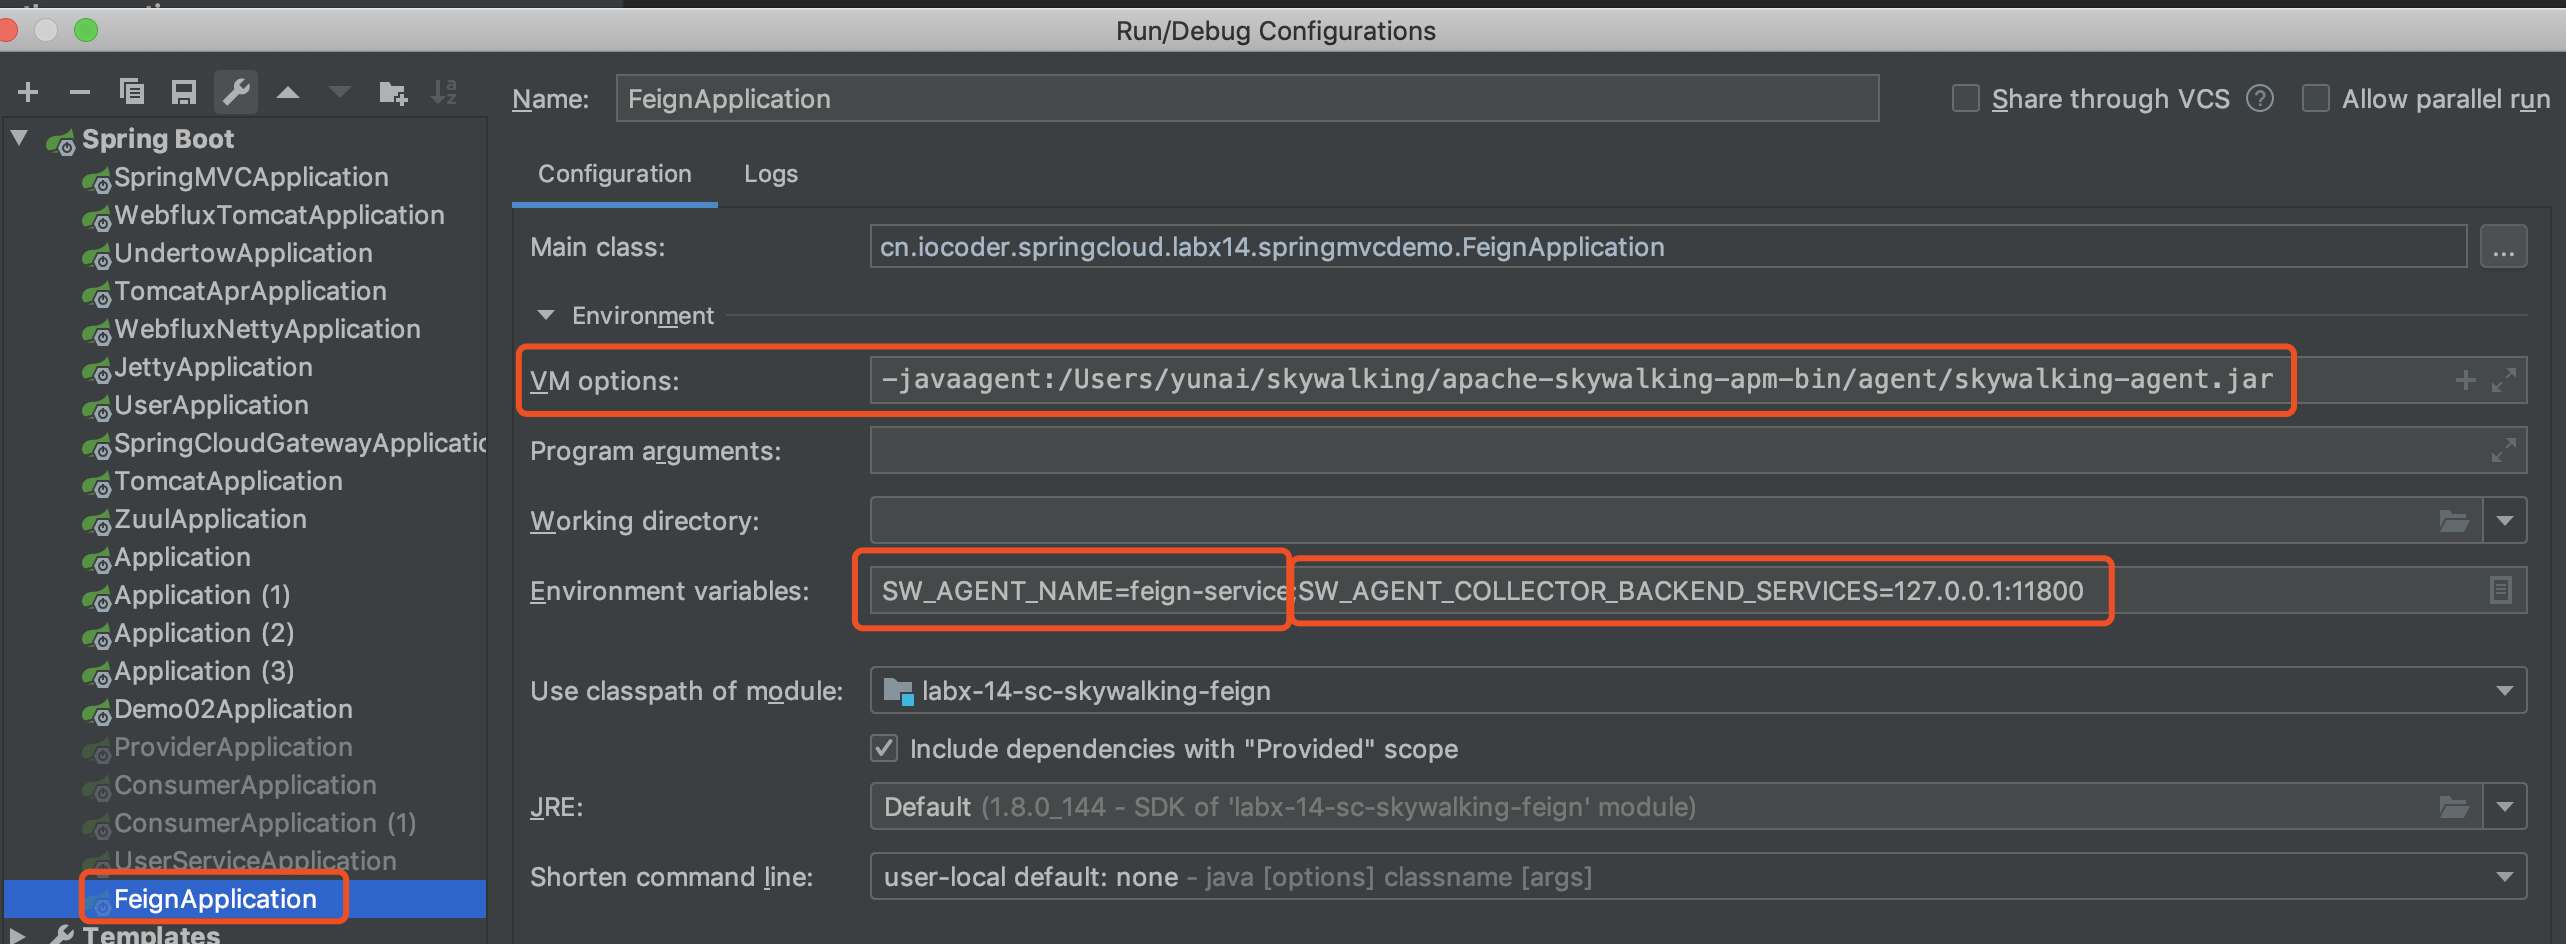
4.7 简单测试
使用 FeignApplication 和 UserServiceApplication 启动两个 Spring Cloud 应用。
① 首先,使用浏览器,访问下 http://127.0.0.1:8081/feign/get?id=1 地址,使用 Feign 调用 user-service 服务。因为,我们要追踪下该链路。
② 然后,继续使用浏览器,打开 http://127.0.0.1:8080/ 地址,进入 SkyWalking UI 界面。如下图所示: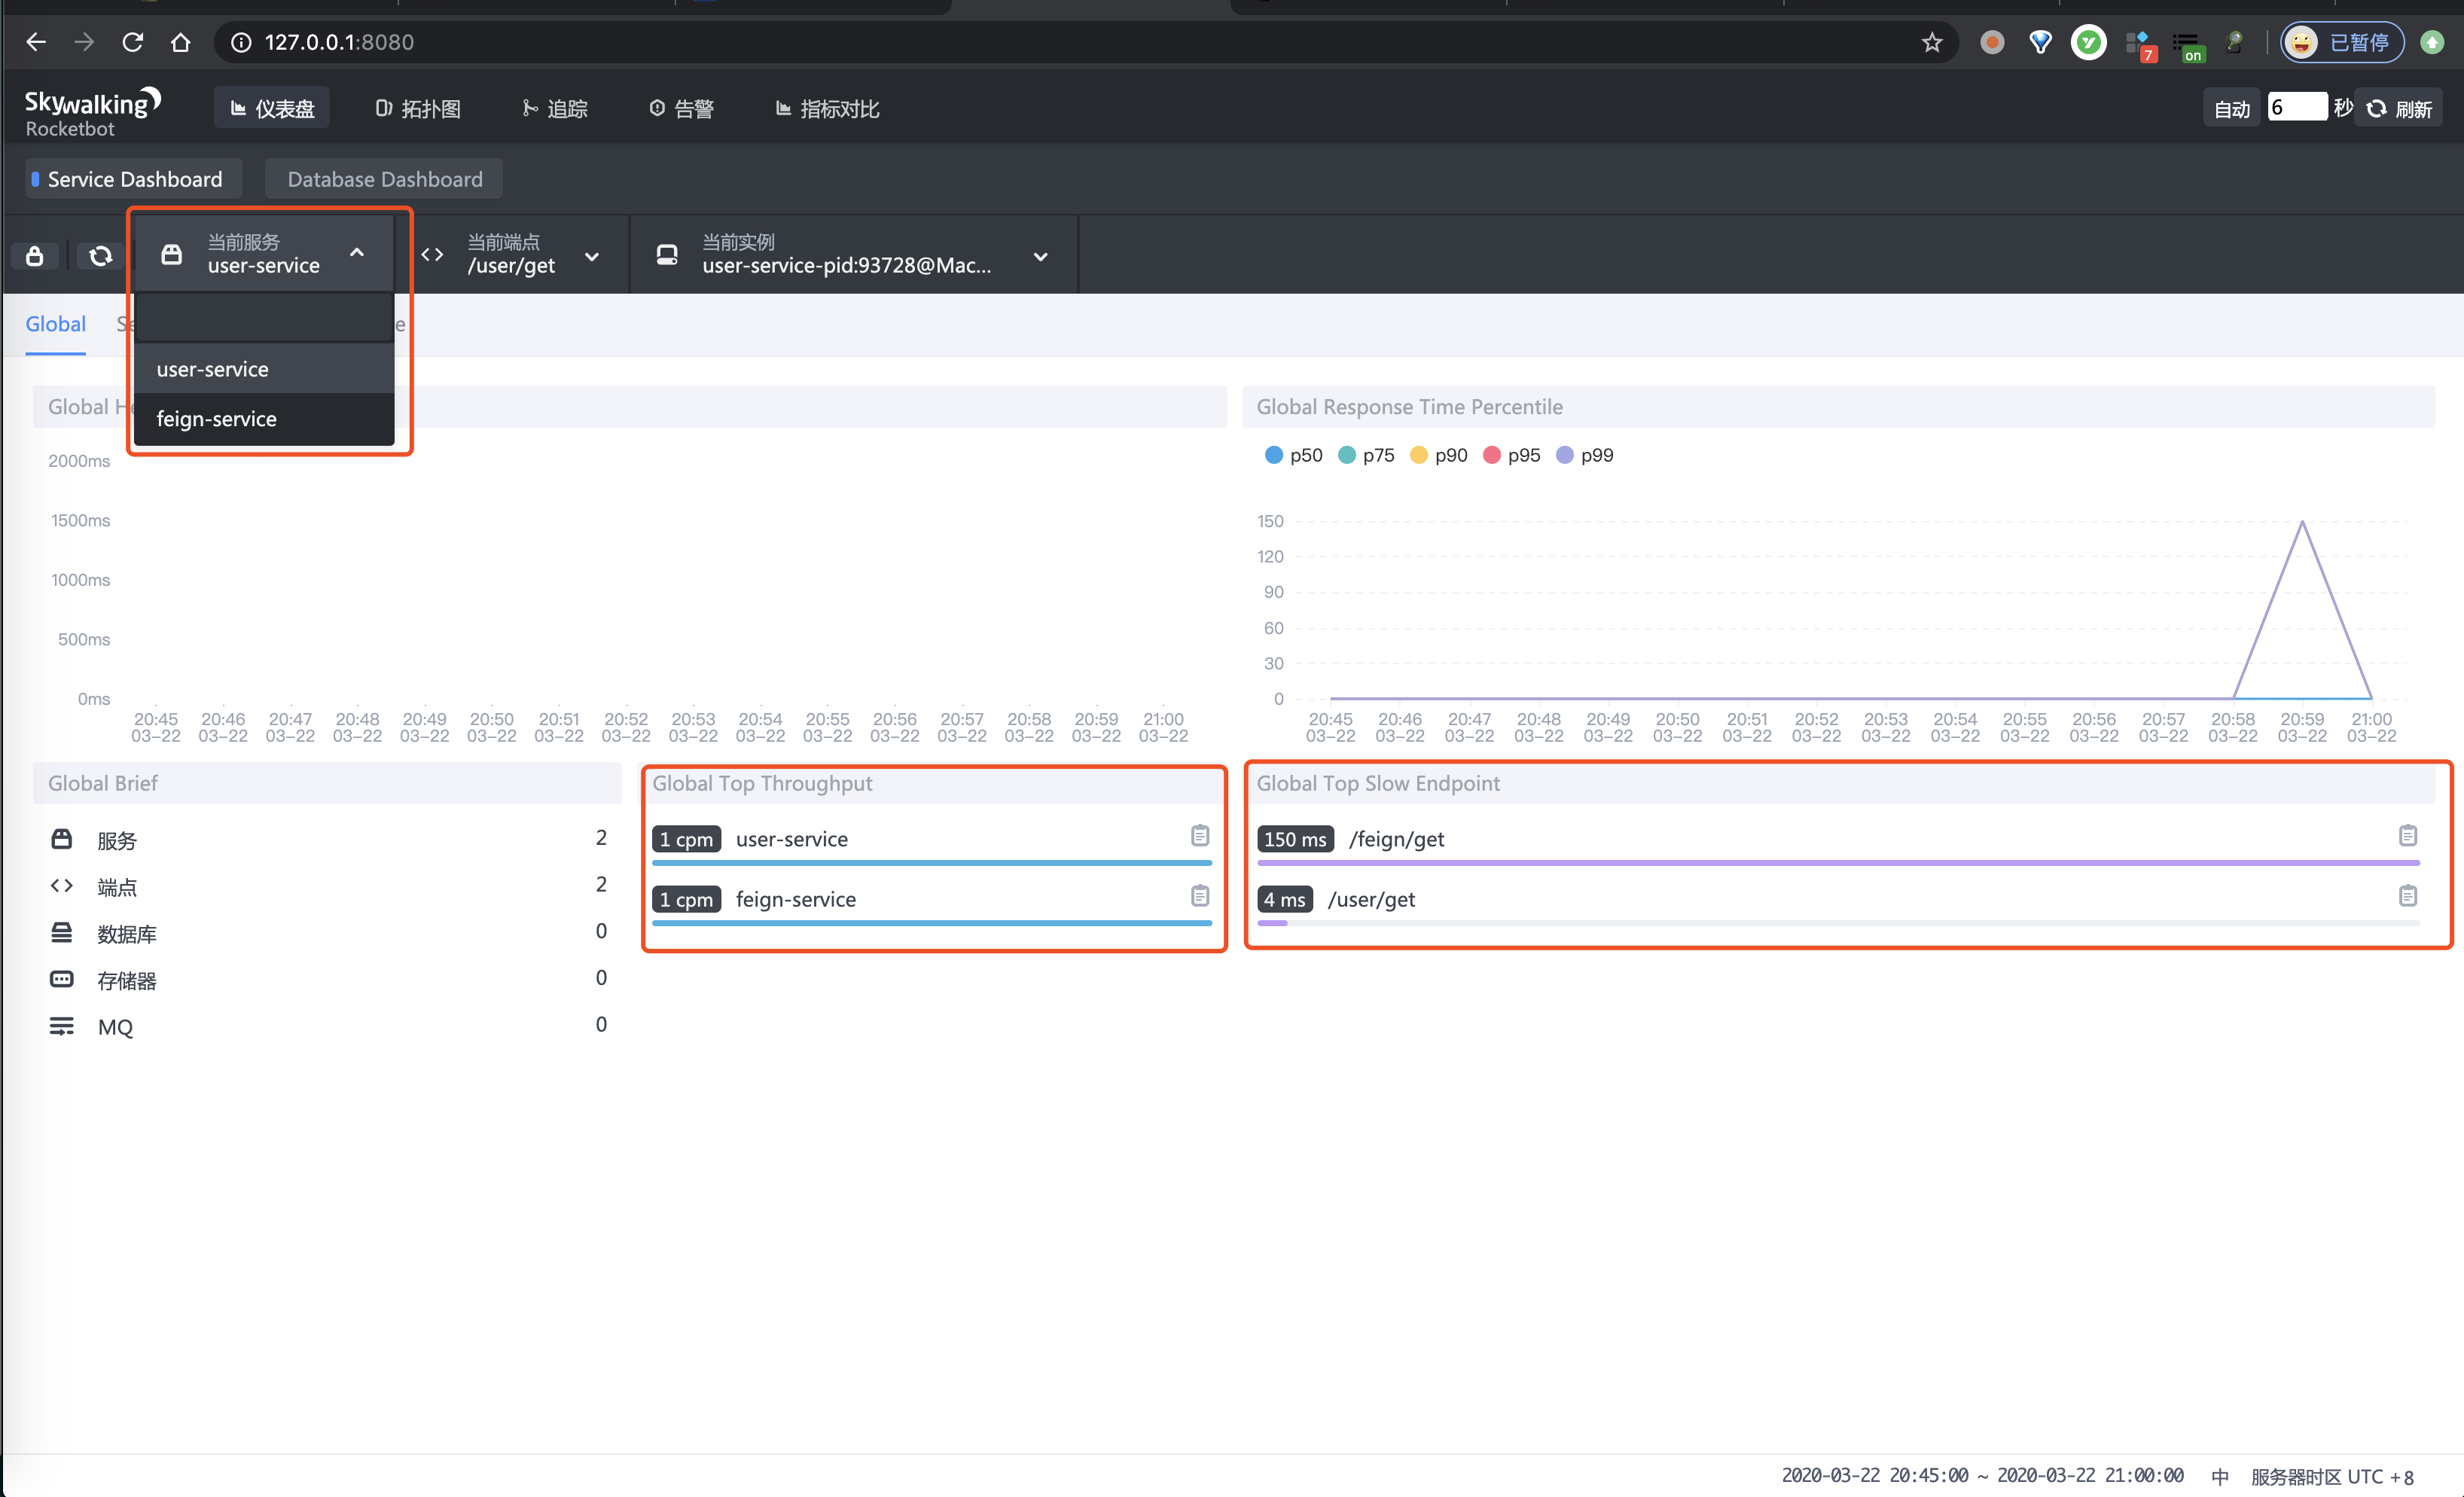
③ 之后,点击「拓扑图」菜单,进入查看拓扑图的界面,可以看到两个服务的小方块,以及对应的调用关系。如下图所示: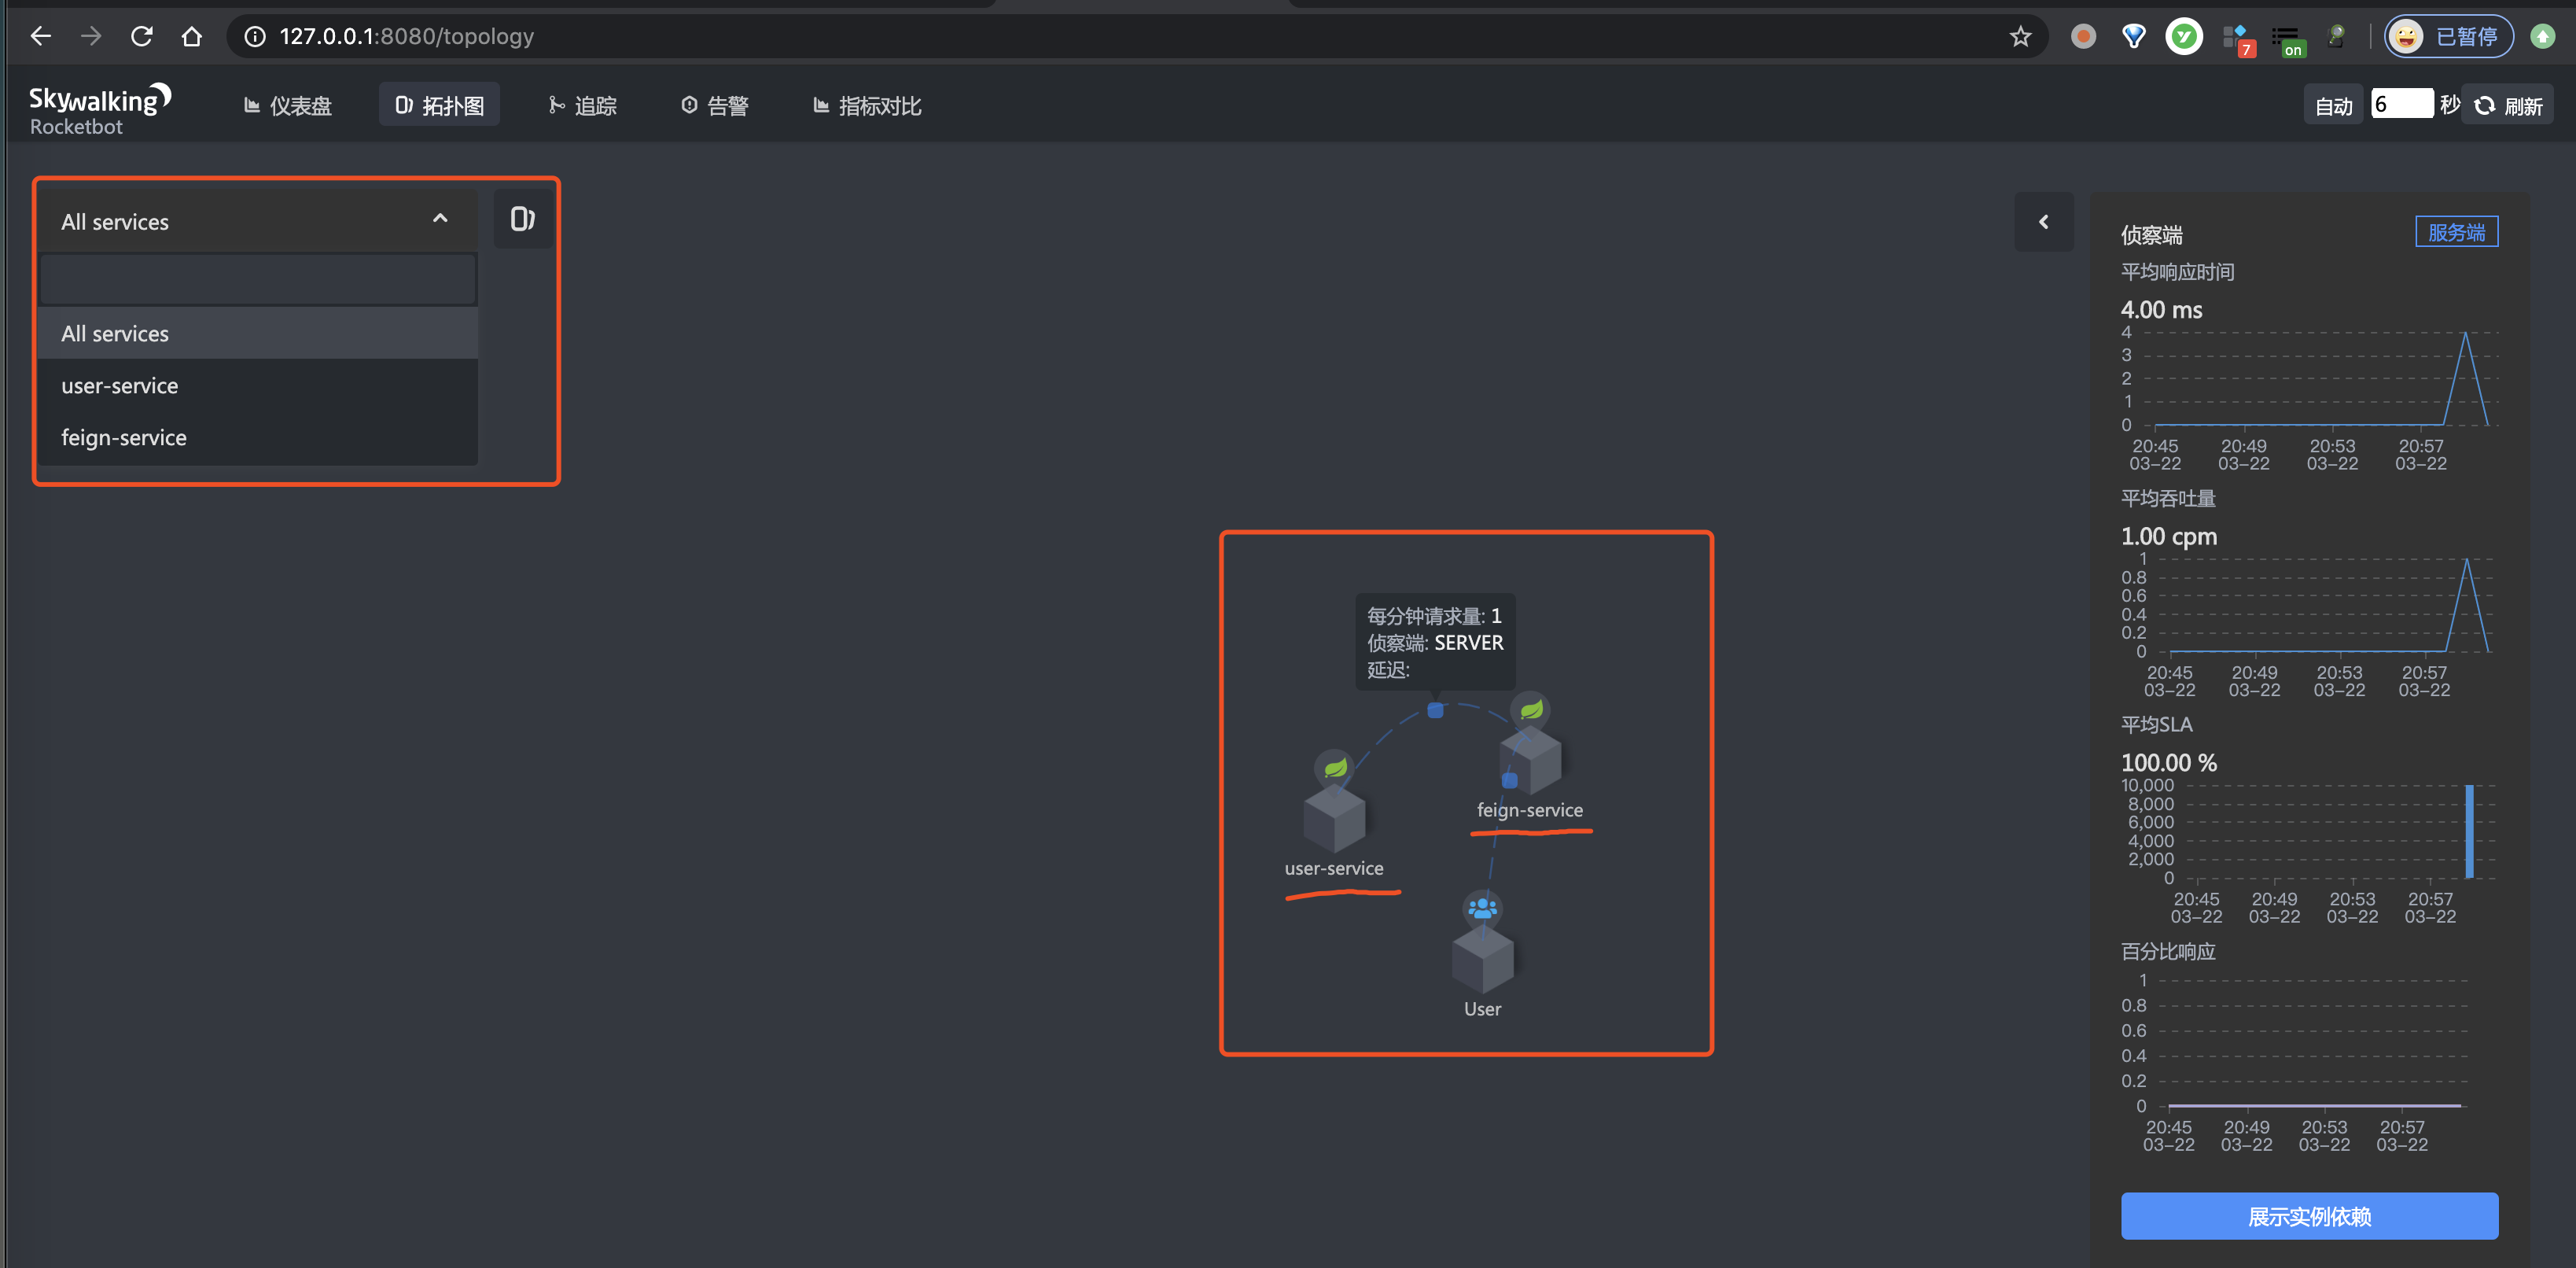
④ 再之后,点击「追踪」菜单,进入查看链路数据的界面。如下图所示: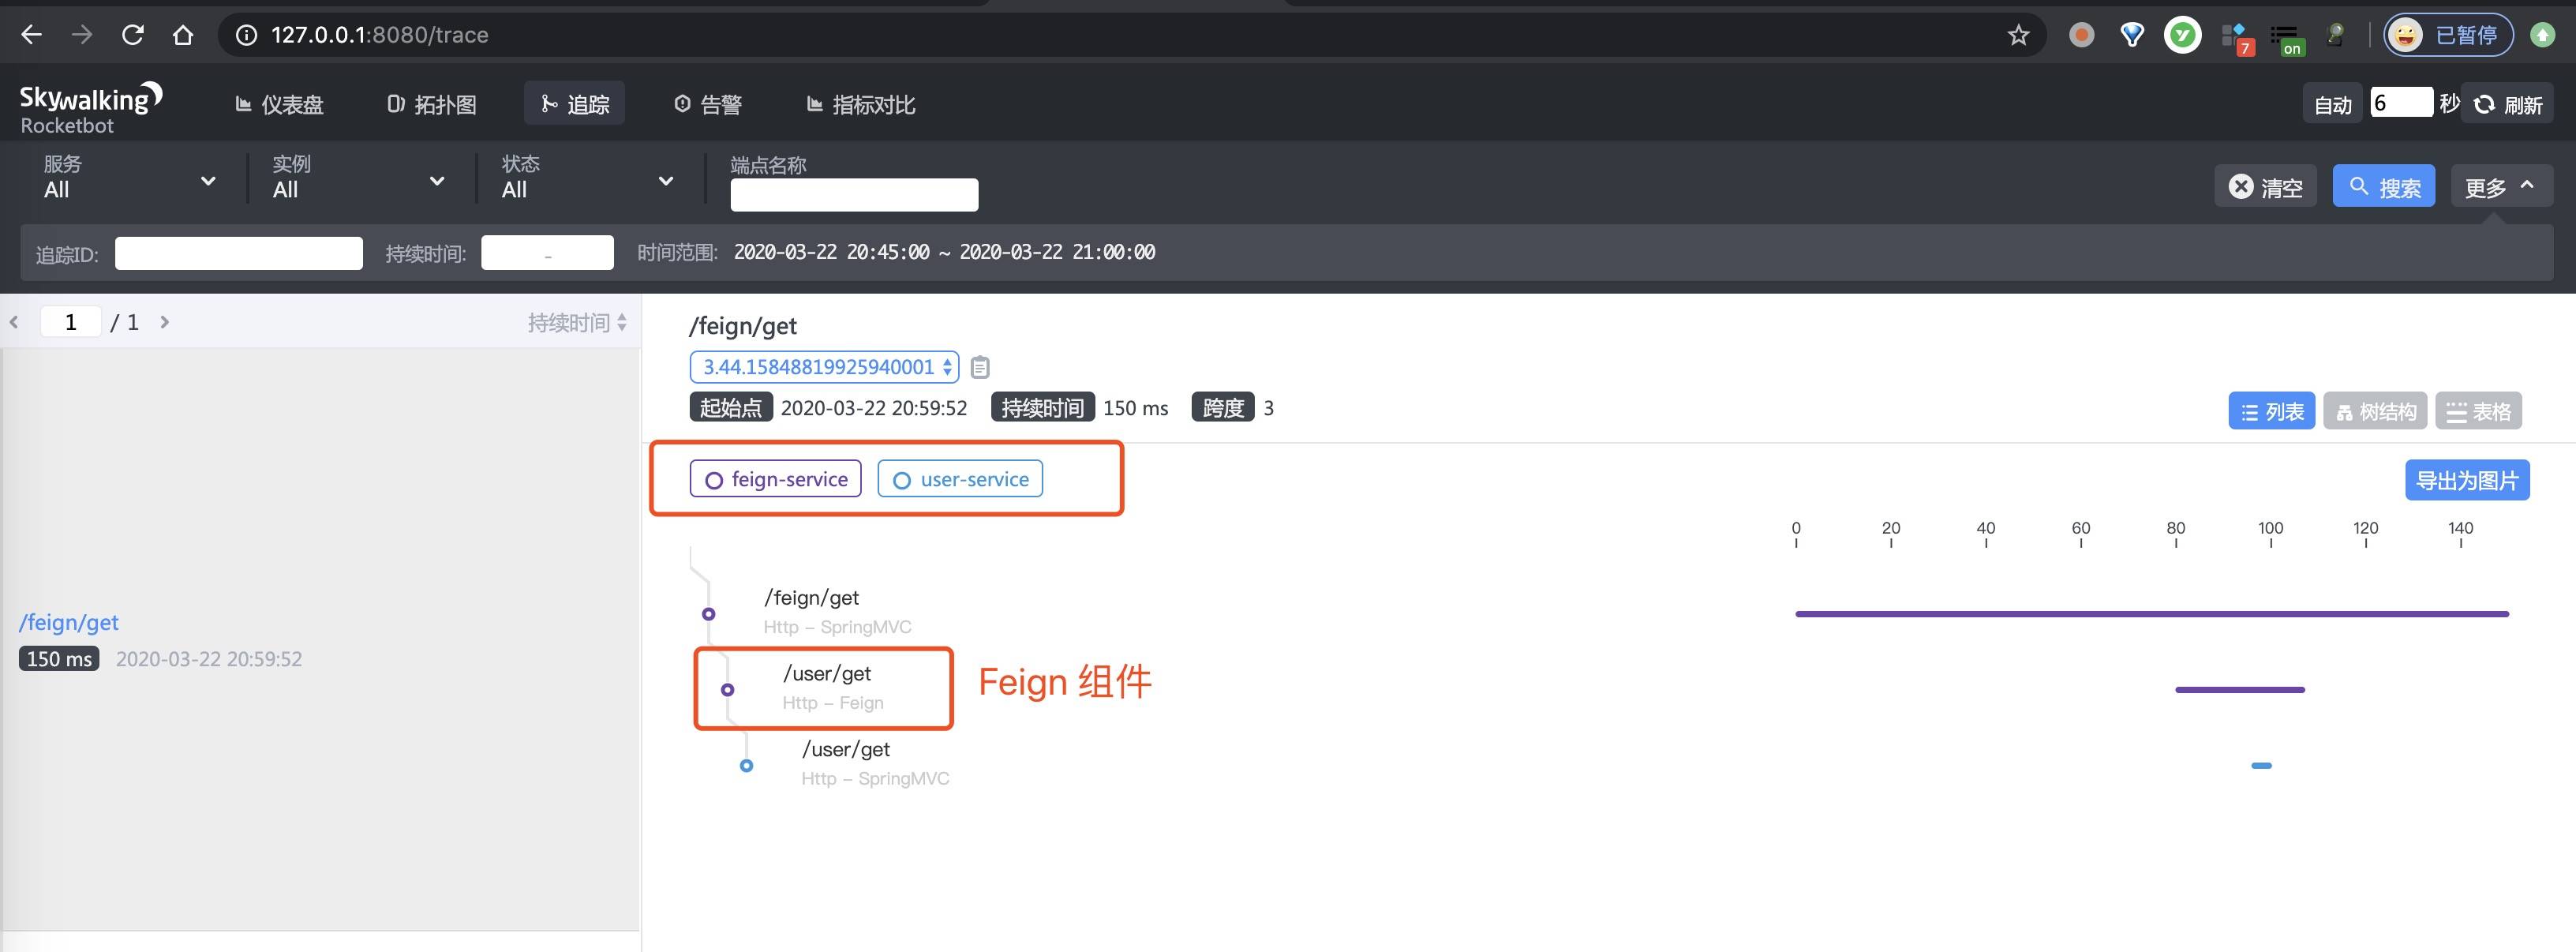
5. Spring Cloud Gateway 示例
示例代码对应仓库:
本小节,我们来搭建一个 SkyWalking 对 Spring Cloud Gateway 的代理请求的链路追踪。该链路通过如下插件实现收集:
友情提示:因为 Spring Cloud Gateway 是基于 WebFlux 实现,必须搭配上
spring-webflux-5.x-plugin插件一起使用,不能仅仅只使用gateway-2.1.x-plugin插件。
我们来新建一个 labx-14-sc-skywalking-springcloudgateway 项目作为 API 网关,转发请求到后端服务。最终如下图所示: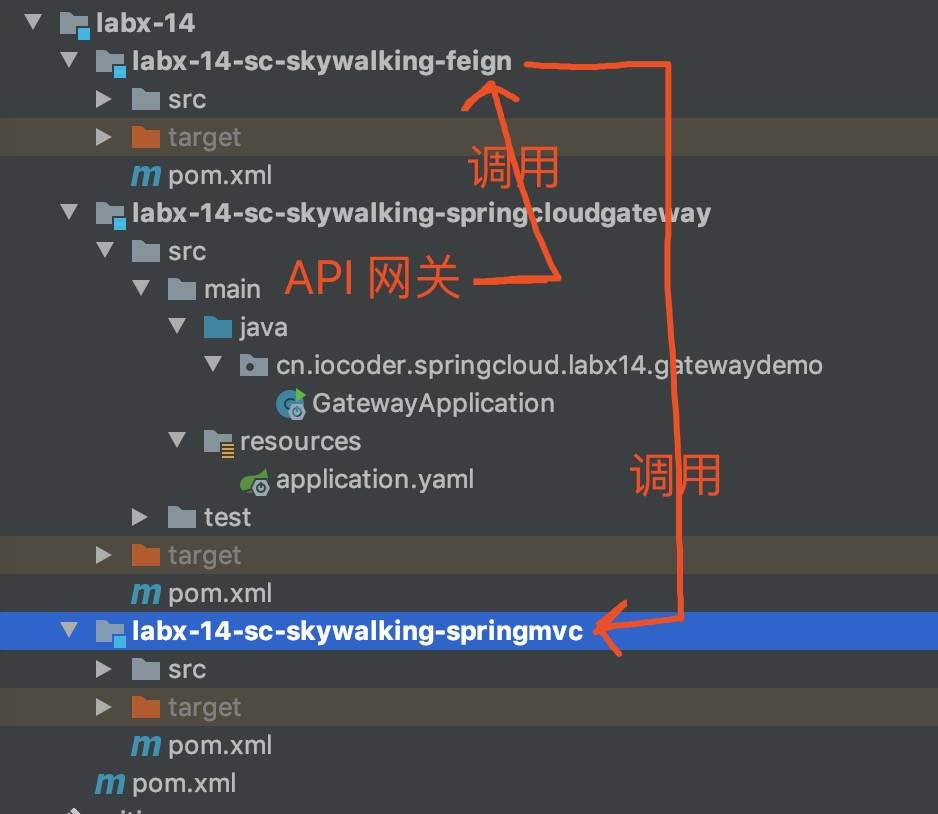
考虑到方便,我们直接使用「4. Feign 示例」的 feign-service 和 user-service 两个服务,作为被转发的后端服务。
5.1 复制插件
gateway-2.1.x-plugin 和 spring-webflux-5.x-plugin 插件,在 optional-plugins 目录下,是可选插件,所以我们需要复制到 plugins 目录下。命令行操作如下:
|
# 查看当前所在目录
$ pwd
/Users/yunai/skywalking/apache-skywalking-apm-bin/agent

# 复制插件到 plugins 目录
$ cp optional-plugins/apm-spring-cloud-gateway-2.x-plugin-6.6.0.jar plugins/
$ cp optional-plugins/apm-spring-webflux-5.x-plugin-6.6.0.jar plugins/
| |
| -- |
5.2 引入依赖
在 pom.xml 文件中,引入相关依赖。
|
<?xml version="1.0" encoding="UTF-8"?>
<project xmlns="http://maven.apache.org/POM/4.0.0"
         xmlns:xsi="http://www.w3.org/2001/XMLSchema-instance"
         xsi:schemaLocation="http://maven.apache.org/POM/4.0.0 http://maven.apache.org/xsd/maven-4.0.0.xsd">
    <parent>
        <artifactId>labx-08</artifactId>
        <groupId>cn.iocoder.springboot.labs</groupId>
        <version>1.0-SNAPSHOT</version>
    </parent>
    <modelVersion>4.0.0</modelVersion>

    <artifactId>labx-14-sc-skywalking-springcloudgateway</artifactId>

    <properties>
        <spring.boot.version>2.1.13.RELEASE</spring.boot.version>
        <spring.cloud.version>Greenwich.SR1</spring.cloud.version>
    </properties>

    <!--
        引入 Spring Boot、Spring Cloud、Spring Cloud Alibaba 三者 BOM 文件,进行依赖版本的管理,防止不兼容。
        在 https://dwz.cn/mcLIfNKt 文章中,Spring Cloud Alibaba 开发团队推荐了三者的依赖关系
     -->
    <dependencyManagement>
        <dependencies>
            <dependency>
                <groupId>org.springframework.boot</groupId>
                <artifactId>spring-boot-starter-parent</artifactId>
                <version>${spring.boot.version}</version>
                <type>pom</type>
                <scope>import</scope>
            </dependency>
            <dependency>
                <groupId>org.springframework.cloud</groupId>
                <artifactId>spring-cloud-dependencies</artifactId>
                <version>${spring.cloud.version}</version>
                <type>pom</type>
                <scope>import</scope>
            </dependency>
        </dependencies>
    </dependencyManagement>

    <dependencies>
        <!-- 引入 Spring Cloud Gateway 相关依赖,使用它作为网关,并实现对其的自动配置 -->
        <dependency>
            <groupId>org.springframework.cloud</groupId>
            <artifactId>spring-cloud-starter-gateway</artifactId>
        </dependency>
    </dependencies>

</project>
| |
| -- |
要注意,艿艿自己测试的时候,发现目前 SkyWalking 提供的 gateway-2.1.x-plugin 暂时只支持 Spring Cloud Gateway 的 2.1.1.RELEASE 版本。胖友自己使用的时候,需要稍微注意和测试下。
5.3 配置文件
创建 application.yml 配置文件,添加相应配置项如下:
|
server:
  port: 8888

spring:
  application:
    name: gateway-application

  cloud:
    # Spring Cloud Gateway 配置项,对应 GatewayProperties 类
    gateway:
      # 路由配置项,对应 RouteDefinition 数组
      routes:
        - id: feign-service-route
          uri: http://127.0.0.1:8081
          predicates:
            - Path=/**
| |
| -- |
在 spring.cloud.gateway 配置项中,我们创建了一个编号为 feign-service-route 的路由,转发到「4. Feign 示例」小节的 feign-service 服务。这样整个请求的链路,就是 gateway-application => feign-service => user-service。
5.4 GatewayApplication
创建 GatewayApplication 类,网关启动类。代码如下:
|
@SpringBootApplication
public class GatewayApplication {

    public static void main(String[] args) {
        SpringApplication.run(GatewayApplication.class, args);
    }

}
| |
| -- |
5.5 IDEA 配置
通过 IDEA 的「Run/Debug Configurations」配置使用 SkyWalking Agent。如下图所示: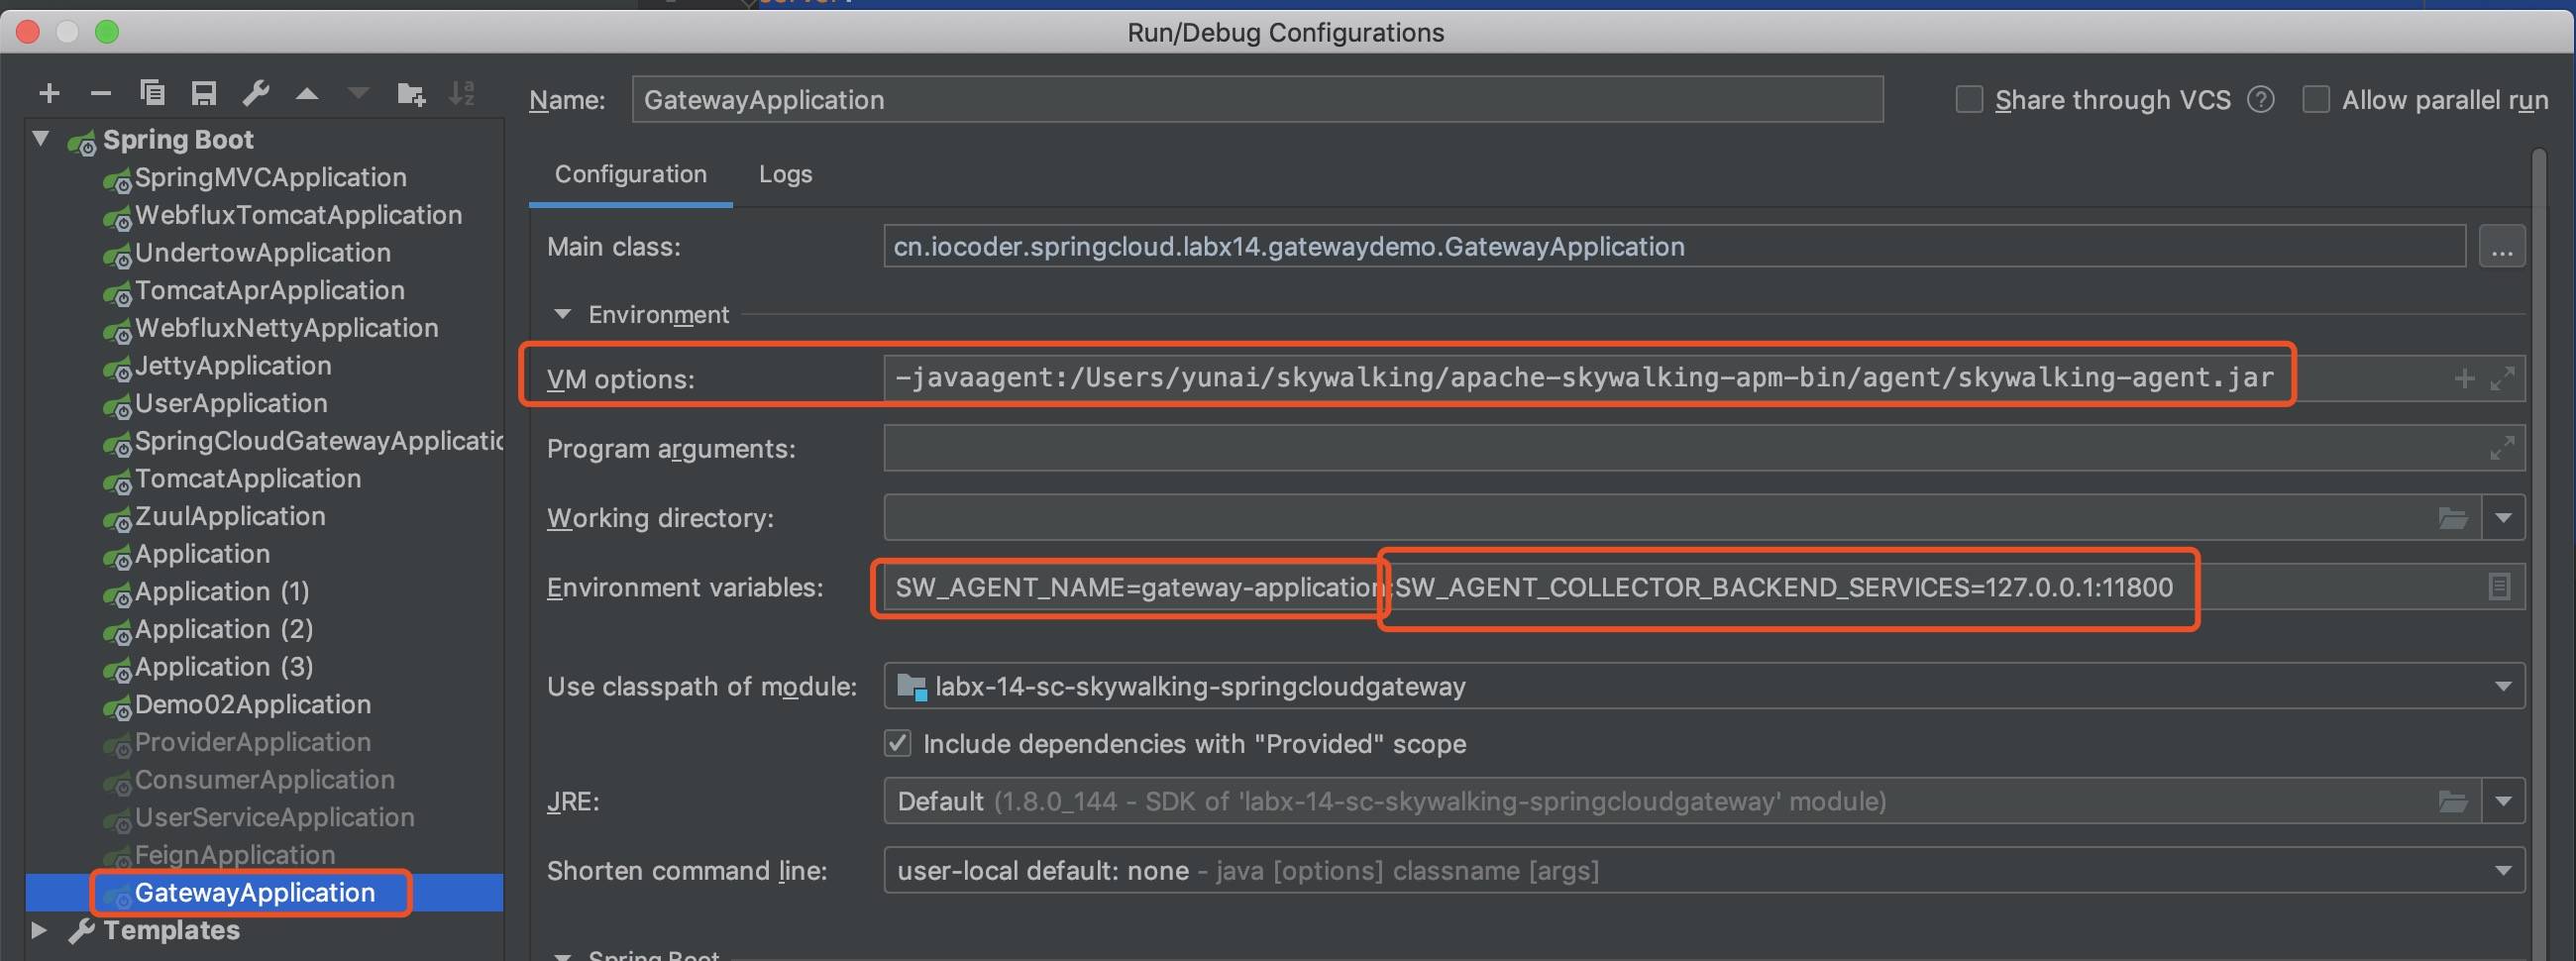
5.6 简单测试
使用 FeignApplication、UserServiceApplication、GatewayApplication 启动三个 Spring Cloud 应用。
① 首先,使用浏览器,访问下 http://127.0.0.1:8888/feign/get?id=1 地址,请求 API 网关,从而转发请求到 feign-service 服务。因为,我们要追踪下该链路。
② 然后,继续使用浏览器,打开 http://127.0.0.1:8080/ 地址,进入 SkyWalking UI 界面。如下图所示: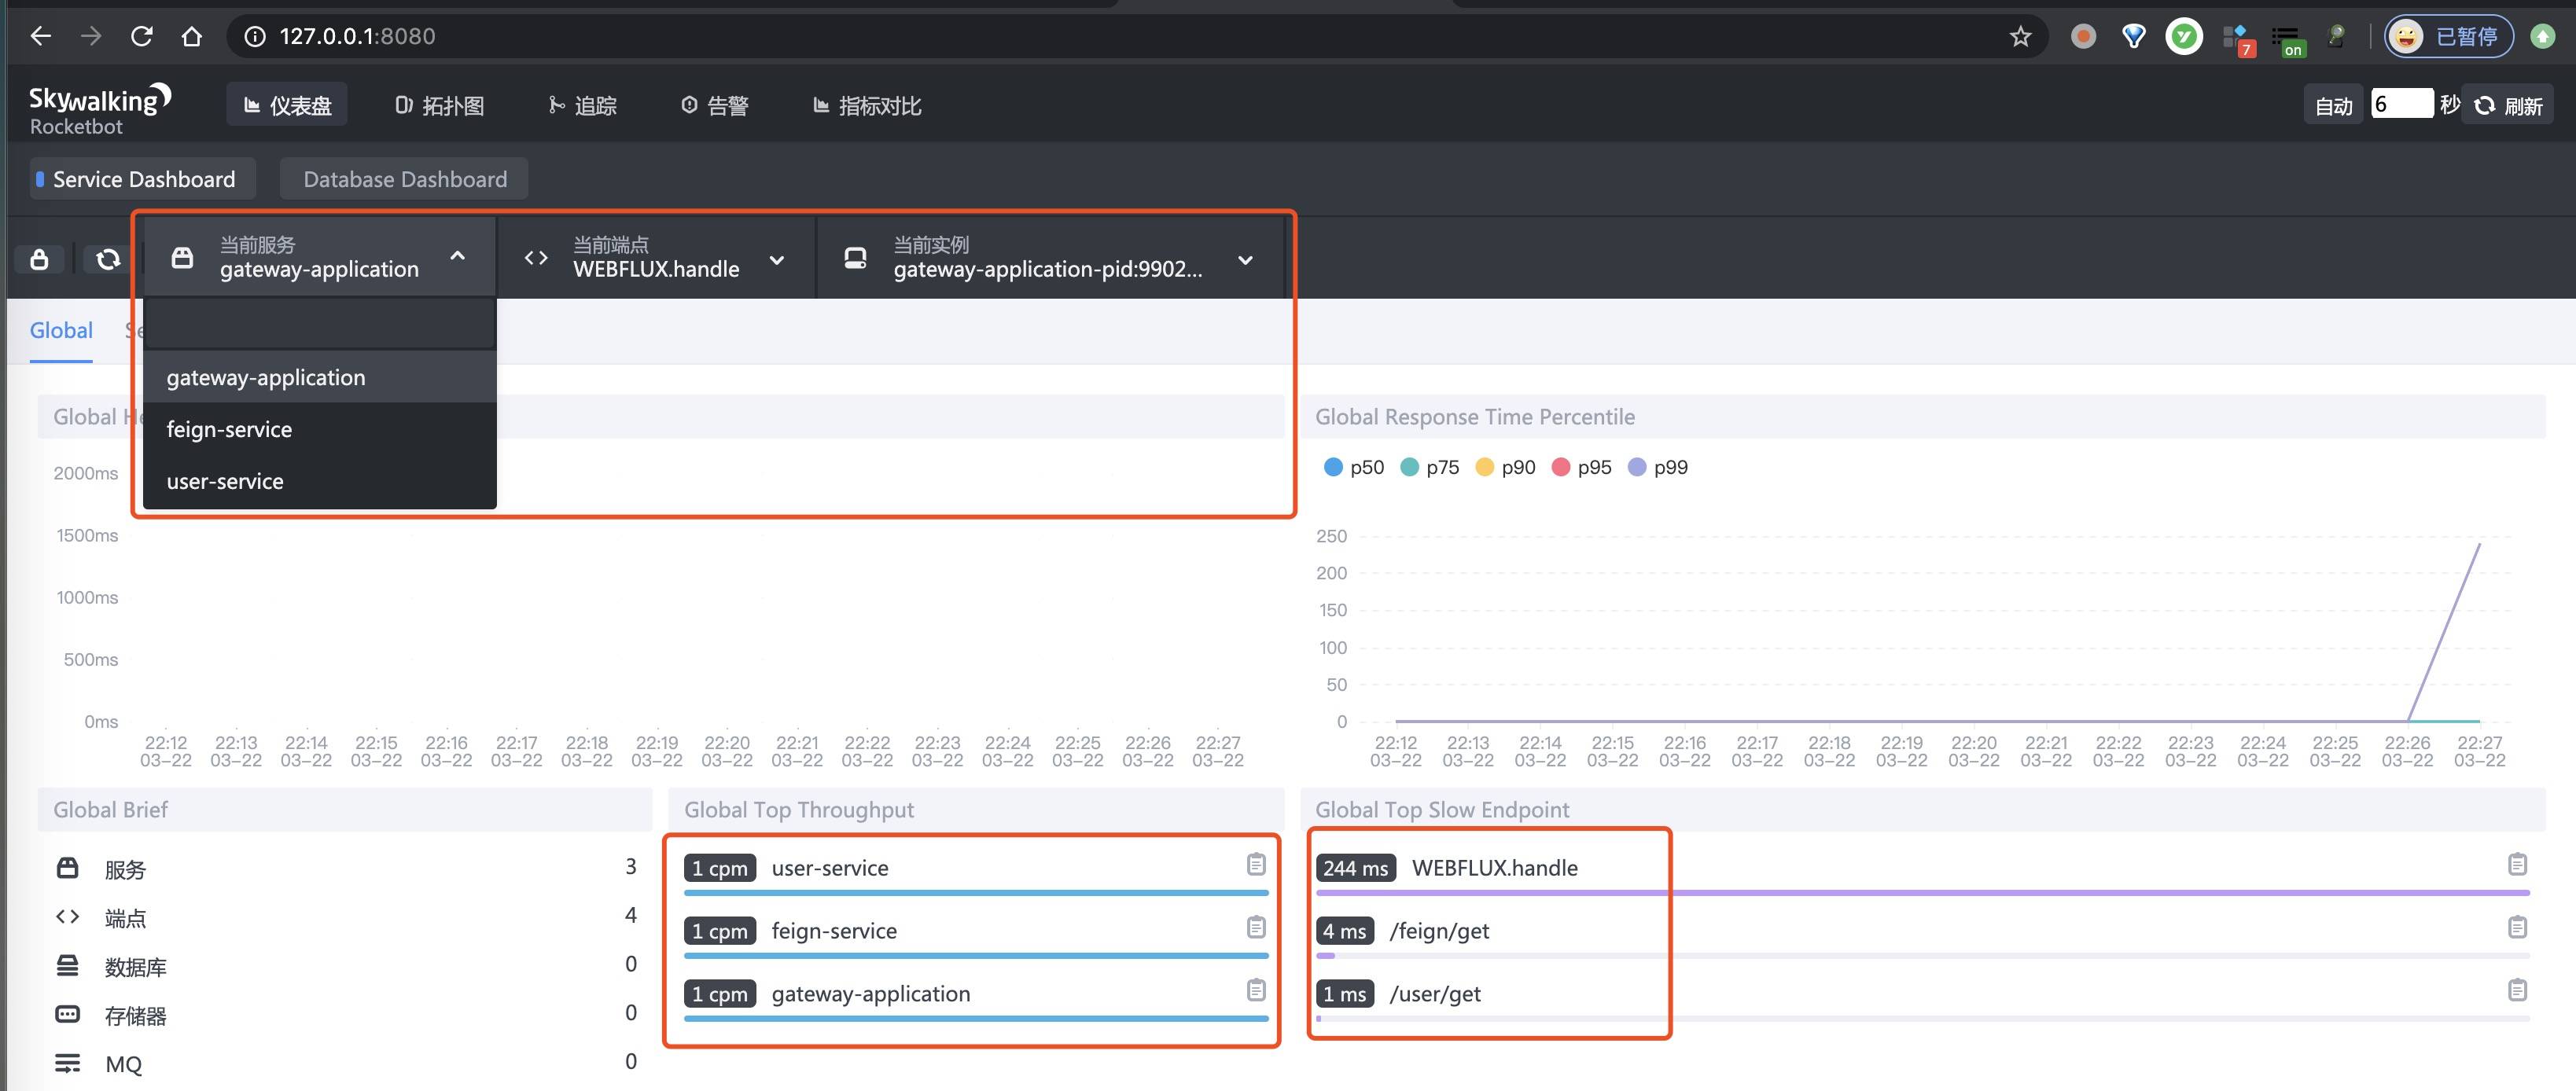
③ 之后,点击「拓扑图」菜单,进入查看拓扑图的界面,可以看到 API 网关转发请求到后端服务。如下图所示: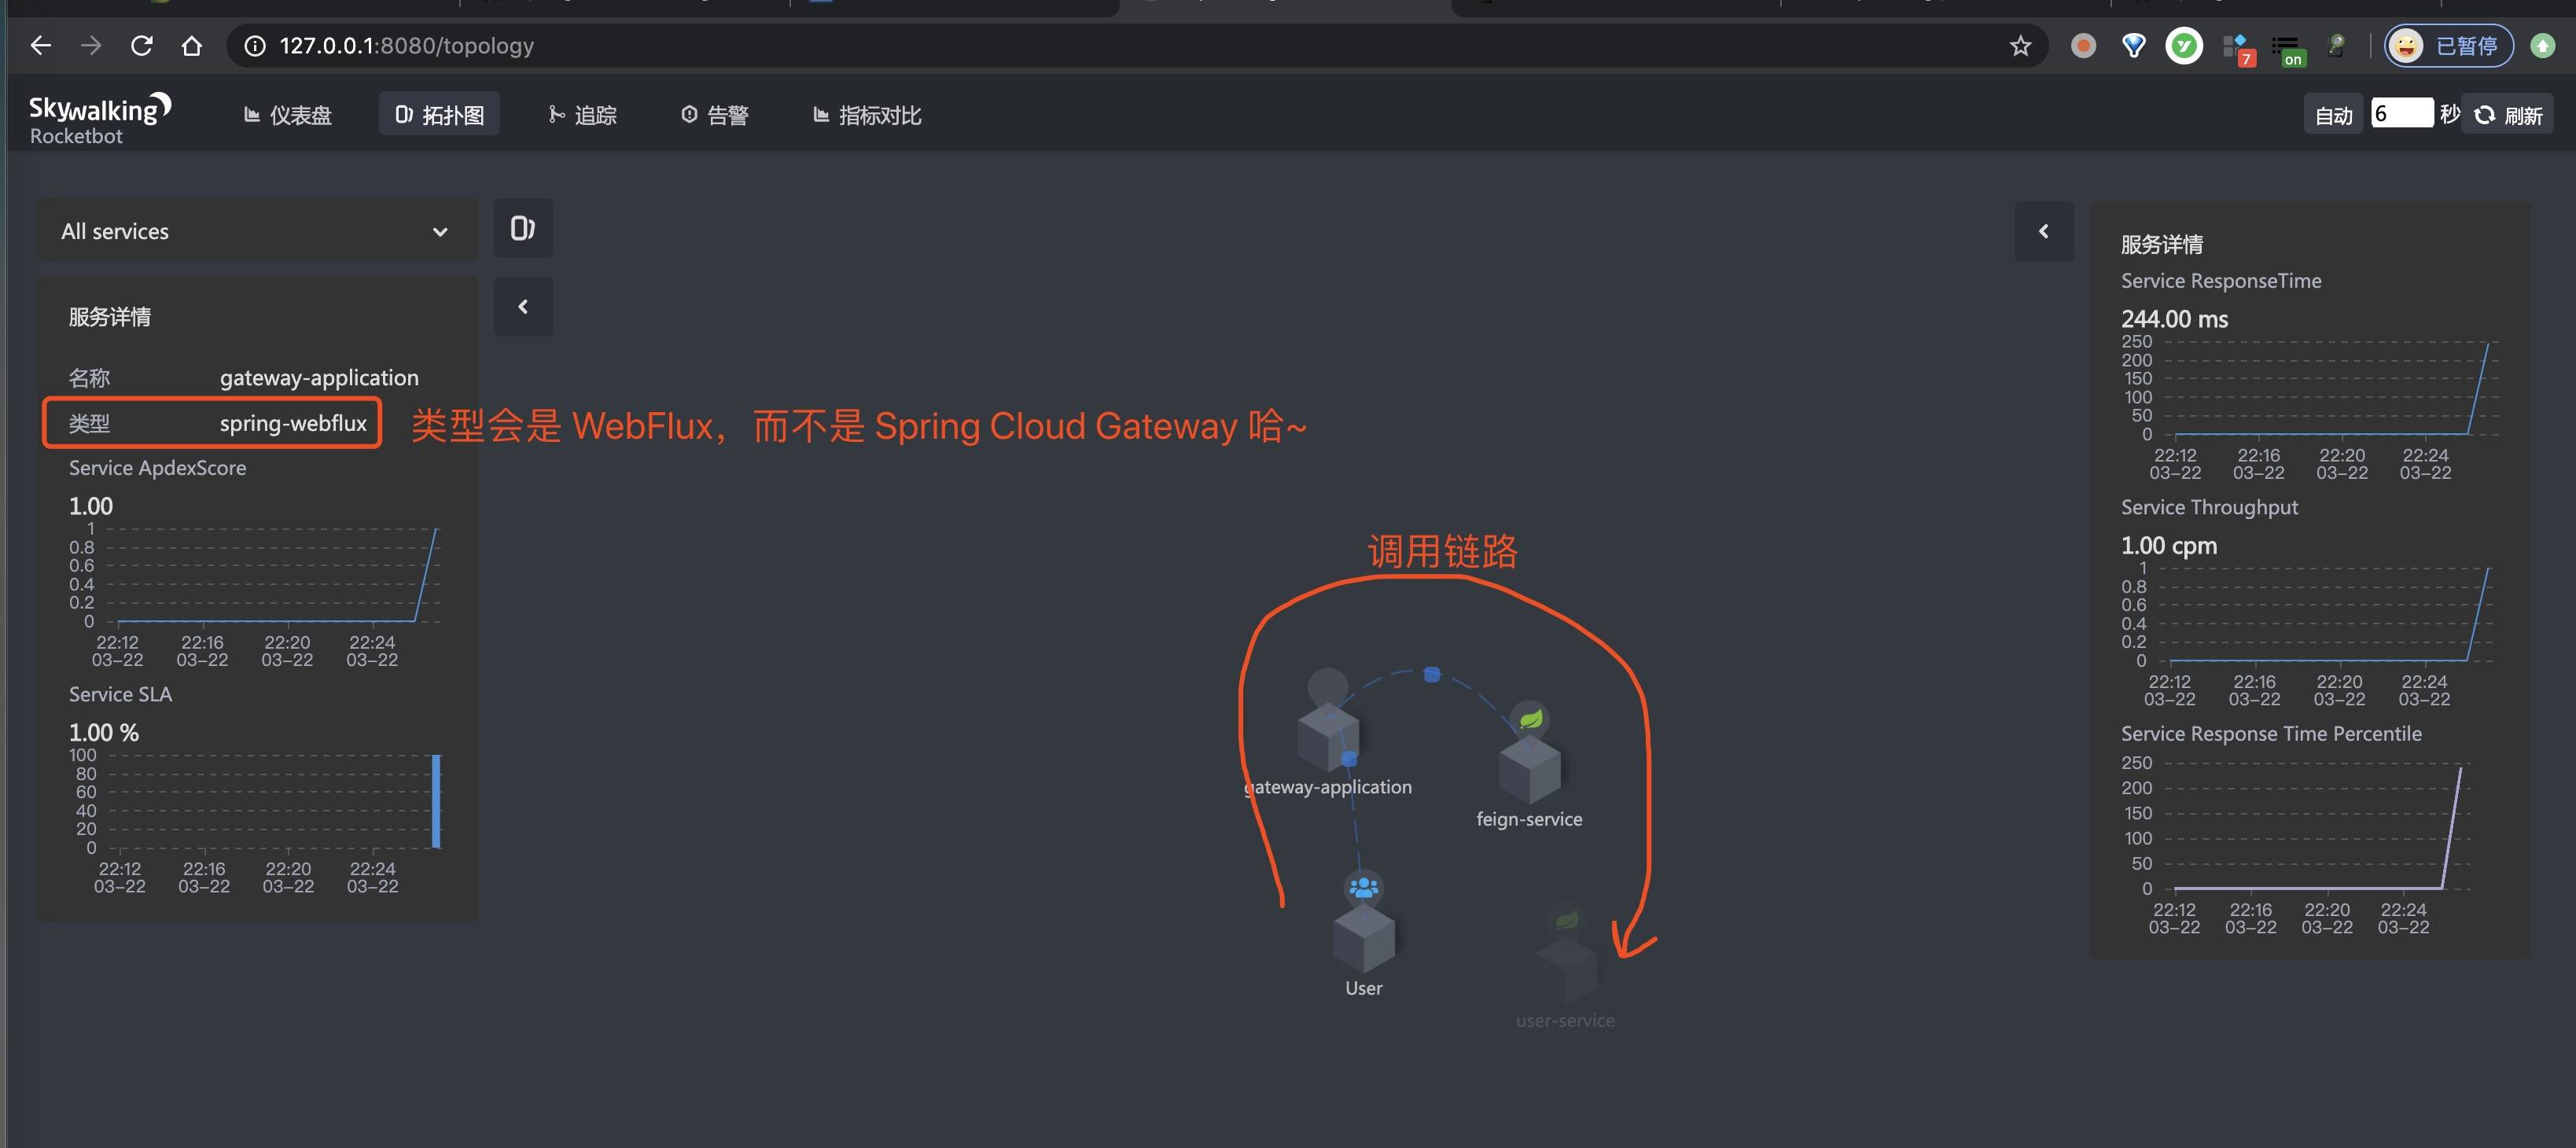
④ 再之后,点击「追踪」菜单,进入查看链路数据的界面。如下图所示: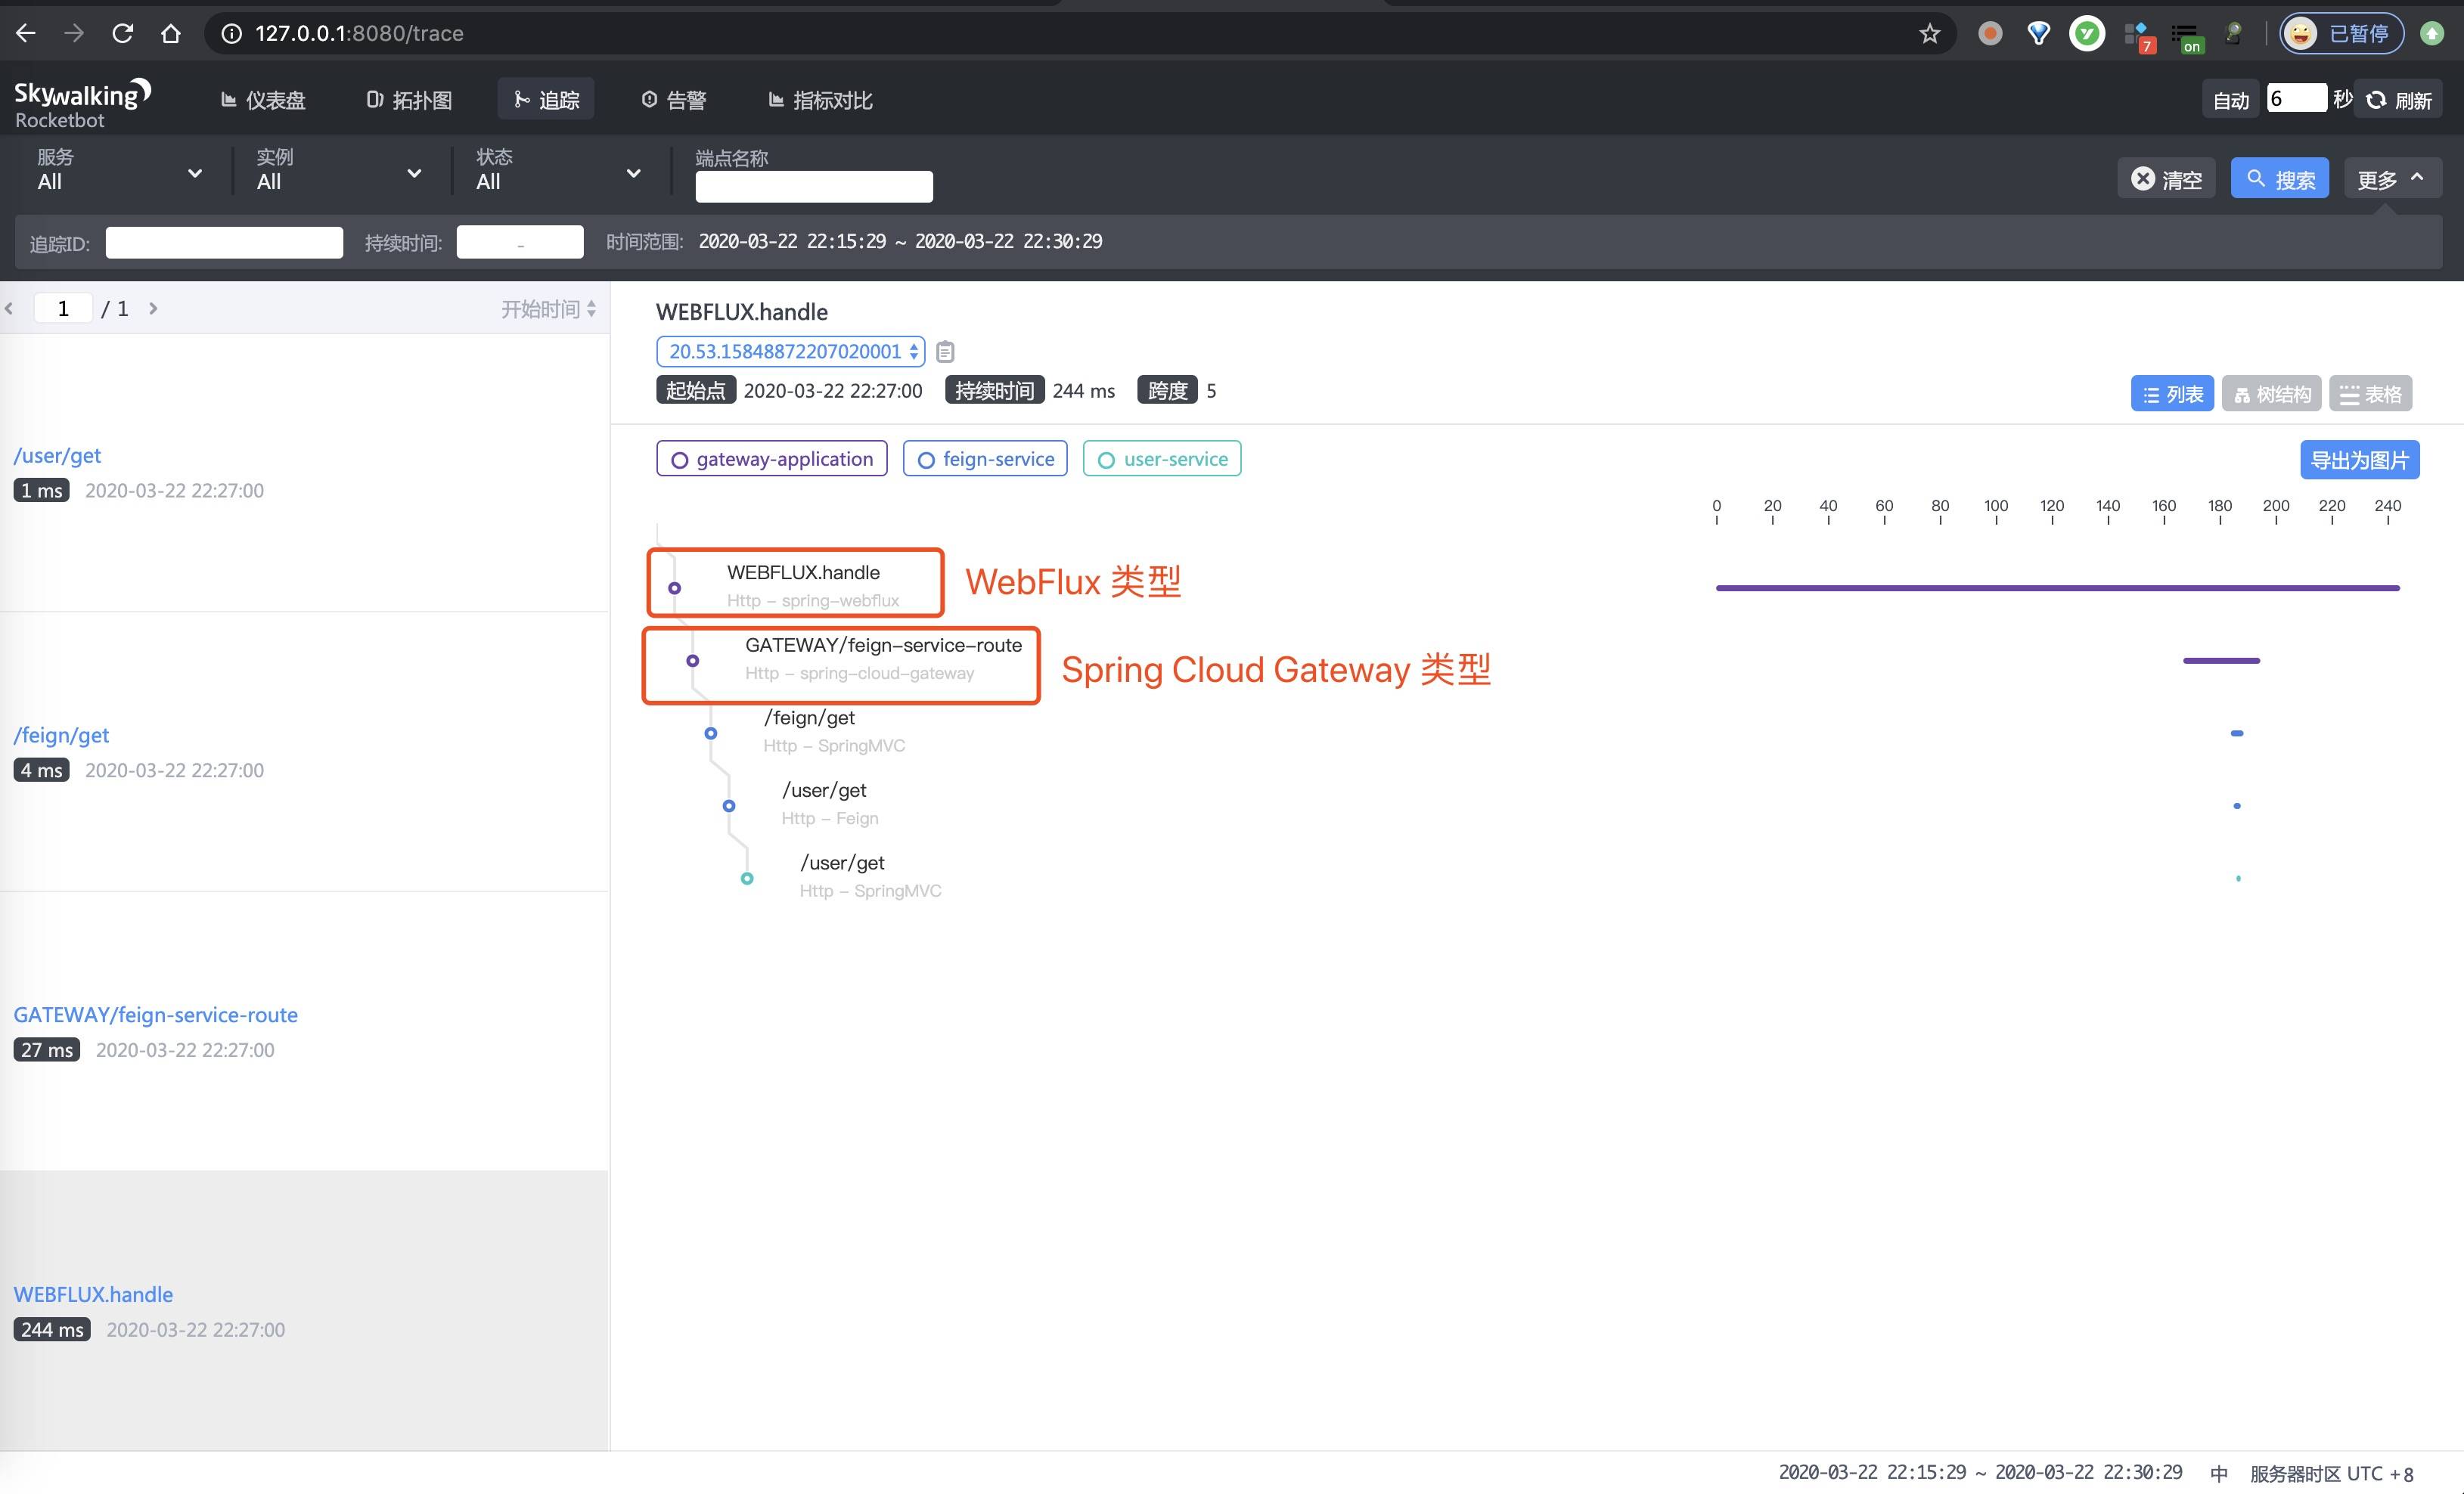
6. Zuul 示例
TODO 后续补充
7. Dubbo 示例
示例代码对应仓库:
- 服务 API 项目:
labx-14-sc-skywalking-dubbo-api- 服务 Provider 项目:
labx-14-sc-skywalking-dubbo-provider- 服务 Consumer 项目:
labx-14-sc-skywalking-dubbo-consumer
本小节,我们来搭建一个 SkyWalking 对 Dubbo 的远程 RPC 调用的链路追踪。该链路通过如下插件实现收集:
我们来新建一个 labx-14-sc-skywalking-dubbo 模块,一共包含三个子项目。最终如下图所示: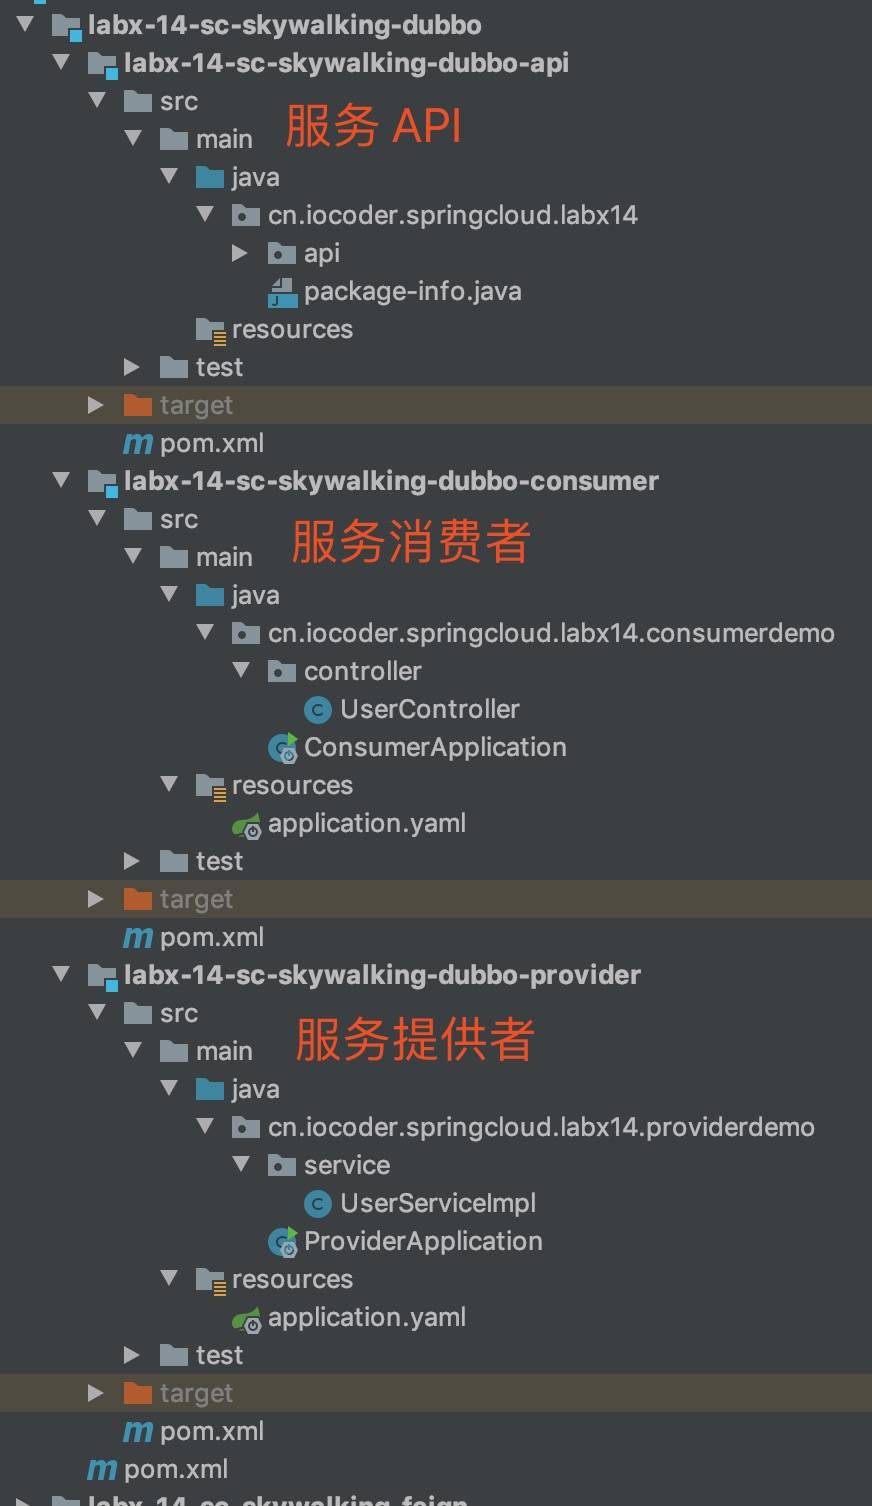
另外,考虑到 Spring Cloud Alibaba 主推 Nacos 作为诸注册中心,所以本小节也是使用 Nacos。不了解的胖友,后续可以看看《Nacos 极简入门》文章。
7.1 搭建 API 项目
创建 labx-14-sc-skywalking-dubbo-api 项目, 服务接口 ,定义 Dubbo Service API 接口,提供给消费者使用。
7.1.1 UserService
创建 UserService 接口,定义用户服务 RPC Service 接口。代码如下:
|
public interface UserService {

    /**
     * 根据指定用户编号,获得用户信息
     *
     * @param id 用户编号
     * @return 用户信息
     */
    String get(Integer id);

}
| |
| -- |
7.2 搭建服务提供者
创建 labx-14-sc-skywalking-dubbo-provider 项目, 服务提供者 ,实现 labx-14-sc-skywalking-dubbo-api 项目定义的 Dubbo Service API 接口,提供相应的服务。
7.2.1 引入依赖
创建 pom.xml 文件中,引入依赖。
|
<?xml version="1.0" encoding="UTF-8"?>
<project xmlns="http://maven.apache.org/POM/4.0.0"
         xmlns:xsi="http://www.w3.org/2001/XMLSchema-instance"
         xsi:schemaLocation="http://maven.apache.org/POM/4.0.0 http://maven.apache.org/xsd/maven-4.0.0.xsd">
    <parent>
        <artifactId>labx-14-sc-skywalking-dubbo</artifactId>
        <groupId>cn.iocoder.springboot.labs</groupId>
        <version>1.0-SNAPSHOT</version>
    </parent>
    <modelVersion>4.0.0</modelVersion>

    <artifactId>labx-14-sc-skywalking-dubbo-provider</artifactId>

    <properties>
        <maven.compiler.target>1.8</maven.compiler.target>
        <maven.compiler.source>1.8</maven.compiler.source>
        <spring.boot.version>2.2.4.RELEASE</spring.boot.version>
        <spring.cloud.version>Hoxton.SR1</spring.cloud.version>
        <spring.cloud.alibaba.version>2.2.0.RELEASE</spring.cloud.alibaba.version>
    </properties>

    <!--
        引入 Spring Boot、Spring Cloud、Spring Cloud Alibaba 三者 BOM 文件,进行依赖版本的管理,防止不兼容。
        在 https://dwz.cn/mcLIfNKt 文章中,Spring Cloud Alibaba 开发团队推荐了三者的依赖关系
    -->
    <dependencyManagement>
        <dependencies>
            <dependency>
                <groupId>org.springframework.boot</groupId>
                <artifactId>spring-boot-starter-parent</artifactId>
                <version>${spring.boot.version}</version>
                <type>pom</type>
                <scope>import</scope>
            </dependency>
            <dependency>
                <groupId>org.springframework.cloud</groupId>
                <artifactId>spring-cloud-dependencies</artifactId>
                <version>${spring.cloud.version}</version>
                <type>pom</type>
                <scope>import</scope>
            </dependency>
            <dependency>
                <groupId>com.alibaba.cloud</groupId>
                <artifactId>spring-cloud-alibaba-dependencies</artifactId>
                <version>${spring.cloud.alibaba.version}</version>
                <type>pom</type>
                <scope>import</scope>
            </dependency>
        </dependencies>
    </dependencyManagement>

    <dependencies>
        <!-- 引入定义的 Dubbo API 接口 -->
        <dependency>
            <groupId>cn.iocoder.springboot.labs</groupId>
            <artifactId>labx-14-sc-skywalking-dubbo-api</artifactId>
            <version>1.0-SNAPSHOT</version>
        </dependency>

        <!-- 引入 Spring Cloud Alibaba Nacos Discovery 相关依赖,将 Nacos 作为注册中心,并实现对其的自动配置 -->
        <dependency>
            <groupId>com.alibaba.cloud</groupId>
            <artifactId>spring-cloud-starter-alibaba-nacos-discovery</artifactId>
        </dependency>

        <!-- 引入 Spring Cloud Alibaba Dubbo 相关依赖,实现呢 Dubbo 进行远程调用,并实现对其的自动配置 -->
        <dependency>
            <groupId>com.alibaba.cloud</groupId>
            <artifactId>spring-cloud-starter-dubbo</artifactId>
        </dependency>
    </dependencies>

</project>
| |
| -- |
7.2.2 配置文件
创建 application.yml 配置文件,添加相应配置项如下:
|
spring:
  application:
    name: demo-provider

# Dubbo 配置项,对应 DubboConfigurationProperties 类
dubbo:
  scan:
    base-packages: cn.iocoder.springcloud.labx14.providerdemo.service # 指定 Dubbo 服务实现类的扫描基准包
  # Dubbo 服务暴露的协议配置,对应 ProtocolConfig Map
  protocols:
    dubbo:
      name: dubbo # 协议名称
      port: -1 # 协议端口,-1 表示自增端口,从 20880 开始
  # Dubbo 服务注册中心配置,对应 RegistryConfig 类
  registry:
    address: spring-cloud://127.0.0.1:8848 # 指定 Dubbo 服务注册中心的地址
  # Spring Cloud Alibaba Dubbo 专属配置项,对应 DubboCloudProperties 类
  cloud:
    subscribed-services: '' # 设置订阅的应用列表,默认为 * 订阅所有应用。
| |
| -- |
关于
dubbo配置项,胖友可以后续阅读《芋道 Spring Cloud Alibaba 服务调用 Dubbo 入门》文章。
7.2.3 UserServiceImpl
创建 UserServiceImpl 类,实现 UserService 接口,用户服务具体实现类。代码如下:
|
@org.apache.dubbo.config.annotation.Service(protocol = "dubbo", version = "1.0.0")
public class UserServiceImpl implements UserService {

    @Override
    public String get(Integer id) {
        return "user:" + id;
    }

}
| |
| -- |
7.2.4 ProviderApplication
创建 ProviderApplication 类,服务提供者的启动类。代码如下:
|
@SpringBootApplication
public class ProviderApplication {

    public static void main(String[] args) {
        SpringApplication.run(ProviderApplication.class);
    }

}
| |
| -- |
7.2.5 IDEA 配置
通过 IDEA 的「Run/Debug Configurations」配置使用 SkyWalking Agent。如下图所示:
7.3 搭建服务消费者
创建 labx-14-sc-skywalking-dubbo-consumer 项目, 服务消费者 ,会调用 labx-14-sc-skywalking-dubbo-provider 项目提供的 User Service 服务。
7.3.1 引入依赖
创建 pom.xml 文件中,引入依赖。和「7.2.1 引入依赖」基本是一致的,胖友可以点击 pom.xml 文件查看。
7.3.2 配置文件
创建 application.yml 配置文件,添加相应配置项如下:
|
server:
  port: 8079

spring:
  application:
    name: demo-consumer
  cloud:
    # Nacos 作为注册中心的配置项
    nacos:
      discovery:
        server-addr: 127.0.0.1:8848

# Dubbo 配置项,对应 DubboConfigurationProperties 类
dubbo:
  # Dubbo 服务注册中心配置,对应 RegistryConfig 类
  registry:
    address: spring-cloud://127.0.0.1:8848 # 指定 Dubbo 服务注册中心的地址
  # Spring Cloud Alibaba Dubbo 专属配置项,对应 DubboCloudProperties 类
  cloud:
    subscribed-services: demo-provider # 设置订阅的应用列表,默认为 * 订阅所有应用。
| |
| -- |
关于
dubbo配置项,胖友可以后续阅读《芋道 Spring Cloud Alibaba 服务调用 Dubbo 入门》文章。
7.3.3 UserController
创建 UserController 类,提供调用 UserService 服务的 HTTP 接口。代码如下:
|
@RestController
@RequestMapping("/user")
public class UserController {

    @Reference(protocol = "dubbo", version = "1.0.0")
    private UserService userService;

    @GetMapping("/get")
    public String  get(@RequestParam("id") Integer id) {
        return userService.get(id);
    }

}
| |
| -- |
7.3.4 ConsumerApplication
创建 ConsumerApplication 类,服务消费者的启动类。代码如下:
|
@SpringBootApplication
public class ConsumerApplication {

    public static void main(String[] args) {
        SpringApplication.run(ConsumerApplication.class);
    }

}
| |
| -- |
7.3.5 IDEA 配置
通过 IDEA 的「Run/Debug Configurations」配置使用 SkyWalking Agent。如下图所示:
7.4 简单测试
使用 ProviderApplication 启动服务提供者,使用 ConsumerApplication 启动服务消费者。
① 首先,使用浏览器,访问 http://127.0.0.1:8079/user/get?id=1 地址,使用 Dubbo 调用 demo-provider 服务。因为,我们要追踪下该链路。
② 然后,继续使用浏览器,打开 http://127.0.0.1:8080/ 地址,进入 SkyWalking UI 界面。如下图所示: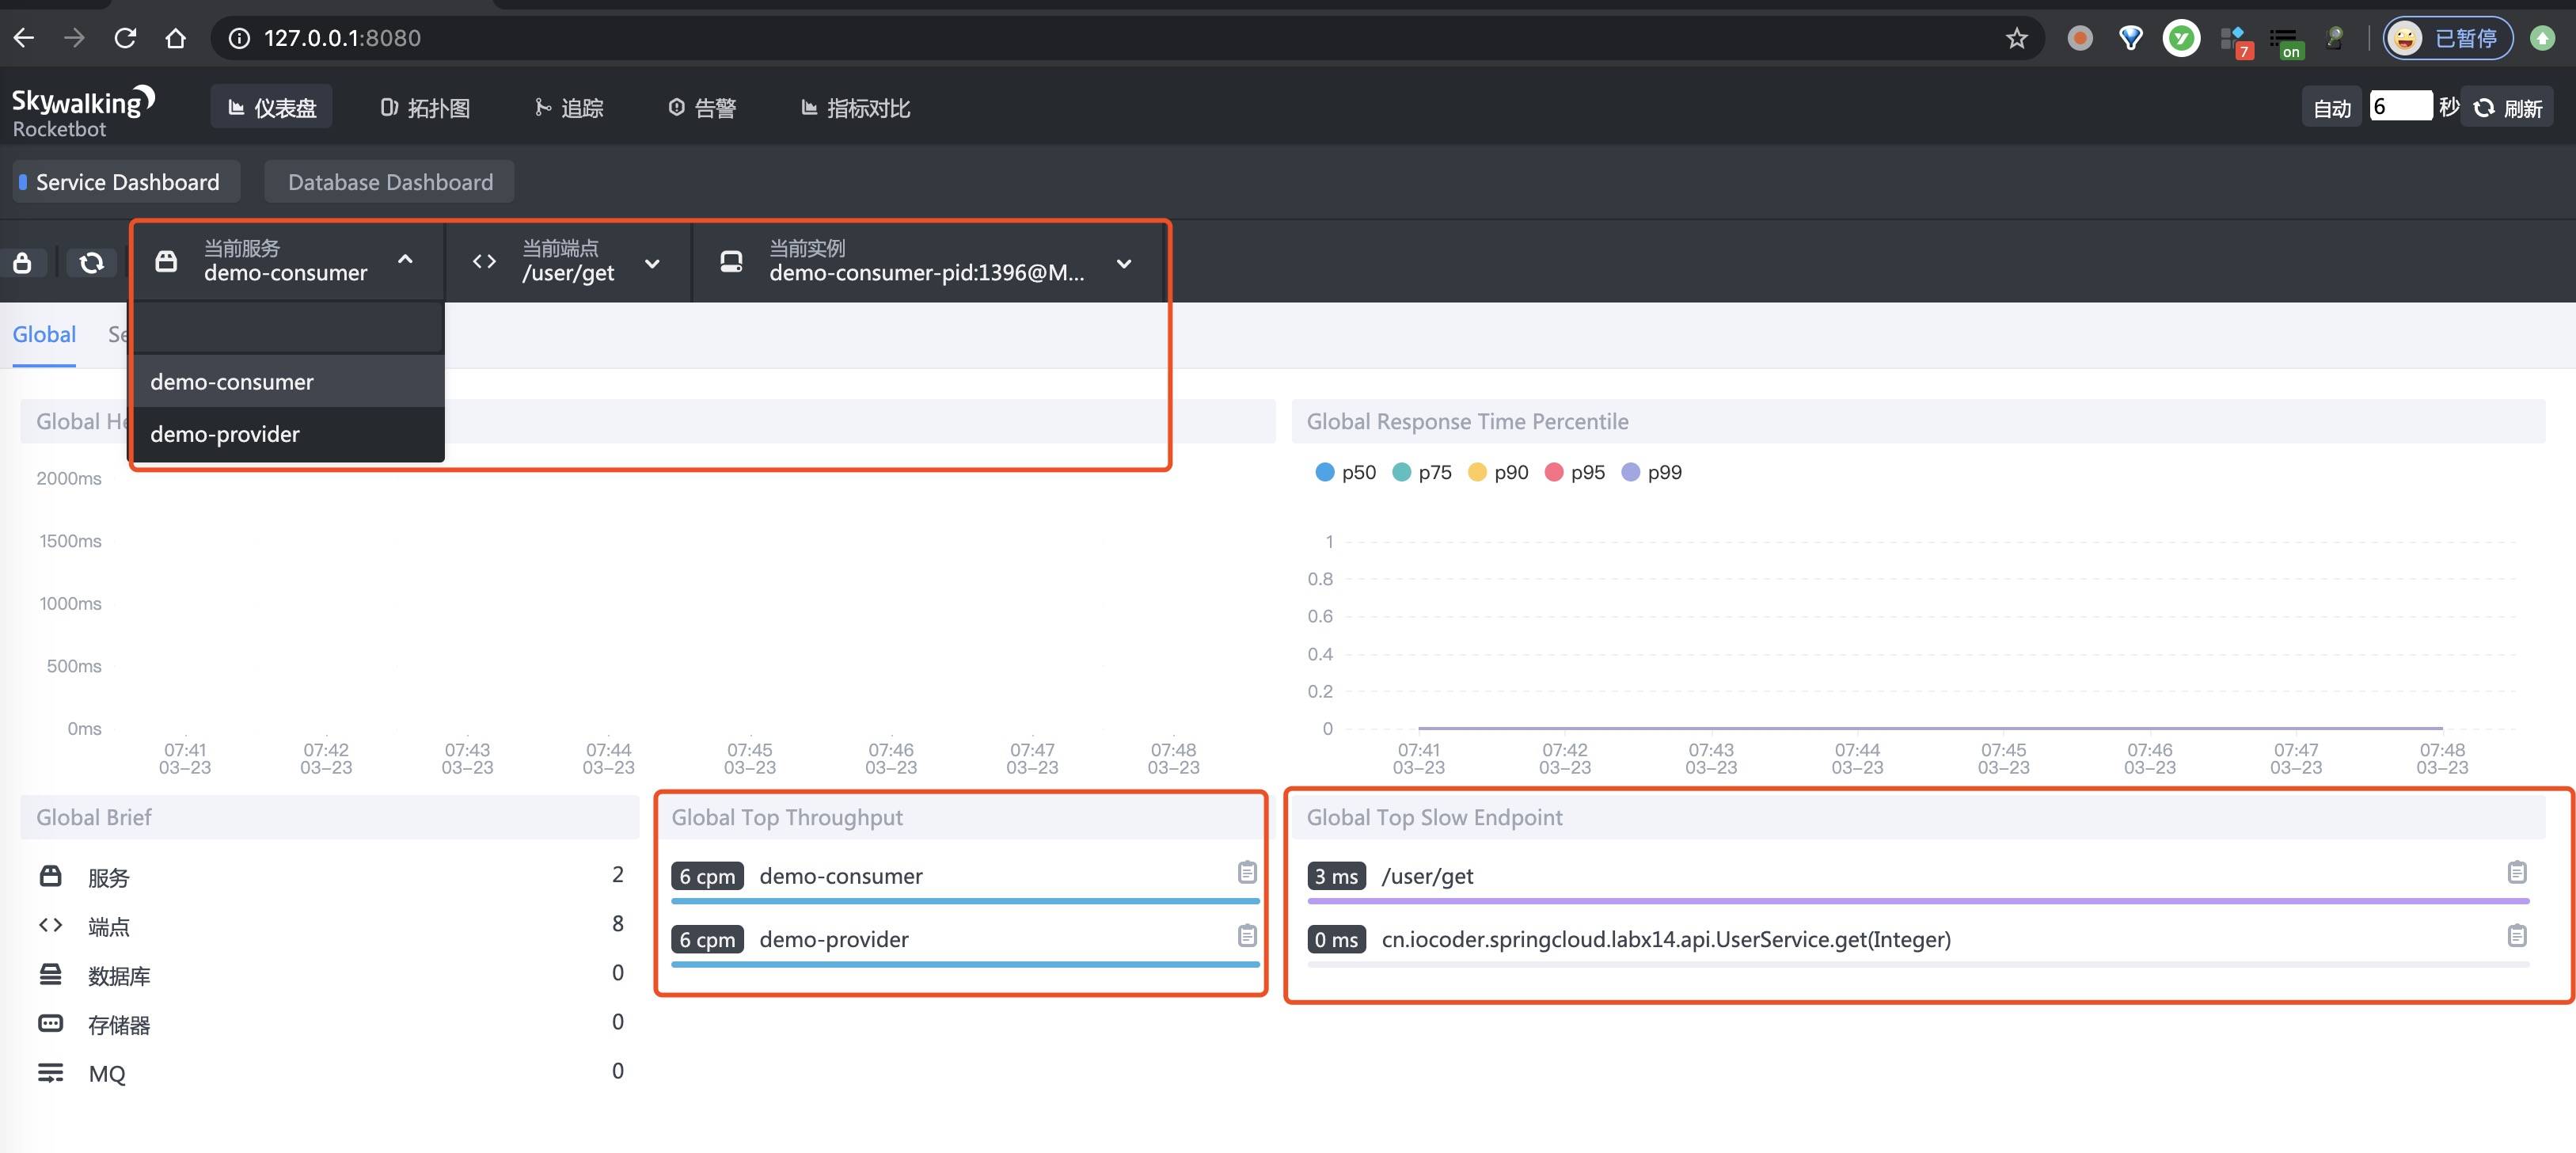
③ 之后,点击「拓扑图」菜单,进入查看拓扑图的界面,可以看到两个服务的小方块,以及对应的调用关系。如下图所示: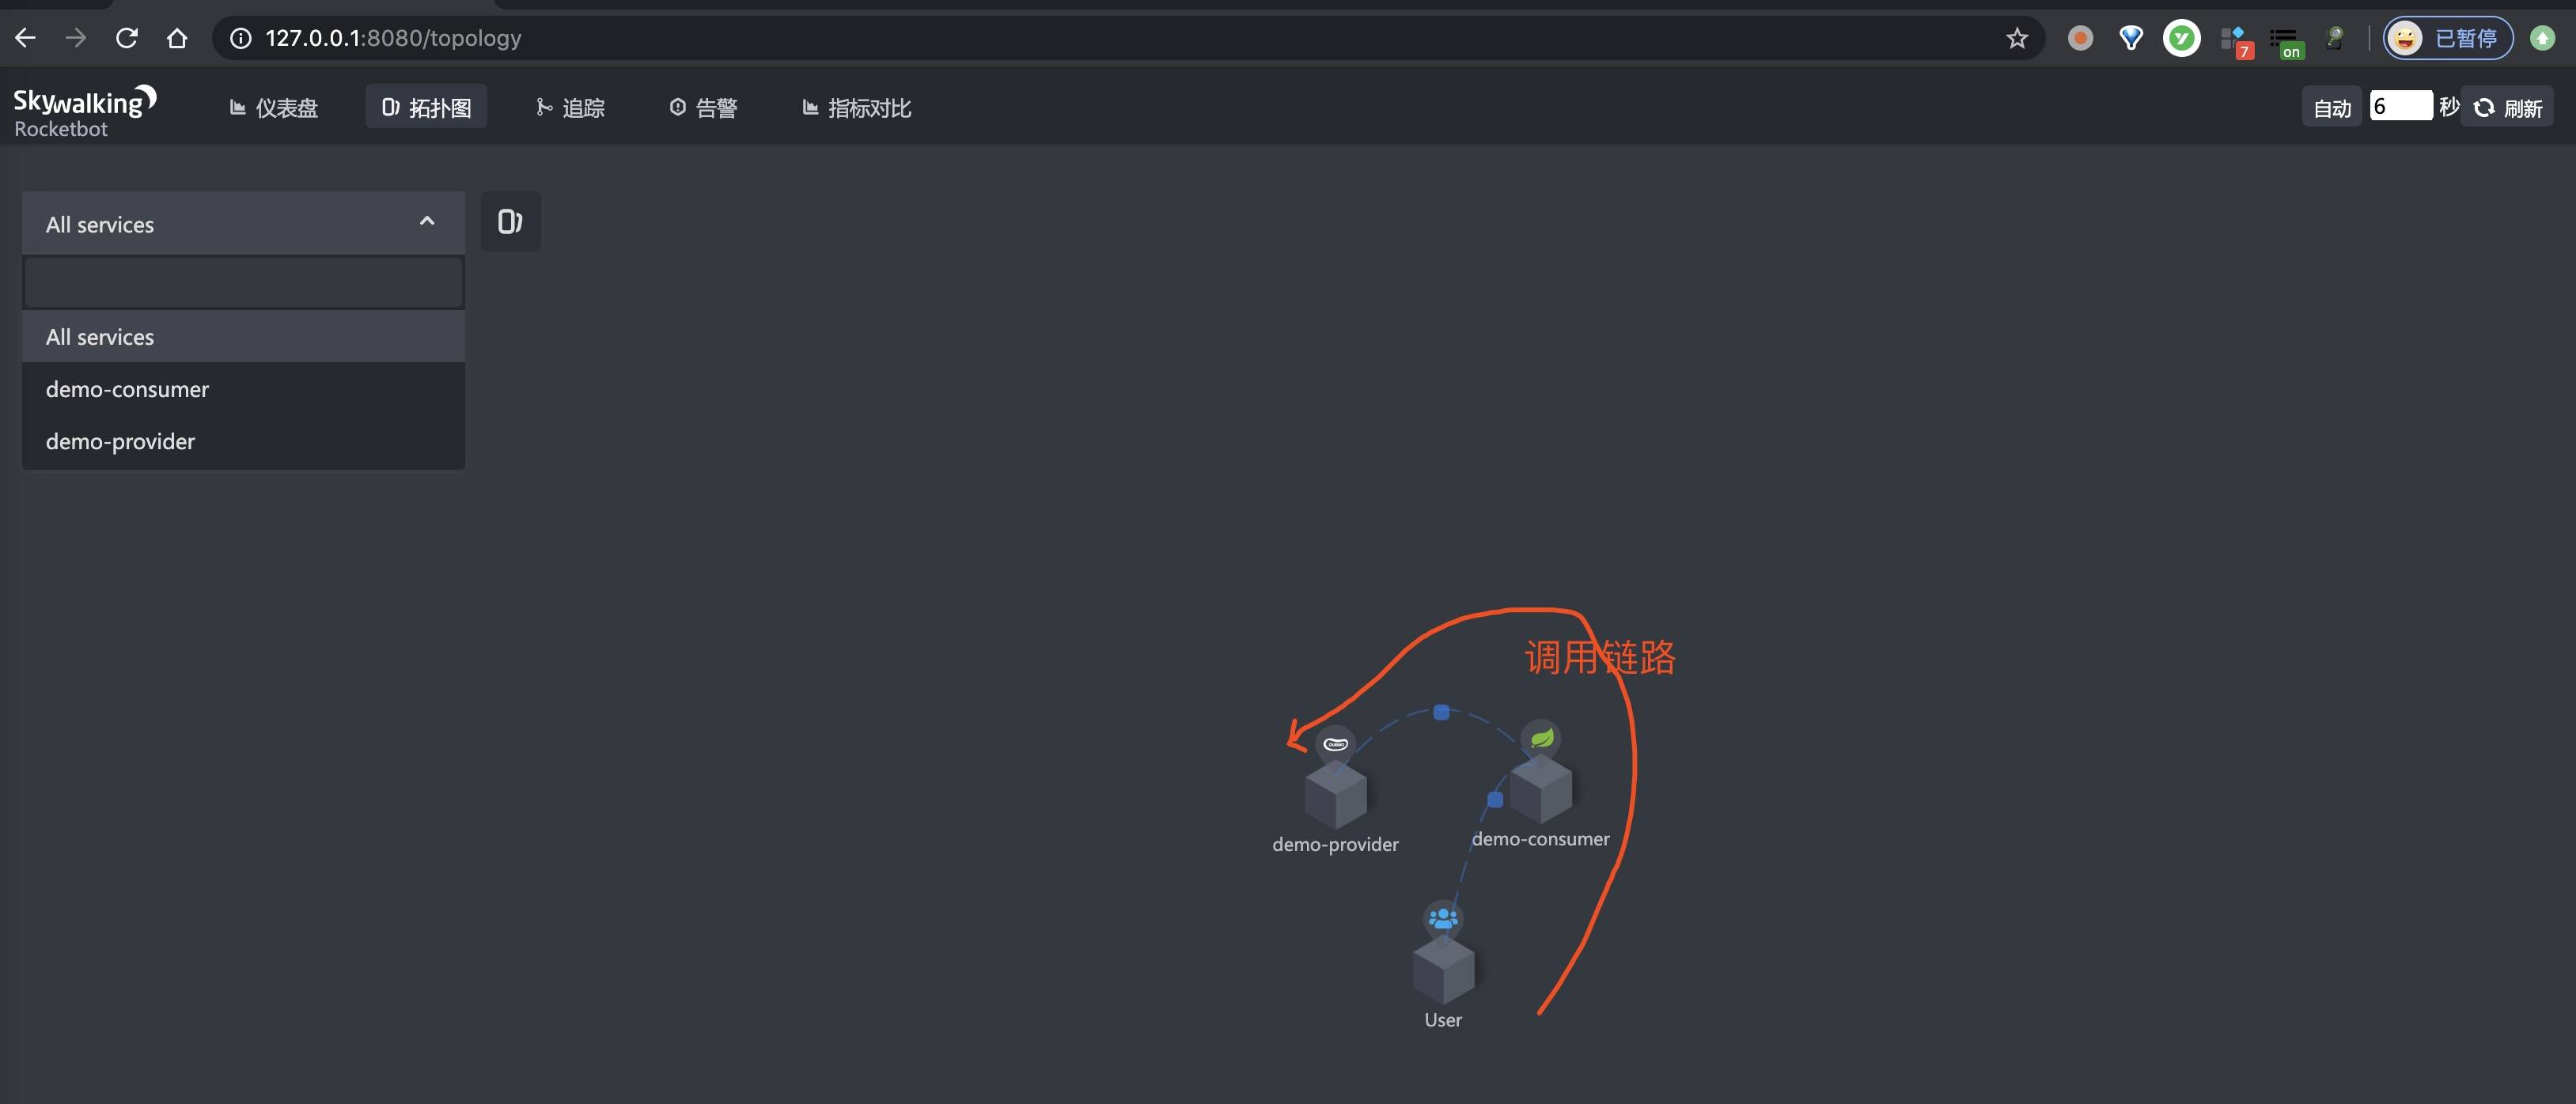
④ 再之后,点击「追踪」菜单,进入查看链路数据的界面。如下图所示:
8. MySQL 示例
详见《芋道 Spring Boot 链路追踪 SkyWalking 入门》文章的「4. MySQL 示例」小节。
9. Redis 示例
详见《芋道 Spring Boot 链路追踪 SkyWalking 入门》文章的「5. Redis 示例」小节。
10. MongoDB 示例
详见《芋道 Spring Boot 链路追踪 SkyWalking 入门》文章的「6. MongoDB 示例」小节。
11. Elasticsearch 示例
详见《芋道 Spring Boot 链路追踪 SkyWalking 入门》文章的「7. Elasticsearch 示例」小节。
12. RocketMQ 示例
示例代码对应仓库:
本小节,我们来搭建一个 SkyWalking 对 RocketMQ 消息的发送和消费的链路追踪。该链路通过如下插件实现收集:
我们来新建一个 labx-14-sc-skywalking-mq-rocketmq 模块,会包括生产者和消费者两个子项目。最终如下图所示: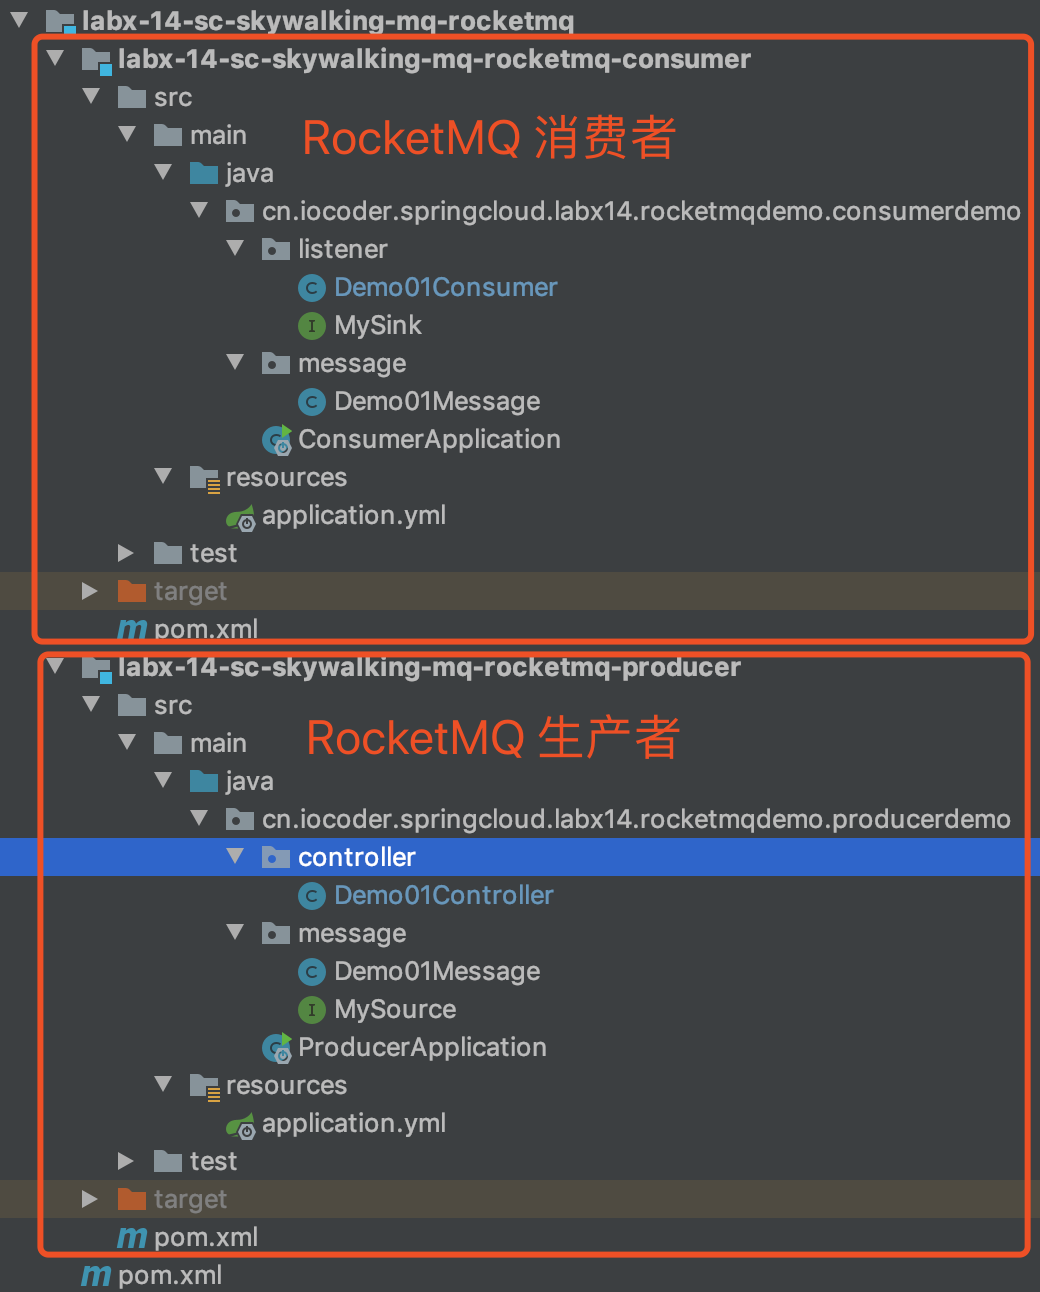
另外,我们将使用 Spring Cloud Stream RocketMQ 进行 RocketMQ 的操作。对 RocketMQ 感兴趣的胖友,可以后续去看看《芋道 Spring Cloud 消息队列 RocketMQ 入门》文章。
12.1 搭建生产者
创建 labx-14-sc-skywalking-mq-rocketmq-producer 项目,作为生产者。
12.1.1 引入依赖
创建 pom.xml 文件中,引入相关依赖。
|
<?xml version="1.0" encoding="UTF-8"?>
<project xmlns="http://maven.apache.org/POM/4.0.0"
         xmlns:xsi="http://www.w3.org/2001/XMLSchema-instance"
         xsi:schemaLocation="http://maven.apache.org/POM/4.0.0 http://maven.apache.org/xsd/maven-4.0.0.xsd">
    <parent>
        <artifactId>labx-14-sc-skywalking-mq-rocketmq</artifactId>
        <groupId>cn.iocoder.springboot.labs</groupId>
        <version>1.0-SNAPSHOT</version>
    </parent>
    <modelVersion>4.0.0</modelVersion>

    <artifactId>labx-14-sc-skywalking-mq-rocketmq-producer</artifactId>

    <properties>
        <maven.compiler.target>1.8</maven.compiler.target>
        <maven.compiler.source>1.8</maven.compiler.source>
        <spring.boot.version>2.2.4.RELEASE</spring.boot.version>
        <spring.cloud.version>Hoxton.SR1</spring.cloud.version>
        <spring.cloud.alibaba.version>2.2.0.RELEASE</spring.cloud.alibaba.version>
    </properties>

    <!--
        引入 Spring Boot、Spring Cloud、Spring Cloud Alibaba 三者 BOM 文件,进行依赖版本的管理,防止不兼容。
        在 https://dwz.cn/mcLIfNKt 文章中,Spring Cloud Alibaba 开发团队推荐了三者的依赖关系
     -->
    <dependencyManagement>
        <dependencies>
            <dependency>
                <groupId>org.springframework.boot</groupId>
                <artifactId>spring-boot-starter-parent</artifactId>
                <version>${spring.boot.version}</version>
                <type>pom</type>
                <scope>import</scope>
            </dependency>
            <dependency>
                <groupId>org.springframework.cloud</groupId>
                <artifactId>spring-cloud-dependencies</artifactId>
                <version>${spring.cloud.version}</version>
                <type>pom</type>
                <scope>import</scope>
            </dependency>
            <dependency>
                <groupId>com.alibaba.cloud</groupId>
                <artifactId>spring-cloud-alibaba-dependencies</artifactId>
                <version>${spring.cloud.alibaba.version}</version>
                <type>pom</type>
                <scope>import</scope>
            </dependency>
        </dependencies>
    </dependencyManagement>

    <dependencies>
        <!-- 引入 SpringMVC 相关依赖,并实现对其的自动配置 -->
        <dependency>
            <groupId>org.springframework.boot</groupId>
            <artifactId>spring-boot-starter-web</artifactId>
        </dependency>

        <!-- 引入 Spring Cloud Alibaba Stream RocketMQ 相关依赖,将 RocketMQ 作为消息队列,并实现对其的自动配置 -->
        <dependency>
            <groupId>com.alibaba.cloud</groupId>
            <artifactId>spring-cloud-starter-stream-rocketmq</artifactId>
        </dependency>
    </dependencies>

</project>
| |
| -- |
12.1.2 配置文件
创建 application.yaml 配置文件,添加相关配置。
|
spring:
  application:
    name: demo-producer-application
  cloud:
    # Spring Cloud Stream 配置项,对应 BindingServiceProperties 类
    stream:
      # Binding 配置项,对应 BindingProperties Map
      bindings:
        demo01-output:
          destination: DEMO-TOPIC-01 # 目的地。这里使用 RocketMQ Topic
          content-type: application/json # 内容格式。这里使用 JSON
      # Spring Cloud Stream RocketMQ 配置项
      rocketmq:
        # RocketMQ Binder 配置项,对应 RocketMQBinderConfigurationProperties 类
        binder:
          name-server: 127.0.0.1:9876 # RocketMQ Namesrv 地址
        # RocketMQ 自定义 Binding 配置项,对应 RocketMQBindingProperties Map
        bindings:
          demo01-output:
            # RocketMQ Producer 配置项,对应 RocketMQProducerProperties 类
            producer:
              group: test # 生产者分组
              sync: true # 是否同步发送消息,默认为 false 异步。

server:
  port: 18080
| |
| -- |
12.1.3 MySource
创建 MySource 接口,声明名字为 Output Binding。代码如下:
|
public interface MySource {

    @Output("demo01-output")
    MessageChannel demo01Output();

}
| |
| -- |
12.1.4 Demo01Message
创建 Demo01Message 类,示例 Message 消息。代码如下:
|
public class Demo01Message {

    /**
     * 编号
     */
    private Integer id;

    // ... 省略 setter/getter/toString 方法

}
| |
| -- |
12.1.5 Demo01Controller
创建 Demo01Controller 类,提供发送消息的 HTTP 接口。代码如下:
|
@RestController
@RequestMapping("/demo01")
public class Demo01Controller {

    private Logger logger = LoggerFactory.getLogger(getClass());

    @Autowired
    private MySource mySource;

    @GetMapping("/send")
    public boolean send() {
        // 创建 Message
        Demo01Message message = new Demo01Message()
                .setId(new Random().nextInt());
        // 创建 Spring Message 对象
        Message<Demo01Message> springMessage = MessageBuilder.withPayload(message)
                .build();
        // 发送消息
        return mySource.demo01Output().send(springMessage);
    }

}
| |
| -- |
12.1.6 ProducerApplication
创建 ProducerApplication 类,启动生产者的应用。代码如下:
|
@SpringBootApplication
@EnableBinding(MySource.class)
public class ProducerApplication {

    public static void main(String[] args) {
        SpringApplication.run(ProducerApplication.class, args);
    }

}
| |
| -- |
12.1.7 IDEA 配置
通过 IDEA 的「Run/Debug Configurations」配置使用 SkyWalking Agent。如下图所示:
12.2 搭建消费者
创建 labx-14-sc-skywalking-mq-rocketmq-consumer 项目,作为消费者。
12.2.1 引入依赖
创建 pom.xml 文件中,引入相关依赖。
友情提示:和「12.1 搭建生产者」基本一样,点击 链接 查看。
12.2.2 配置文件
创建 application.yaml 配置文件,添加相关配置。
|
spring:
  application:
    name: demo-consumer-application
  cloud:
    # Spring Cloud Stream 配置项,对应 BindingServiceProperties 类
    stream:
      # Binding 配置项,对应 BindingProperties Map
      bindings:
        demo01-input:
          destination: DEMO-TOPIC-01 # 目的地。这里使用 RocketMQ Topic
          content-type: application/json # 内容格式。这里使用 JSON
          group: demo01-consumer-group-DEMO-TOPIC-01 # 消费者分组
      # Spring Cloud Stream RocketMQ 配置项
      rocketmq:
        # RocketMQ Binder 配置项,对应 RocketMQBinderConfigurationProperties 类
        binder:
          name-server: 127.0.0.1:9876 # RocketMQ Namesrv 地址
        # RocketMQ 自定义 Binding 配置项,对应 RocketMQBindingProperties Map
        bindings:
          demo01-input:
            # RocketMQ Consumer 配置项,对应 RocketMQConsumerProperties 类
            consumer:
              enabled: true # 是否开启消费,默认为 true
              broadcasting: false # 是否使用广播消费,默认为 false 使用集群消费

server:
  port: ${random.int[10000,19999]} # 随机端口,方便启动多个消费者
| |
| -- |
12.2.3 MySink
创建 MySink 接口,声明名字为 Input Binding。代码如下:
|
public interface MySink {

    String DEMO01_INPUT = "demo01-input";

    @Input(DEMO01_INPUT)
    SubscribableChannel demo01Input();

}
| |
| -- |
12.2.4 Demo01Message
创建 Demo01Message 类,示例 Message 消息。
友情提示:和「12.1.4 Demo01Message」基本一样,点击 链接 查看。
12.2.5 Demo01Consumer
创建 Demo01Consumer 类,消费消息。代码如下:
|
@Component
public class Demo01Consumer {

    private Logger logger = LoggerFactory.getLogger(getClass());

    @StreamListener(MySink.DEMO01_INPUT)
    public void onMessage(@Payload Demo01Message message) {
        logger.info("[onMessage][线程编号:{} 消息内容:{}]", Thread.currentThread().getId(), message);
    }

}
| |
| -- |
12.2.6 ConsumerApplication
创建 ConsumerApplication 类,启动应用。代码如下:
|
@SpringBootApplication
@EnableBinding(MySink.class)
public class ConsumerApplication {

    public static void main(String[] args) {
        SpringApplication.run(ConsumerApplication.class, args);
    }

}
| |
| -- |
12.2.7 IDEA 配置
通过 IDEA 的「Run/Debug Configurations」配置使用 SkyWalking Agent。如下图所示:
12.3 简单测试
使用 ProducerApplication 启动生产者,使用 ConsumerApplication 启动消费者。
① 首先,使用浏览器,访问 http://127.0.0.1:18080/demo01/sent 地址,使用 RocketMQ Producer 发送一条消息,从而触发 RocketMQ Consumer 消费一条消息。因为,我们要追踪下该链路。
② 然后,继续使用浏览器,打开 http://127.0.0.1:8080/ 地址,进入 SkyWalking UI 界面。如下图所示: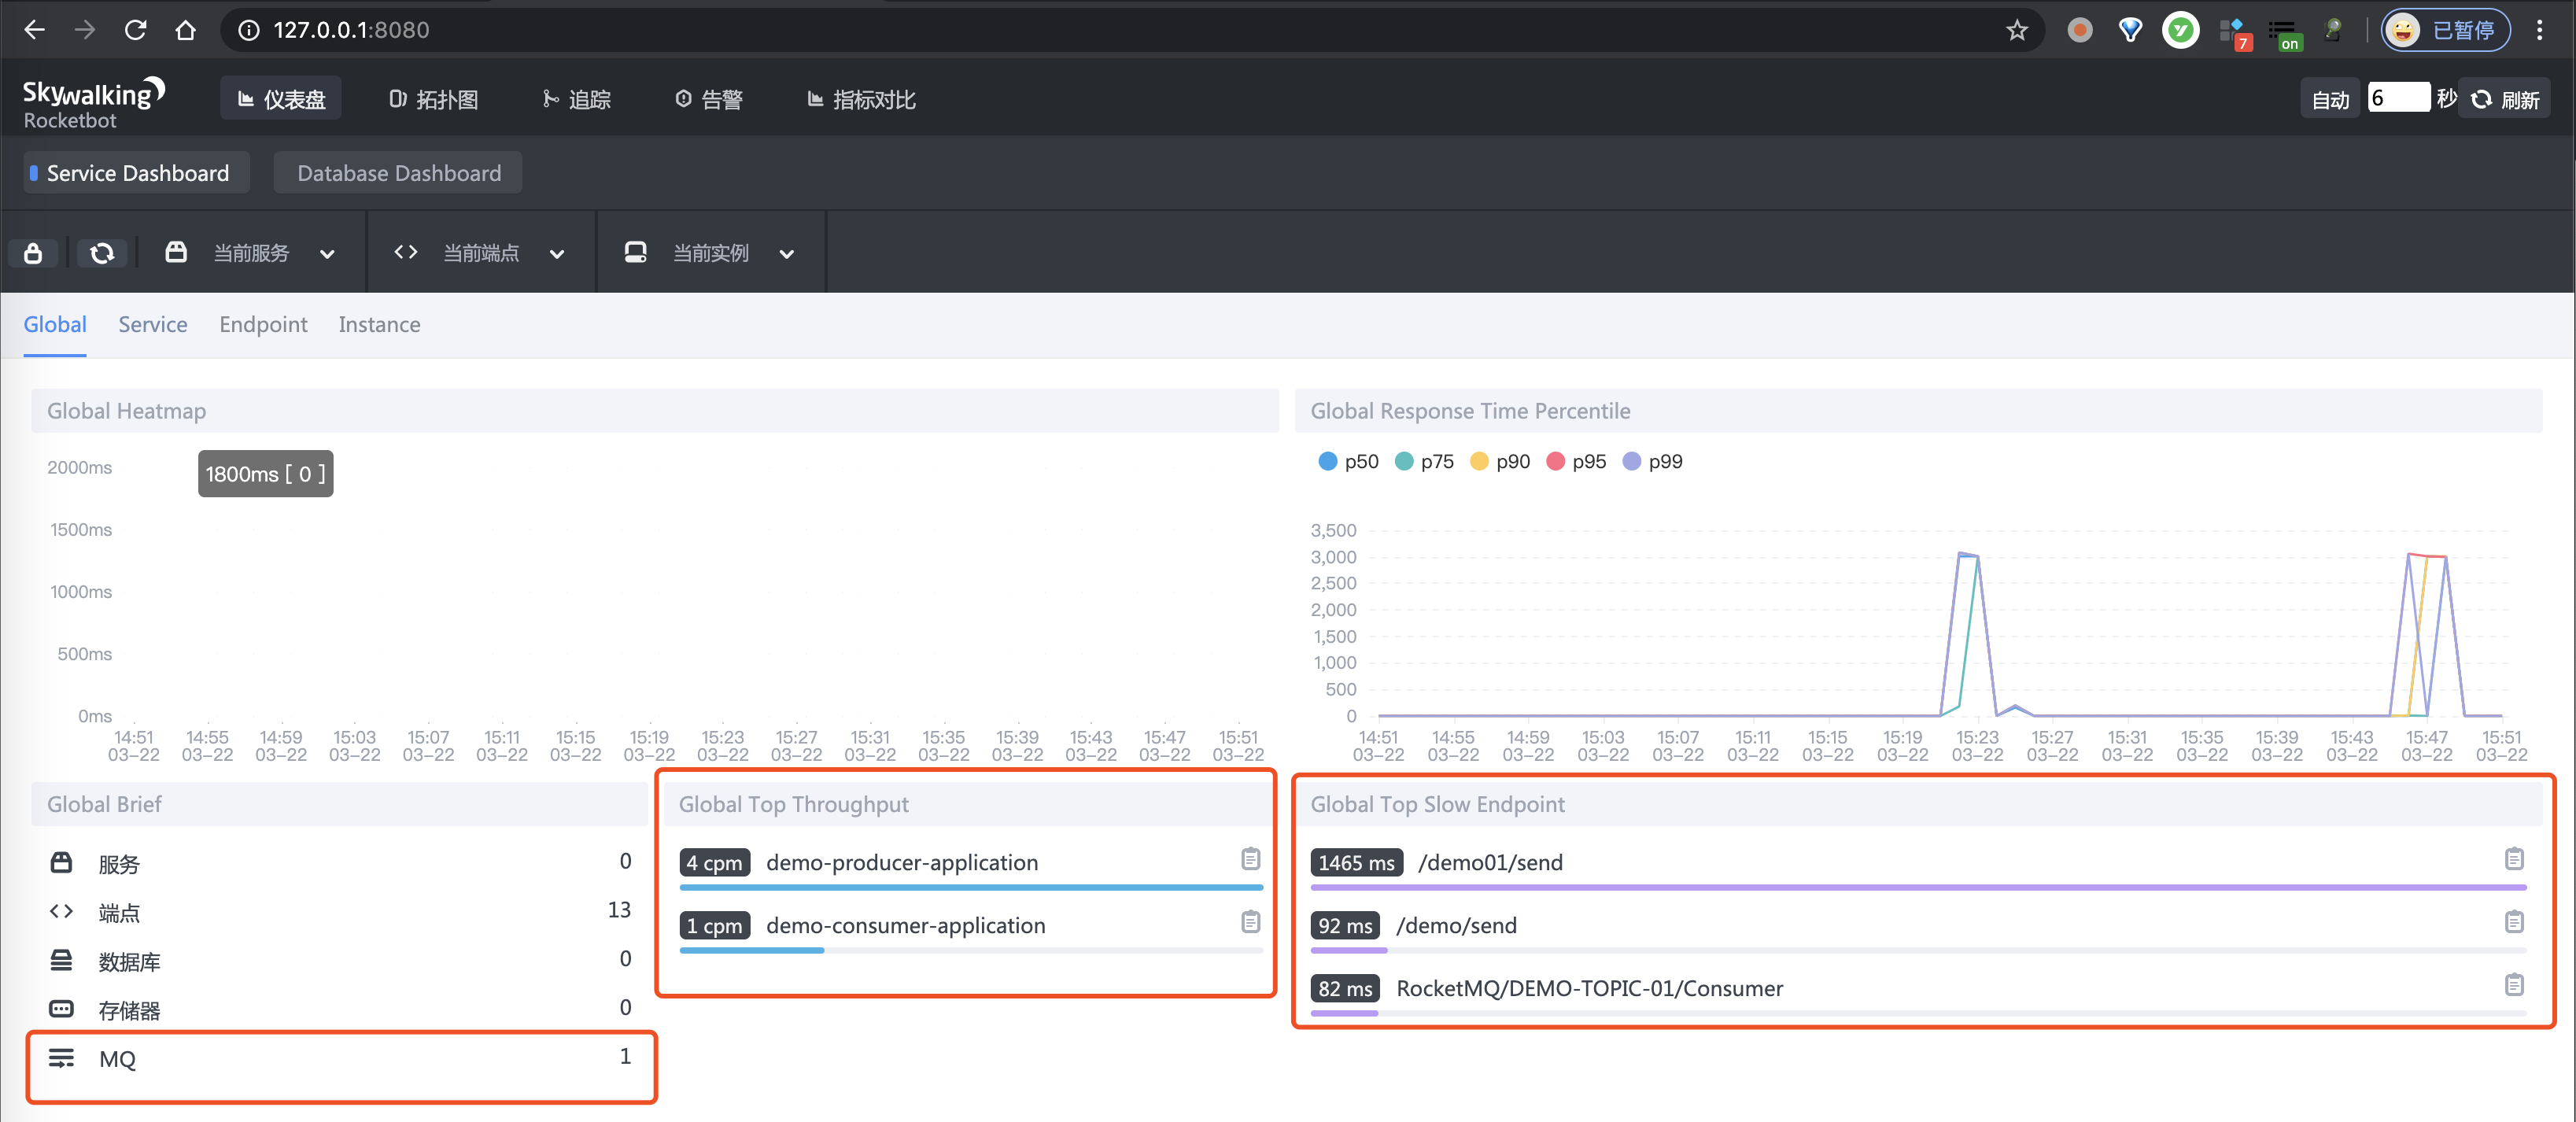
③ 之后,点击「拓扑图」菜单,进入查看拓扑图的界面,可以看到 RocketMQ Broker 的小方块,以及对应的生产者和消费者。如下图所示: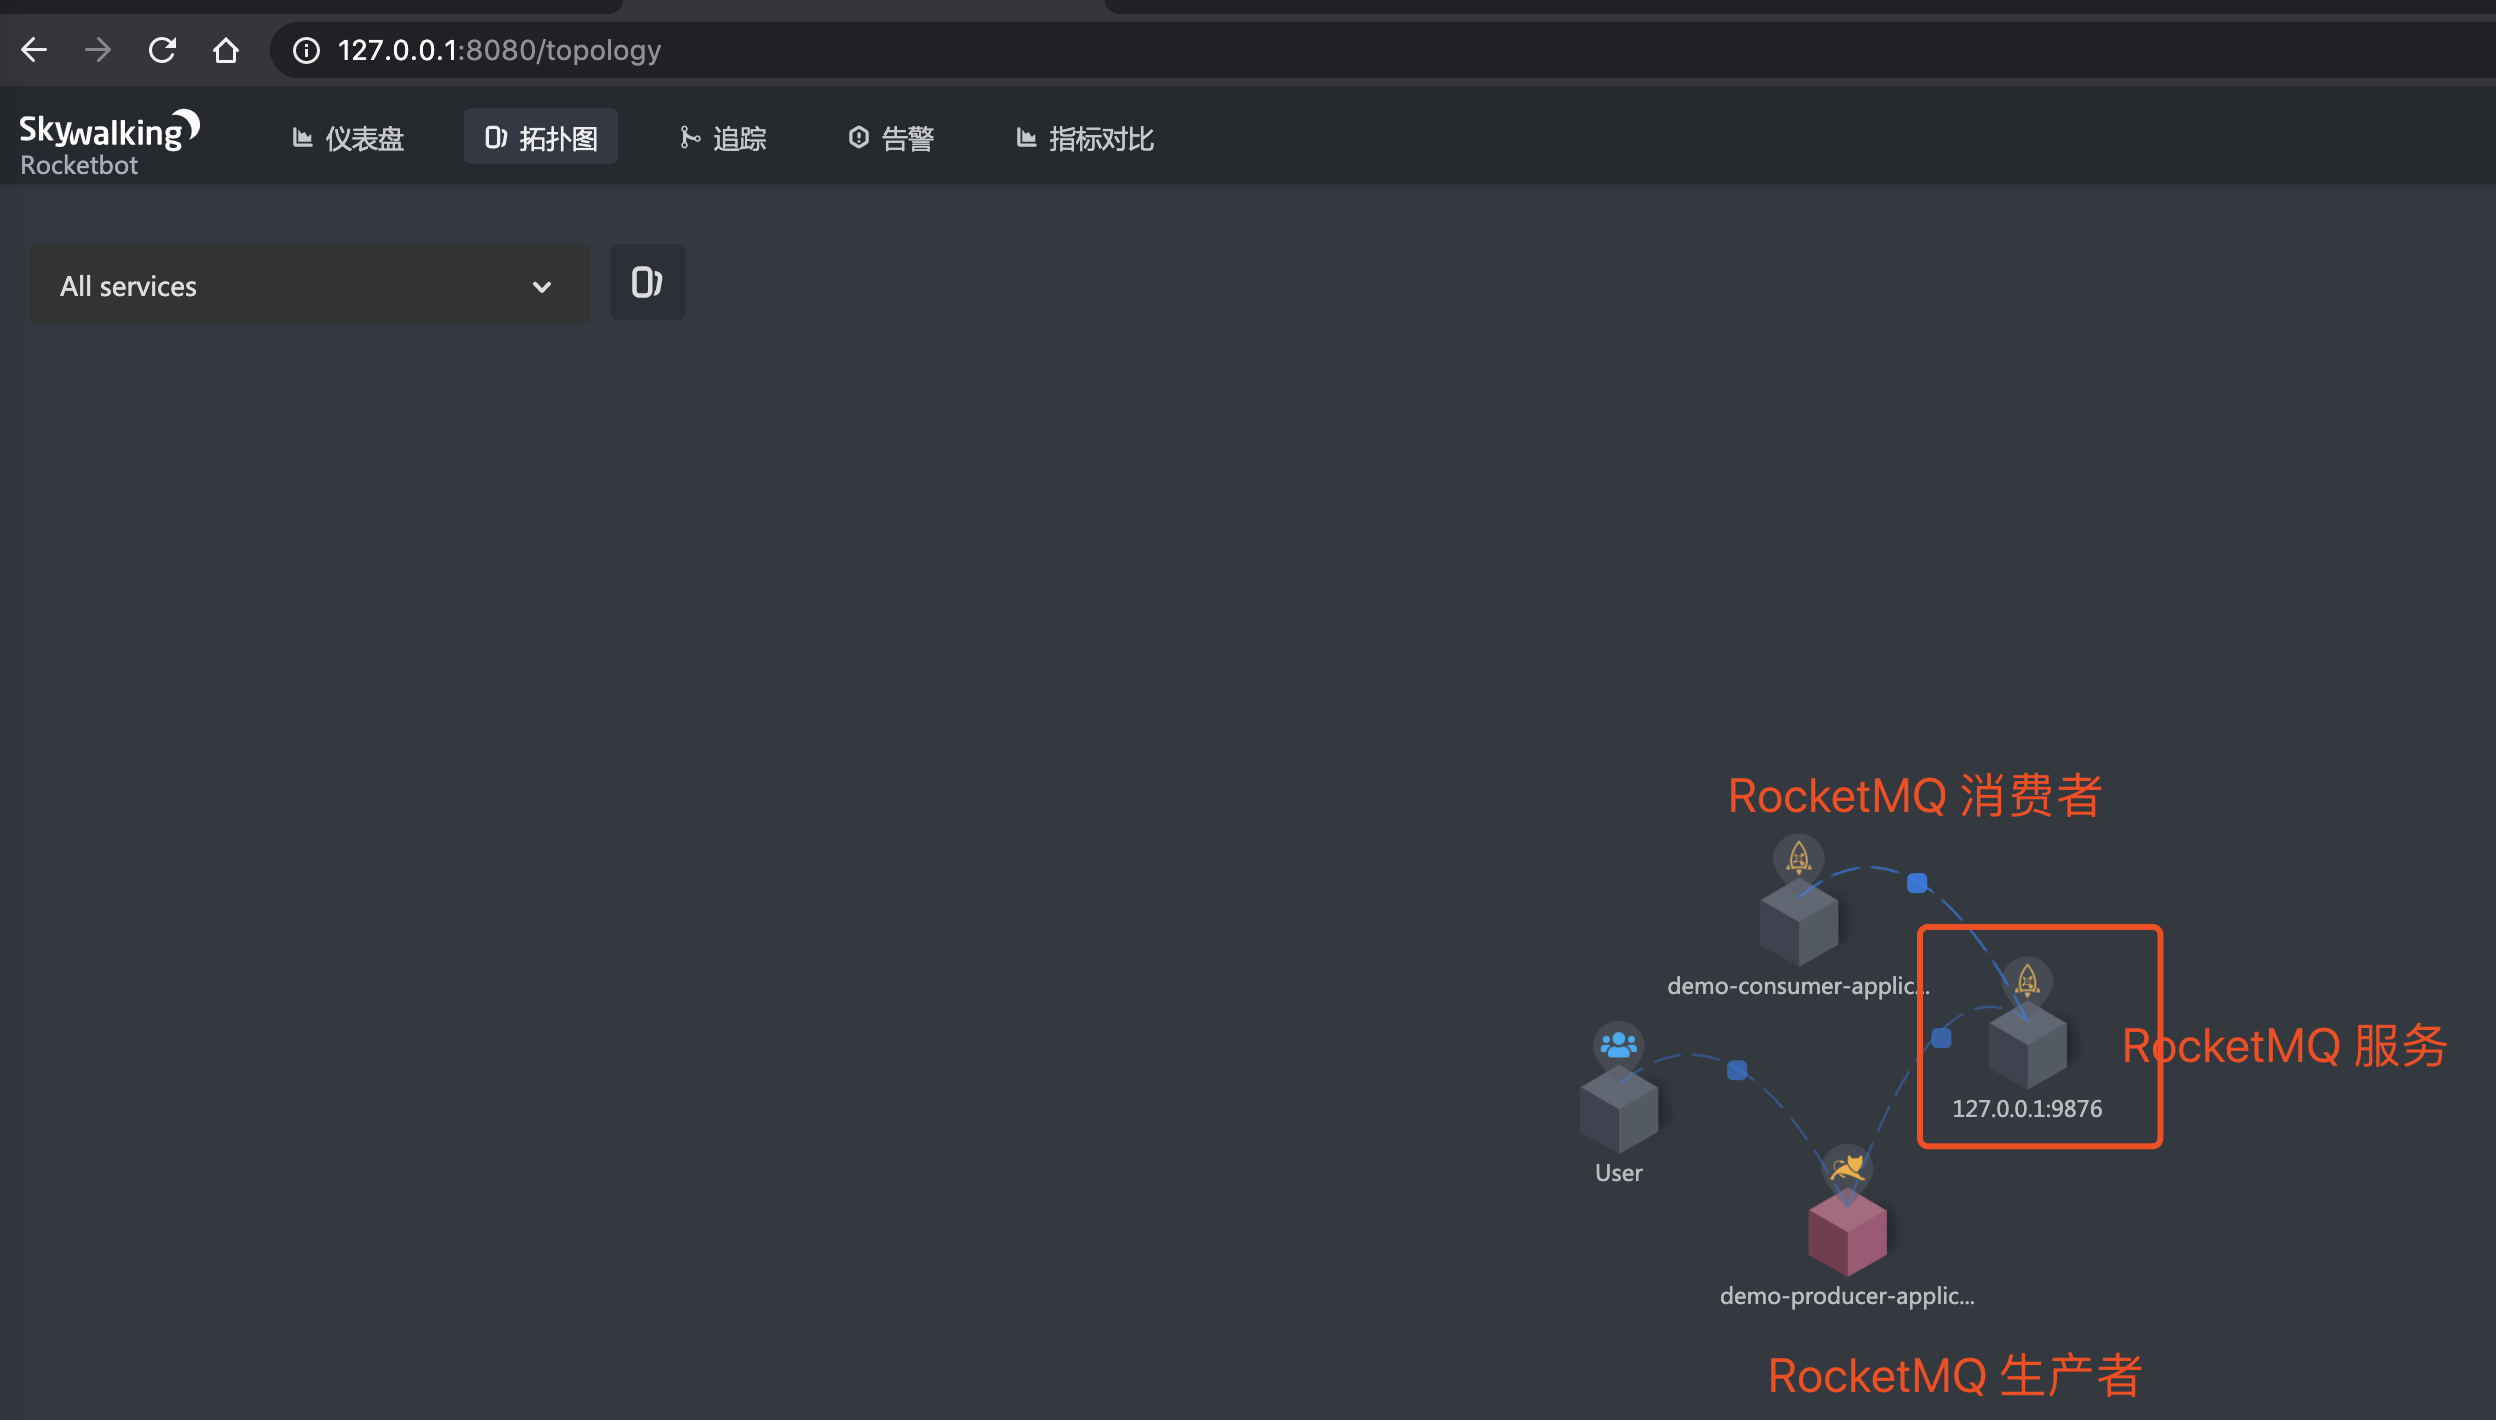
④ 再之后,点击「追踪」菜单,进入查看链路数据的界面。如下图所示:
13. RabbitMQ 示例
示例代码对应仓库:
本小节,我们来搭建一个 SkyWalking 对 RabbitMQ 消息的发送和消费的链路追踪。该链路通过如下插件实现收集:
我们来新建一个 labx-14-sc-skywalking-mq-rabbitmq 模块,会包括生产者和消费者两个子项目。最终如下图所示: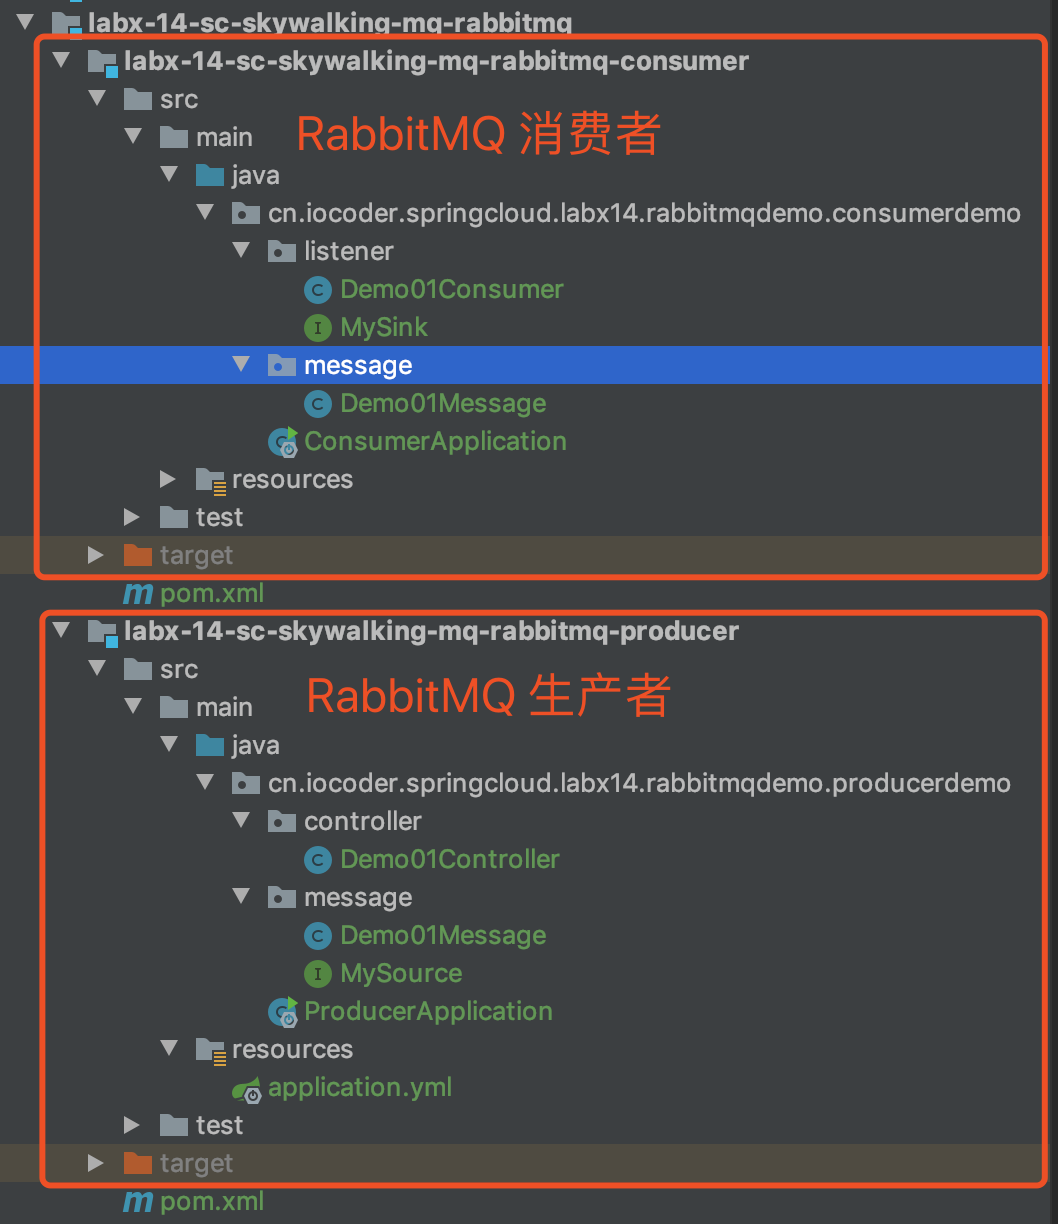
另外,我们将使用 Spring Cloud Stream RabbitMQ 进行 RabbitMQ 的操作。对 RabbitMQ 感兴趣的胖友,可以后续去看看《芋道 Spring Cloud 消息队列 RabbitMQ 入门》文章。
13.1 搭建生产者
创建 labx-14-sc-skywalking-mq-rabbitmq-producer 项目,作为生产者。
13.1.1 引入依赖
创建 pom.xml 文件中,引入相关依赖。
|
<?xml version="1.0" encoding="UTF-8"?>
<project xmlns="http://maven.apache.org/POM/4.0.0"
         xmlns:xsi="http://www.w3.org/2001/XMLSchema-instance"
         xsi:schemaLocation="http://maven.apache.org/POM/4.0.0 http://maven.apache.org/xsd/maven-4.0.0.xsd">
    <parent>
        <artifactId>labx-14-sc-skywalking-mq-rabbitmq</artifactId>
        <groupId>cn.iocoder.springboot.labs</groupId>
        <version>1.0-SNAPSHOT</version>
    </parent>
    <modelVersion>4.0.0</modelVersion>

    <artifactId>labx-14-sc-skywalking-mq-rabbitmq-producer</artifactId>

    <properties>
        <maven.compiler.target>1.8</maven.compiler.target>
        <maven.compiler.source>1.8</maven.compiler.source>
        <spring.boot.version>2.2.4.RELEASE</spring.boot.version>
        <spring.cloud.version>Hoxton.SR1</spring.cloud.version>
    </properties>

    <!--
        引入 Spring Boot、Spring Cloud、Spring Cloud Alibaba 三者 BOM 文件,进行依赖版本的管理,防止不兼容。
        在 https://dwz.cn/mcLIfNKt 文章中,Spring Cloud Alibaba 开发团队推荐了三者的依赖关系
     -->
    <dependencyManagement>
        <dependencies>
            <dependency>
                <groupId>org.springframework.boot</groupId>
                <artifactId>spring-boot-starter-parent</artifactId>
                <version>${spring.boot.version}</version>
                <type>pom</type>
                <scope>import</scope>
            </dependency>
            <dependency>
                <groupId>org.springframework.cloud</groupId>
                <artifactId>spring-cloud-dependencies</artifactId>
                <version>${spring.cloud.version}</version>
                <type>pom</type>
                <scope>import</scope>
            </dependency>
        </dependencies>
    </dependencyManagement>

    <dependencies>
        <!-- 引入 SpringMVC 相关依赖,并实现对其的自动配置 -->
        <dependency>
            <groupId>org.springframework.boot</groupId>
            <artifactId>spring-boot-starter-web</artifactId>
        </dependency>

        <!-- 引入 Spring Cloud Stream RabbitMQ 相关依赖,将 RabbitMQ 作为消息队列,并实现对其的自动配置 -->
        <dependency>
            <groupId>org.springframework.cloud</groupId>
            <artifactId>spring-cloud-starter-stream-rabbit</artifactId>
        </dependency>
    </dependencies>

</project>
| |
| -- |
13.1.2 配置文件
创建 application.yaml 配置文件,添加相关配置。
|
spring:
  application:
    name: demo-producer-application
  cloud:
    # Spring Cloud Stream 配置项,对应 BindingServiceProperties 类
    stream:
      # Binder 配置项,对应 BinderProperties Map
      binders:
        rabbit001:
          type: rabbit # 设置 Binder 的类型
          environment: # 设置 Binder 的环境配置
            # 如果是 RabbitMQ 类型的时候,则对应的是 RabbitProperties 类
            spring:
              rabbitmq:
                host: 127.0.0.1 # RabbitMQ 服务的地址
                port: 5672 # RabbitMQ 服务的端口
                username: guest # RabbitMQ 服务的账号
                password: guest # RabbitMQ 服务的密码
      # Binding 配置项,对应 BindingProperties Map
      bindings:
        demo01-output:
          destination: DEMO-TOPIC-01 # 目的地。这里使用 RabbitMQ Exchange
          content-type: application/json # 内容格式。这里使用 JSON
          binder: rabbit001 # 设置使用的 Binder 名字

server:
  port: 18080
| |
| -- |
13.1.3 MySource
创建 MySource 接口,声明名字为 Output Binding。代码如下:
|
public interface MySource {

    @Output("demo01-output")
    MessageChannel demo01Output();

}
| |
| -- |
13.1.4 Demo01Message
创建 Demo01Message 类,示例 Message 消息。代码如下:
|
public class Demo01Message {

    /**
     * 编号
     */
    private Integer id;

    // ... 省略 setter/getter/toString 方法

}
| |
| -- |
13.1.5 Demo01Controller
创建 Demo01Controller 类,提供发送消息的 HTTP 接口。代码如下:
|
@RestController
@RequestMapping("/demo01")
public class Demo01Controller {

    private Logger logger = LoggerFactory.getLogger(getClass());

    @Autowired
    private MySource mySource;

    @GetMapping("/send")
    public boolean send() {
        // 创建 Message
        Demo01Message message = new Demo01Message()
                .setId(new Random().nextInt());
        // 创建 Spring Message 对象
        Message<Demo01Message> springMessage = MessageBuilder.withPayload(message)
                .build();
        // 发送消息
        return mySource.demo01Output().send(springMessage);
    }

}
| |
| -- |
13.1.6 ProducerApplication
创建 ProducerApplication 类,启动生产者的应用。代码如下:
|
@SpringBootApplication
@EnableBinding(MySource.class)
public class ProducerApplication {

    public static void main(String[] args) {
        SpringApplication.run(ProducerApplication.class, args);
    }

}
| |
| -- |
13.1.7 IDEA 配置
通过 IDEA 的「Run/Debug Configurations」配置使用 SkyWalking Agent。如下图所示:Run/Debug Configurations
13.2 搭建消费者
创建 labx-14-sc-skywalking-mq-rabbitmq-consumer 项目,作为消费者。
13.2.1 引入依赖
创建 pom.xml 文件中,引入相关依赖。
友情提示:和「13.1 搭建生产者」基本一样,点击 链接 查看。
13.2.2 配置文件
创建 application.yaml 配置文件,添加相关配置。
|
spring:
  application:
    name: demo-consumer-application
  cloud:
    # Spring Cloud Stream 配置项,对应 BindingServiceProperties 类
    stream:
      # Binder 配置项,对应 BinderProperties Map
      binders:
        rabbit001:
          type: rabbit # 设置 Binder 的类型
          environment: # 设置 Binder 的环境配置
            # 如果是 RabbitMQ 类型的时候,则对应的是 RabbitProperties 类
            spring:
              rabbitmq:
                host: 127.0.0.1 # RabbitMQ 服务的地址
                port: 5672 # RabbitMQ 服务的端口
                username: guest # RabbitMQ 服务的账号
                password: guest # RabbitMQ 服务的密码
      # Binding 配置项,对应 BindingProperties Map
      bindings:
        demo01-input:
          destination: DEMO-TOPIC-01 # 目的地。这里使用 RabbitMQ Exchange
          content-type: application/json # 内容格式。这里使用 JSON
          group: demo01-consumer-group-DEMO-TOPIC-01 # 消费者分组
          binder: rabbit001  # 设置使用的 Binder 名字

server:
  port: ${random.int[10000,19999]} # 随机端口,方便启动多个消费者
| |
| -- |
13.2.3 MySink
创建 MySink 接口,声明名字为 Input Binding。代码如下:
|
public interface MySink {

    String DEMO01_INPUT = "demo01-input";

    @Input(DEMO01_INPUT)
    SubscribableChannel demo01Input();

}
| |
| -- |
13.2.4 Demo01Message
创建 Demo01Message 类,示例 Message 消息。
友情提示:和「13.1.4 Demo01Message」基本一样,点击 链接 查看。
13.2.5 Demo01Consumer
创建 Demo01Consumer 类,消费消息。代码如下:
|
@Component
public class Demo01Consumer {

    private Logger logger = LoggerFactory.getLogger(getClass());

    @StreamListener(MySink.DEMO01_INPUT)
    public void onMessage(@Payload Demo01Message message) {
        logger.info("[onMessage][线程编号:{} 消息内容:{}]", Thread.currentThread().getId(), message);
    }

}
| |
| -- |
13.2.6 ConsumerApplication
创建 ConsumerApplication 类,启动应用。代码如下:
|
@SpringBootApplication
@EnableBinding(MySink.class)
public class ConsumerApplication {

    public static void main(String[] args) {
        SpringApplication.run(ConsumerApplication.class, args);
    }

}
| |
| -- |
13.2.7 IDEA 配置
通过 IDEA 的「Run/Debug Configurations」配置使用 SkyWalking Agent。如下图所示:
13.3 简单测试
使用 ProducerApplication 启动生产者,使用 ConsumerApplication 启动消费者。
① 首先,使用浏览器,访问 http://127.0.0.1:18080/demo01/sent 地址,使用 RabbitMQ Producer 发送一条消息,从而触发 RabbitMQ Consumer 消费一条消息。因为,我们要追踪下该链路。
② 然后,继续使用浏览器,打开 http://127.0.0.1:8080/ 地址,进入 SkyWalking UI 界面。如下图所示: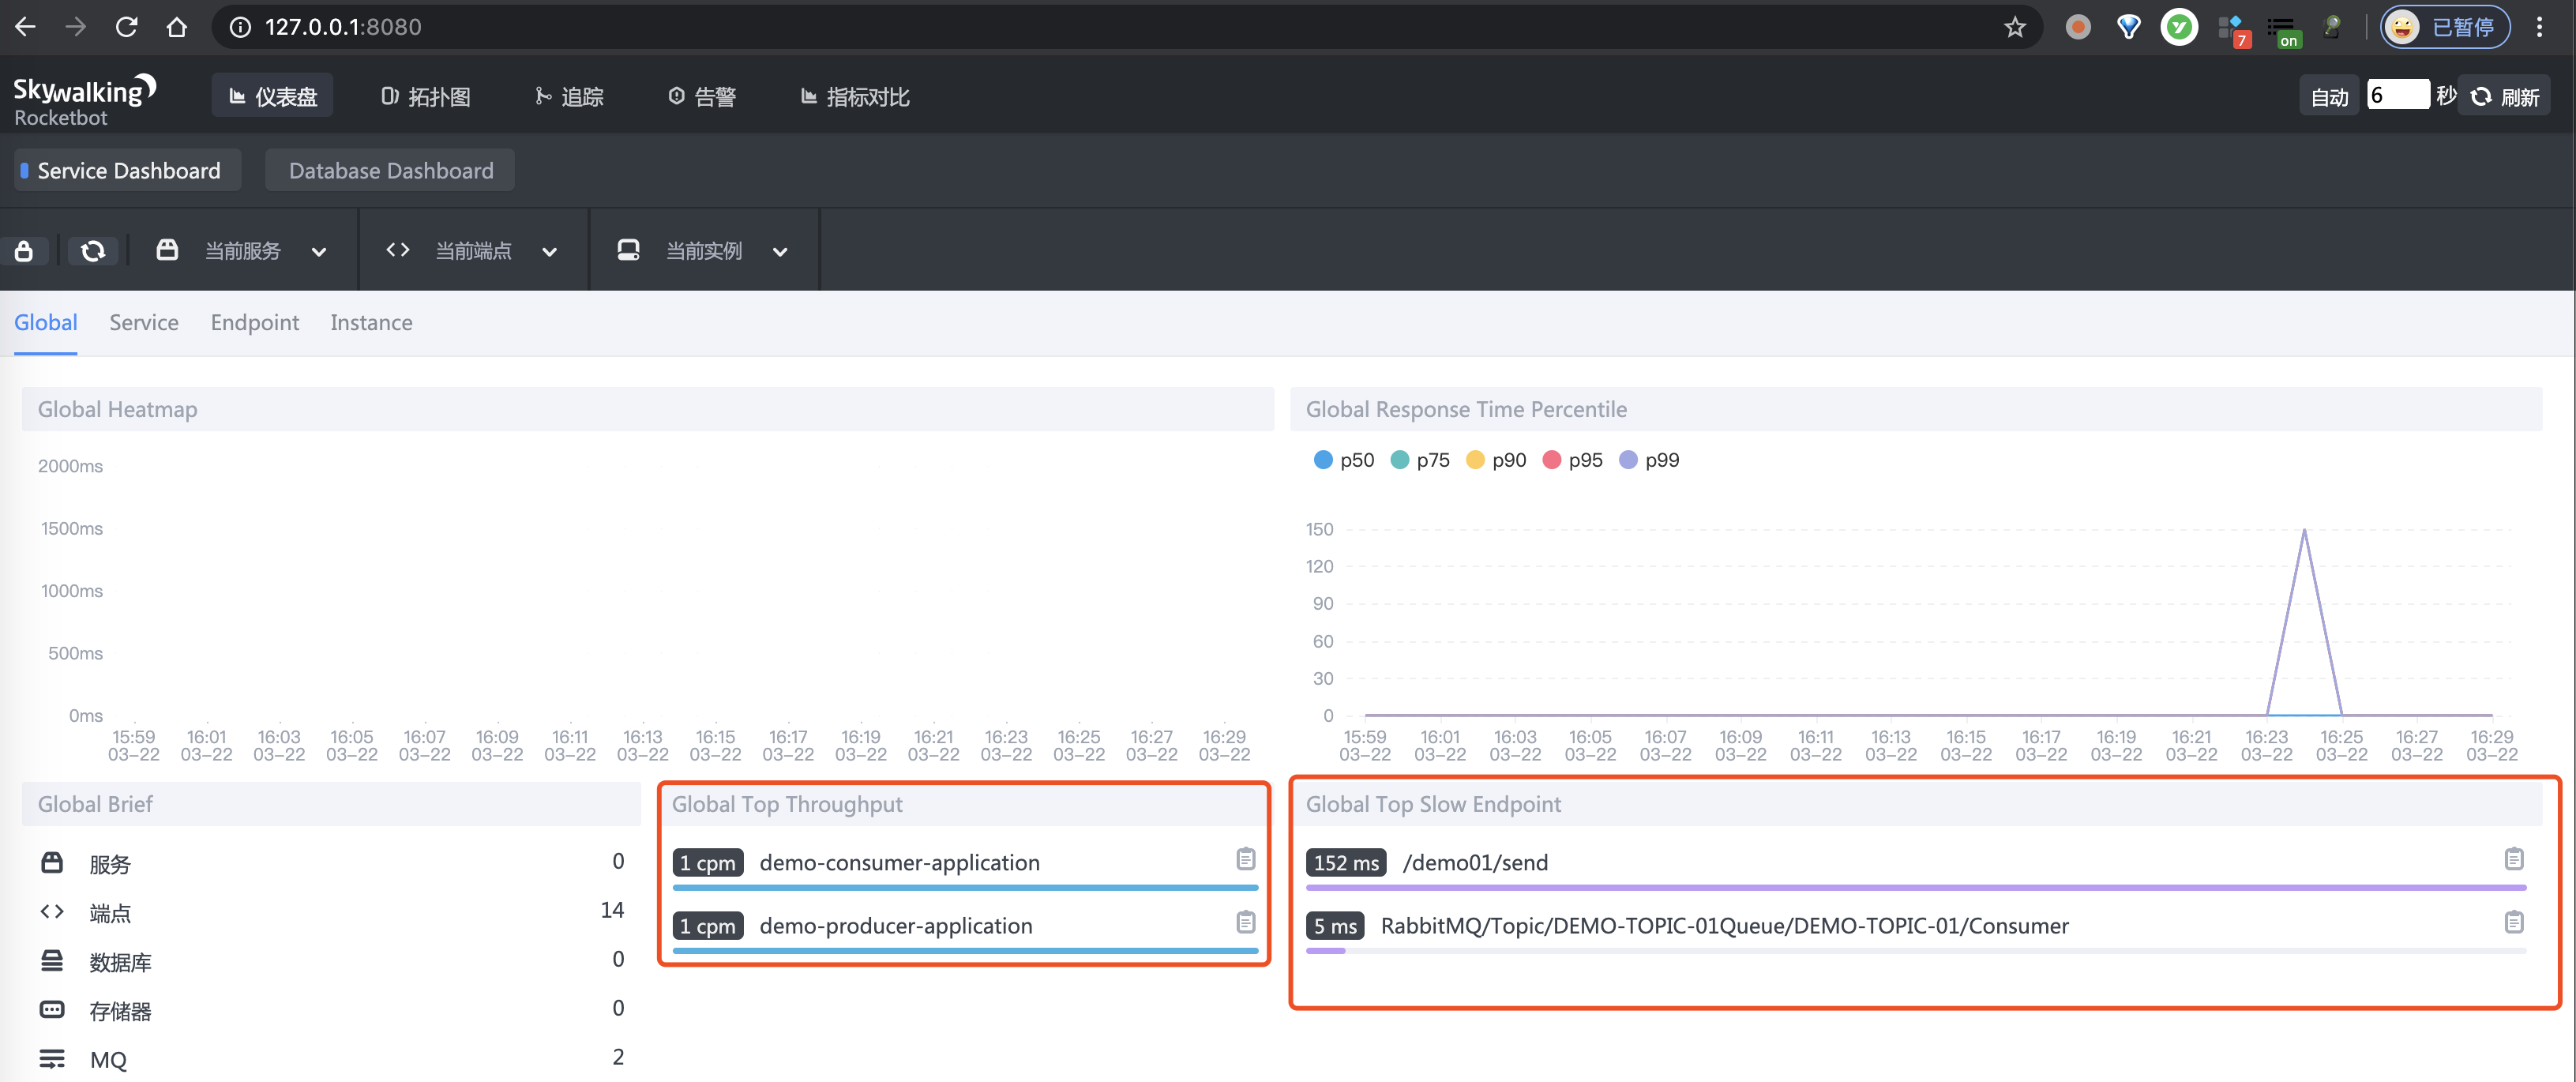
③ 之后,点击「拓扑图」菜单,进入查看拓扑图的界面,可以看到 RabbitMQ Broker 的小方块,以及对应的生产者和消费者。如下图所示: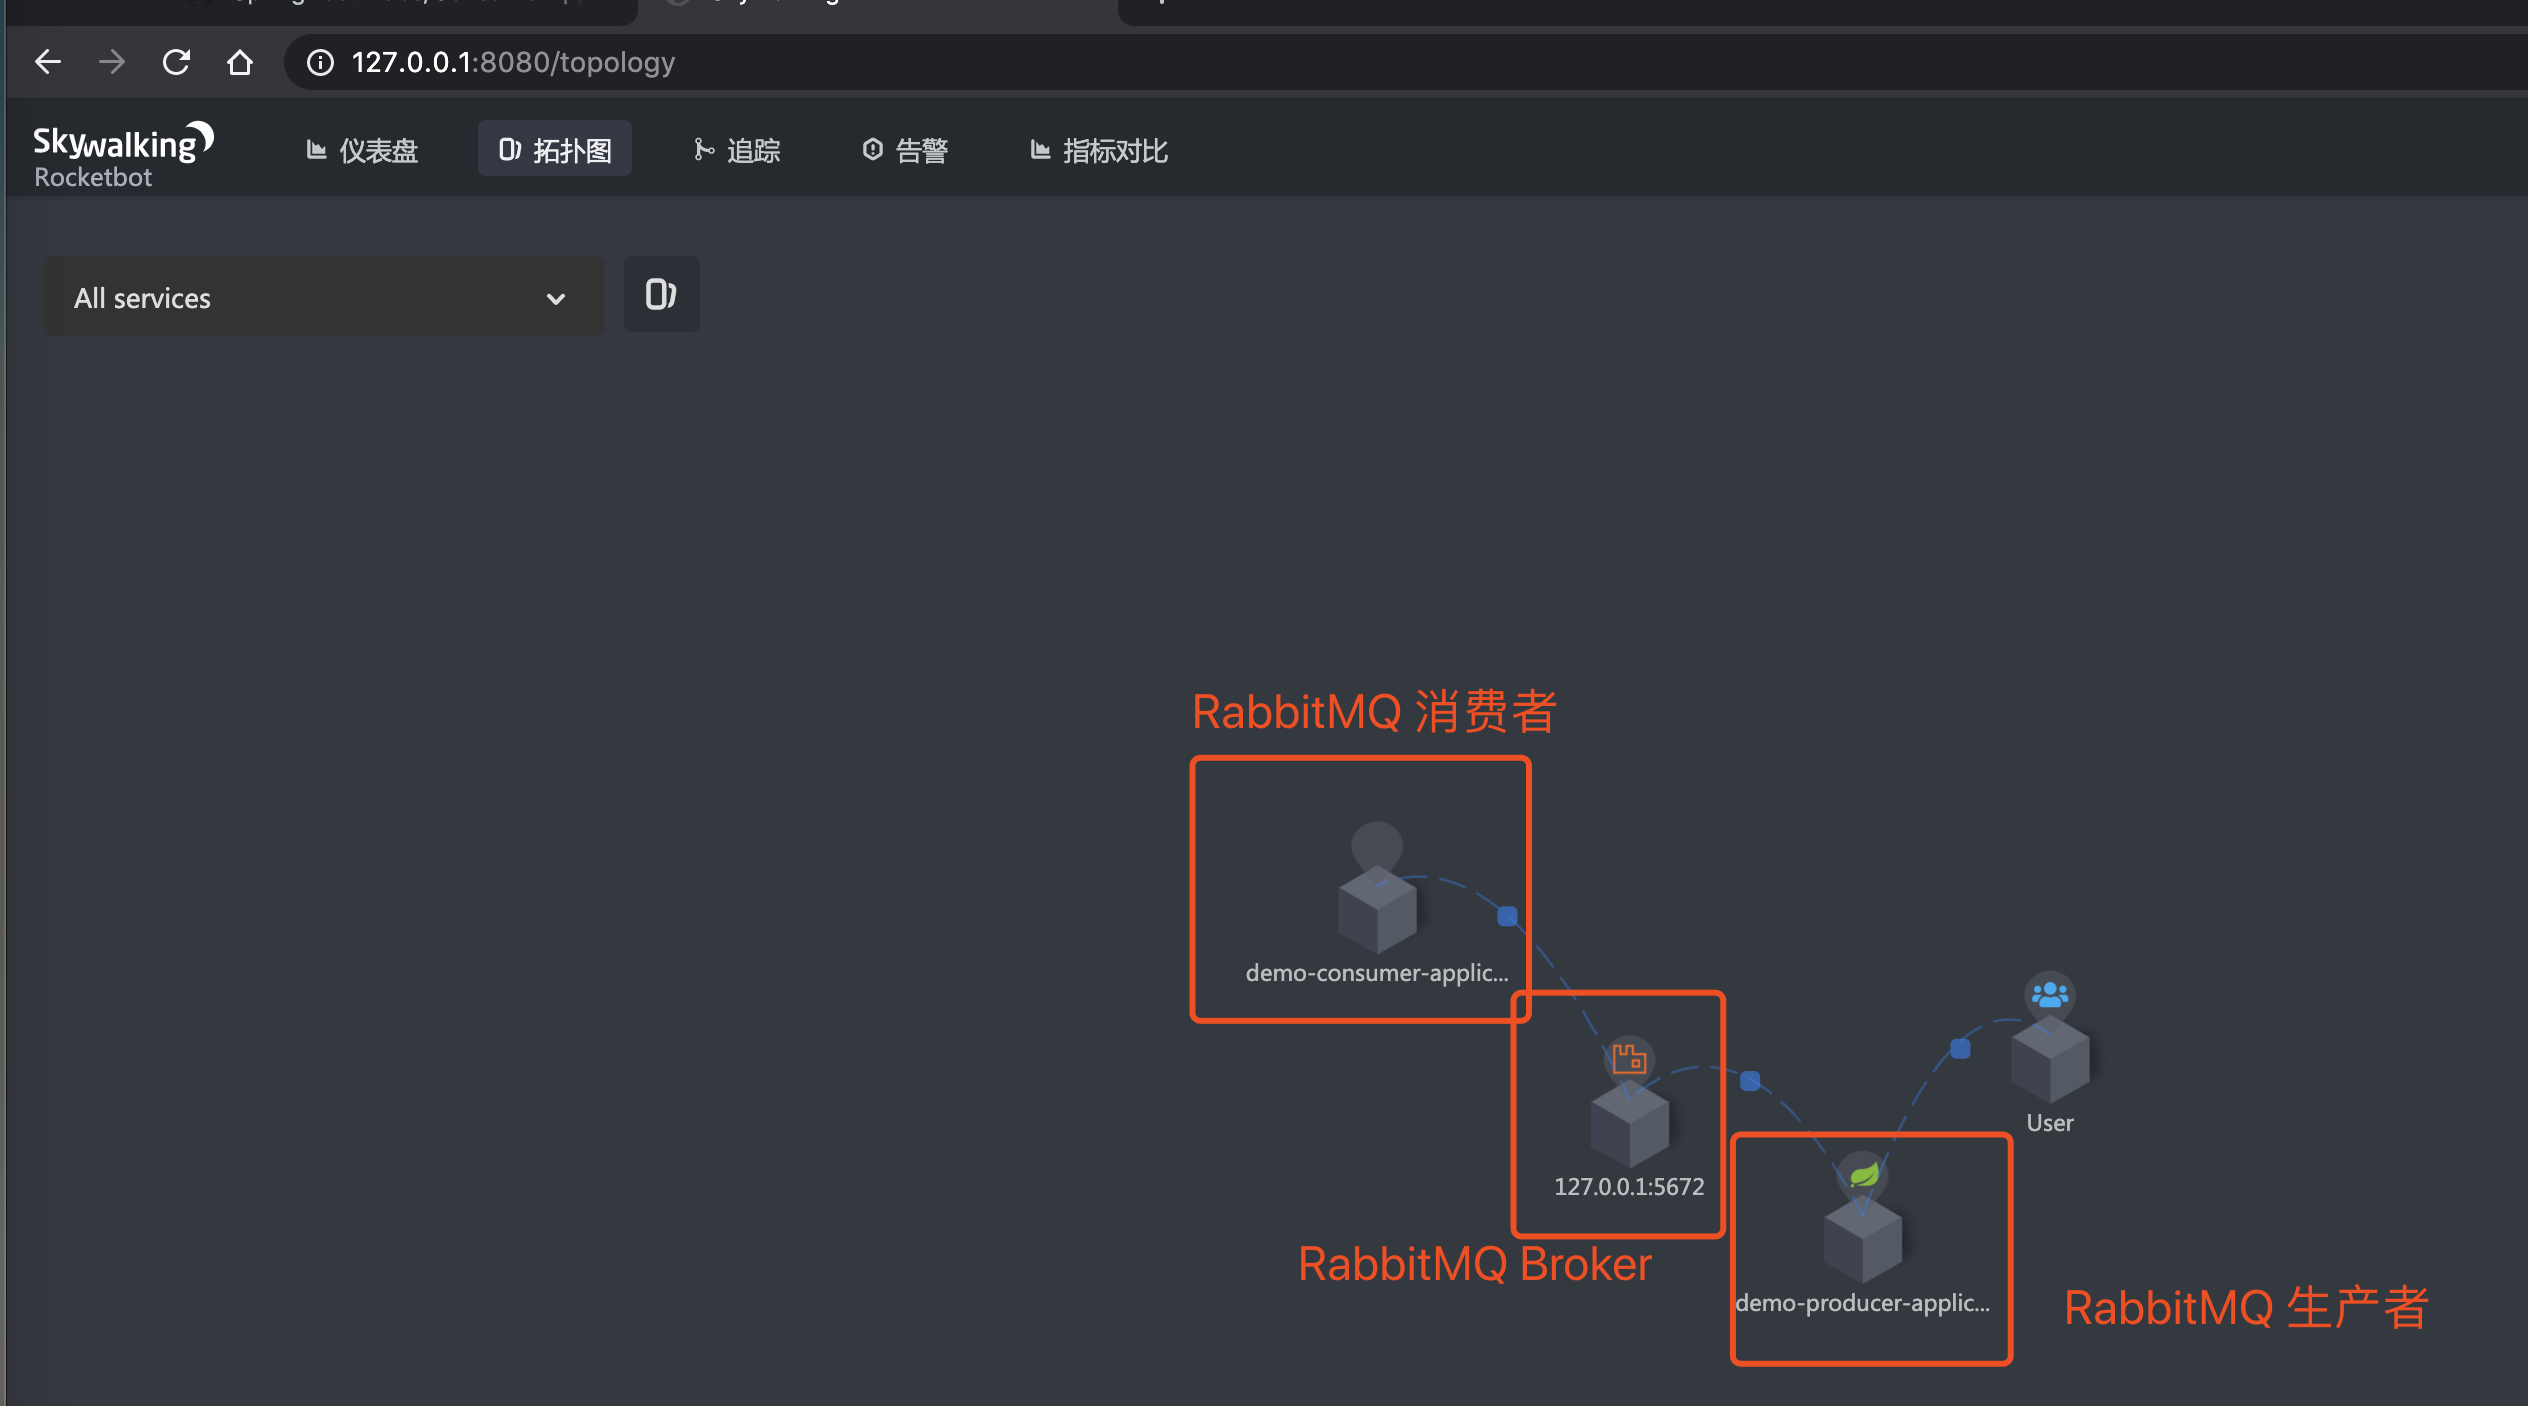
④ 再之后,点击「追踪」菜单,进入查看链路数据的界面。如下图所示: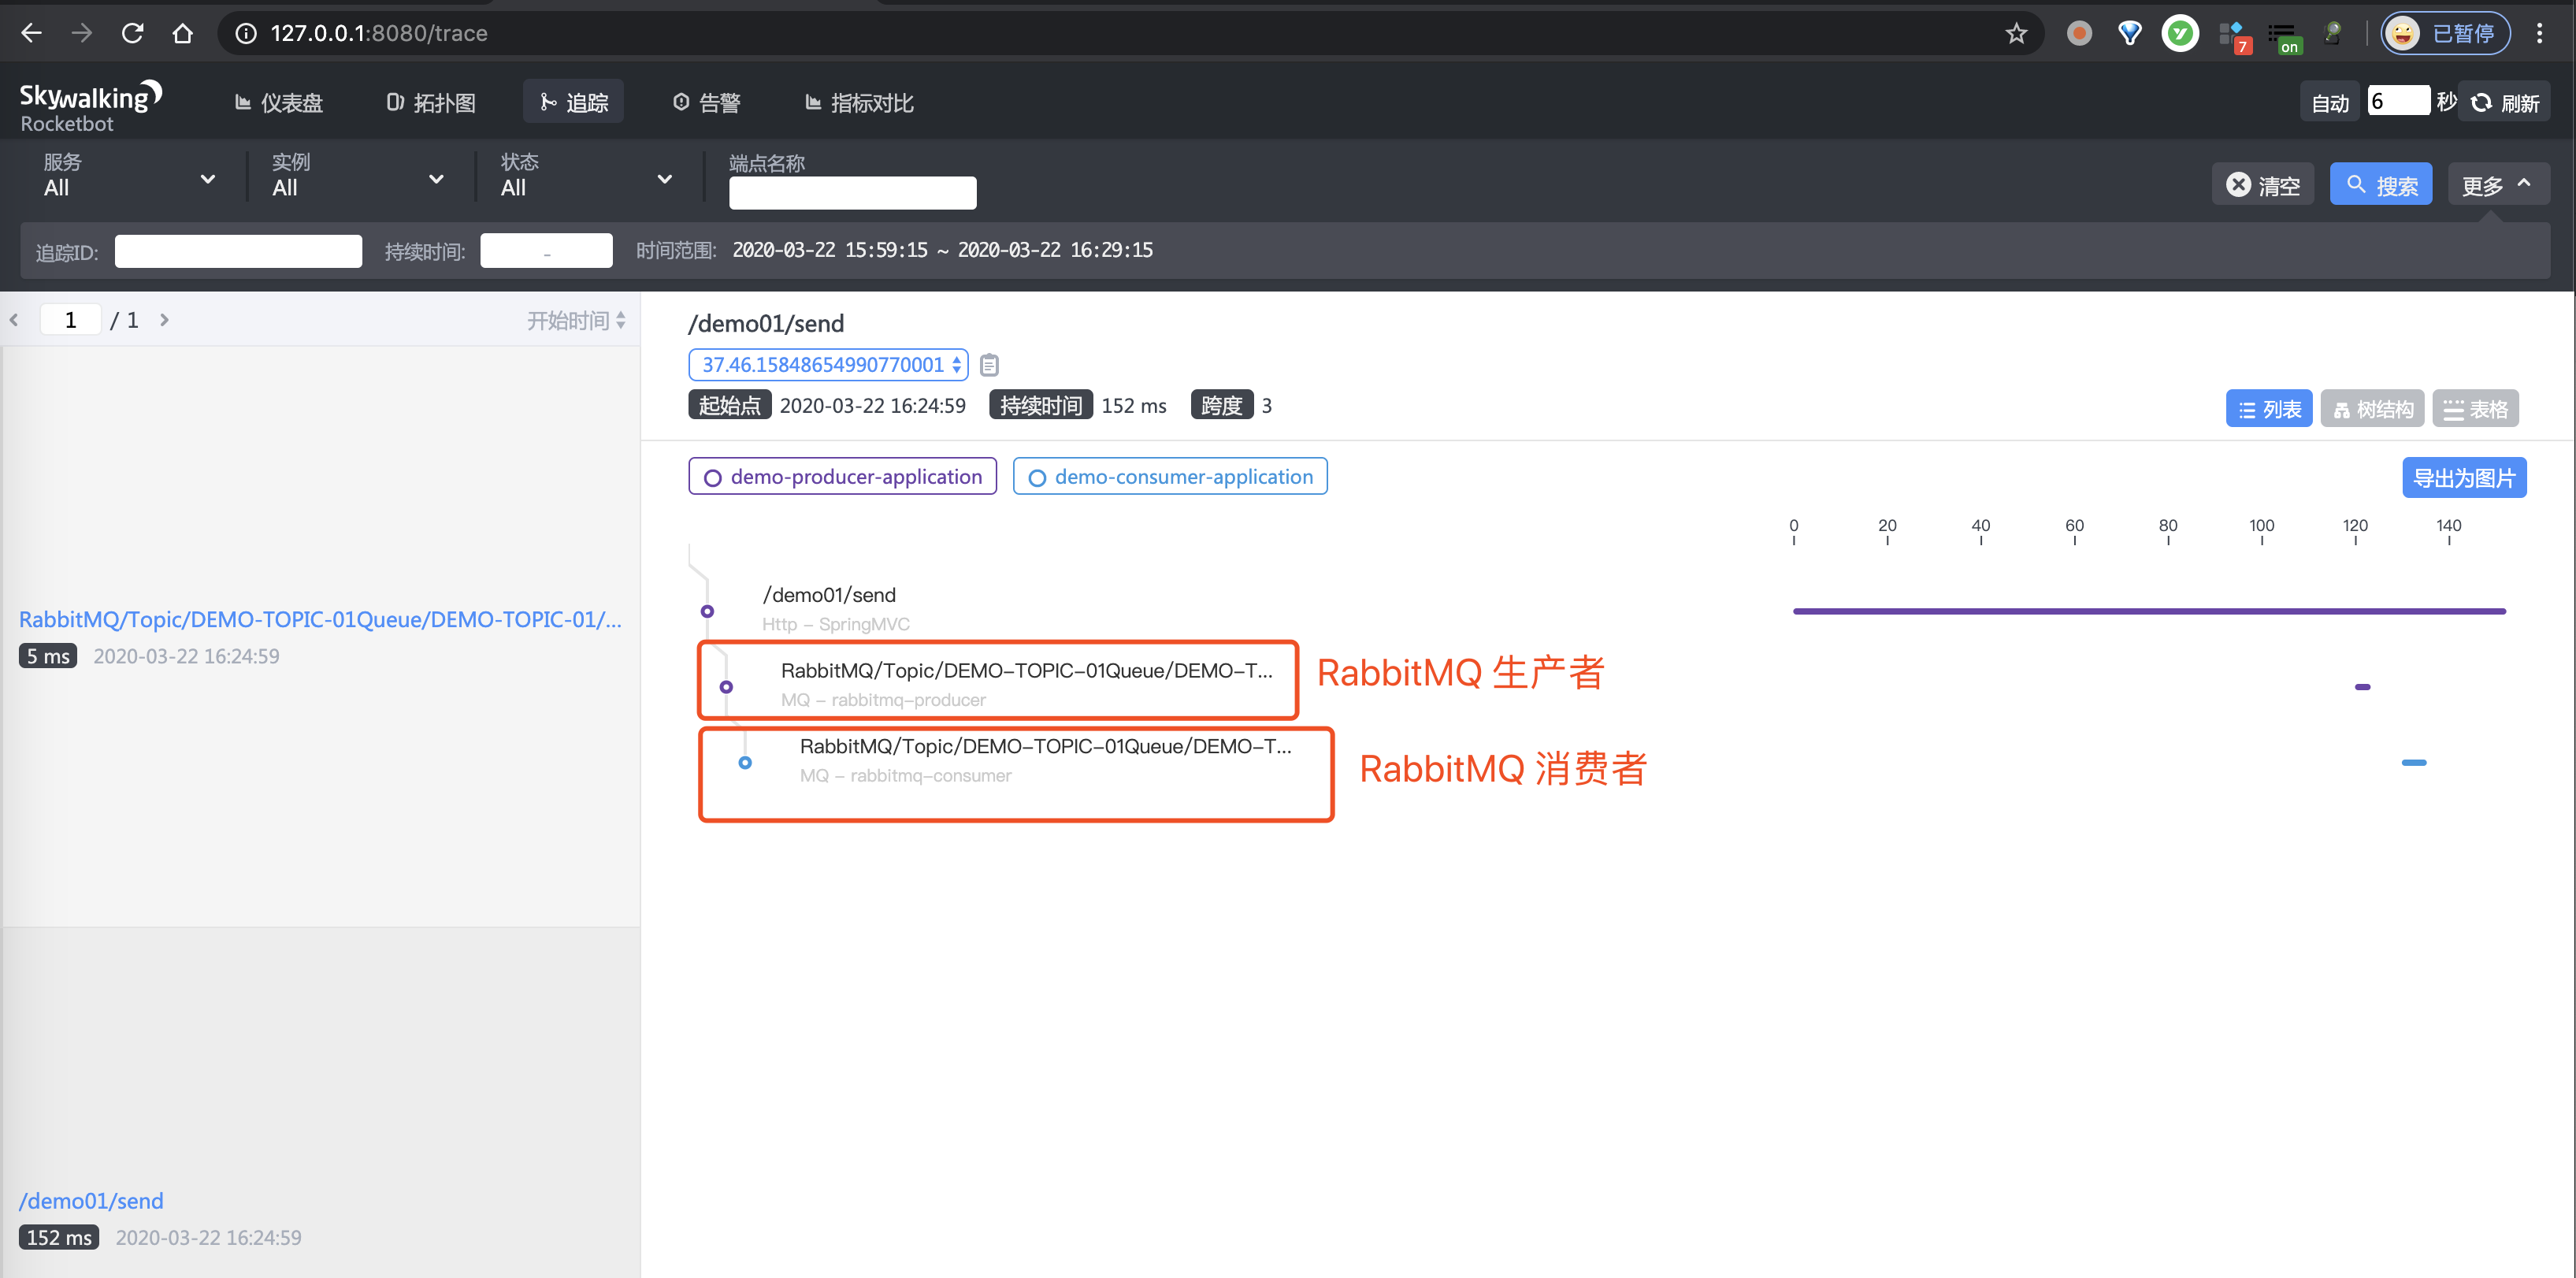
14. Kafka 示例
示例代码对应仓库:
本小节,我们来搭建一个 SkyWalking 对 Kafka 消息的发送和消费的链路追踪。该链路通过如下插件实现收集:
我们来新建一个 labx-14-sc-skywalking-mq-Kafka 模块,会包括生产者和消费者两个子项目。最终如下图所示: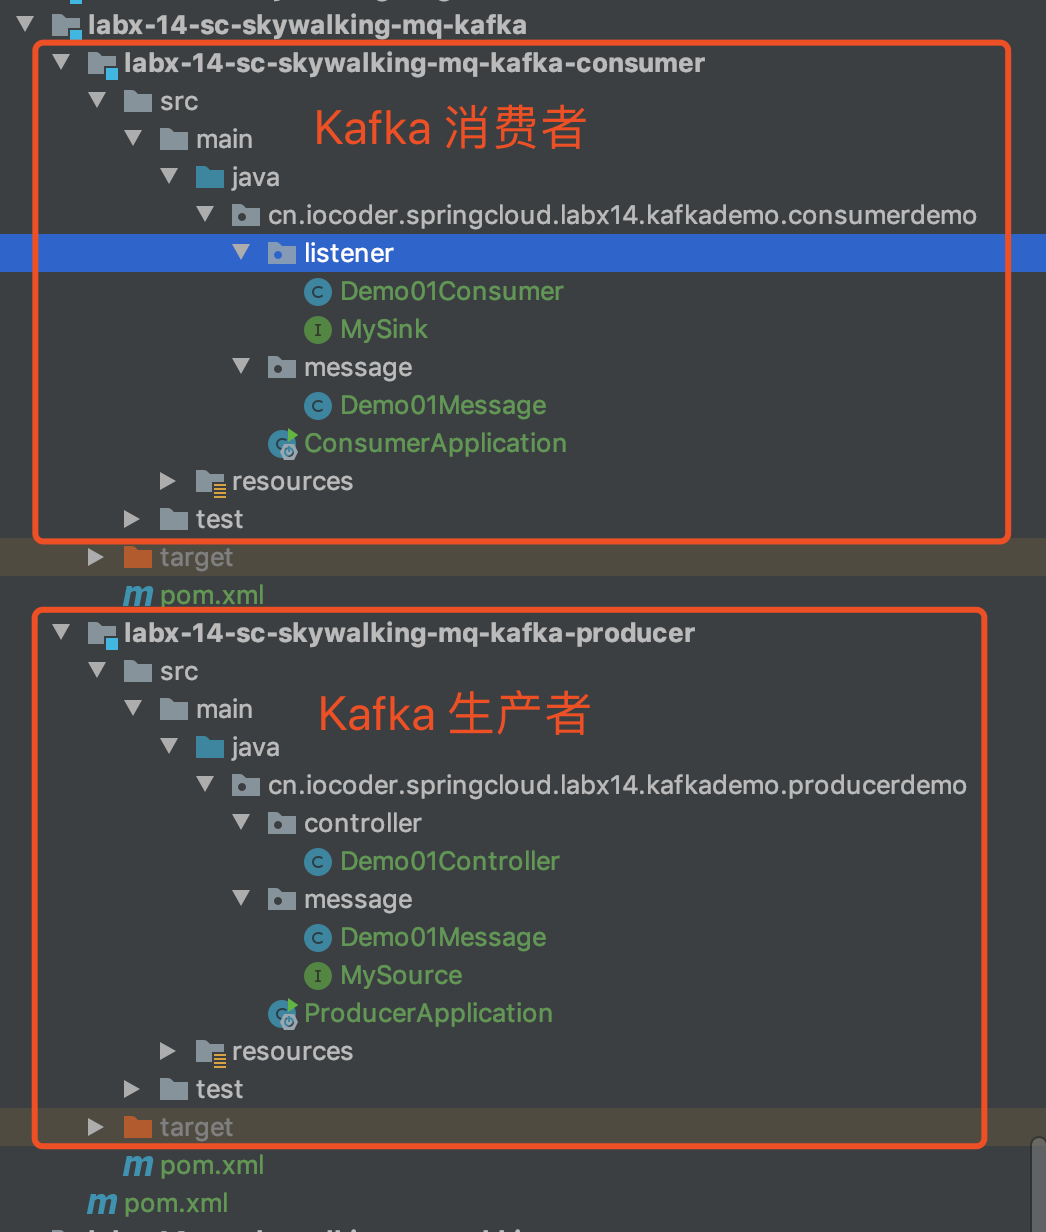
另外,我们将使用 Spring Cloud Stream Kafka 进行 Kafka 的操作。对 Kafka 感兴趣的胖友,可以后续去看看《芋道 Spring Cloud 消息队列 Kafka 入门》文章。
14.1 搭建生产者
创建 labx-14-sc-skywalking-mq-kafka-producer 项目,作为生产者。
14.1.1 引入依赖
创建 pom.xml 文件中,引入相关依赖。
|
<?xml version="1.0" encoding="UTF-8"?>
<project xmlns="http://maven.apache.org/POM/4.0.0"
         xmlns:xsi="http://www.w3.org/2001/XMLSchema-instance"
         xsi:schemaLocation="http://maven.apache.org/POM/4.0.0 http://maven.apache.org/xsd/maven-4.0.0.xsd">
    <parent>
        <artifactId>labx-14-sc-skywalking-mq-kafka</artifactId>
        <groupId>cn.iocoder.springboot.labs</groupId>
        <version>1.0-SNAPSHOT</version>
    </parent>
    <modelVersion>4.0.0</modelVersion>

    <artifactId>labx-14-sc-skywalking-mq-kafka-producer</artifactId>

    <properties>
        <maven.compiler.target>1.8</maven.compiler.target>
        <maven.compiler.source>1.8</maven.compiler.source>
        <spring.boot.version>2.2.4.RELEASE</spring.boot.version>
        <spring.cloud.version>Hoxton.SR1</spring.cloud.version>
    </properties>

    <!--
        引入 Spring Boot、Spring Cloud、Spring Cloud Alibaba 三者 BOM 文件,进行依赖版本的管理,防止不兼容。
        在 https://dwz.cn/mcLIfNKt 文章中,Spring Cloud Alibaba 开发团队推荐了三者的依赖关系
     -->
    <dependencyManagement>
        <dependencies>
            <dependency>
                <groupId>org.springframework.boot</groupId>
                <artifactId>spring-boot-starter-parent</artifactId>
                <version>${spring.boot.version}</version>
                <type>pom</type>
                <scope>import</scope>
            </dependency>
            <dependency>
                <groupId>org.springframework.cloud</groupId>
                <artifactId>spring-cloud-dependencies</artifactId>
                <version>${spring.cloud.version}</version>
                <type>pom</type>
                <scope>import</scope>
            </dependency>
        </dependencies>
    </dependencyManagement>

    <dependencies>
        <!-- 引入 SpringMVC 相关依赖,并实现对其的自动配置 -->
        <dependency>
            <groupId>org.springframework.boot</groupId>
            <artifactId>spring-boot-starter-web</artifactId>
        </dependency>

        <!-- 引入 Spring Cloud Stream Kafka 相关依赖,将 Kafka 作为消息队列,并实现对其的自动配置 -->
        <dependency>
            <groupId>org.springframework.cloud</groupId>
            <artifactId>spring-cloud-starter-stream-kafka</artifactId>
        </dependency>
    </dependencies>

</project>
| |
| -- |
14.1.2 配置文件
创建 application.yaml 配置文件,添加相关配置。
|
spring:
  application:
    name: demo-producer-application
  cloud:
    # Spring Cloud Stream 配置项,对应 BindingServiceProperties 类
    stream:
      # Binder 配置项,对应 BinderProperties Map
      #      binders:
      # Binding 配置项,对应 BindingProperties Map
      bindings:
        demo01-output:
          destination: DEMO-TOPIC-01 # 目的地。这里使用 Kafka Topic
          content-type: application/json # 内容格式。这里使用 JSON
      # Spring Cloud Stream Kafka 配置项
      kafka:
        # Kafka Binder 配置项,对应 KafkaBinderConfigurationProperties 类
        binder:
          brokers: 127.0.0.1:9092 # 指定 Kafka Broker 地址,可以设置多个,以逗号分隔
        # Kafka 自定义 Binding 配置项,对应 KafkaBindingProperties Map
        bindings:
          demo01-output:
            # Kafka Producer 配置项,对应 KafkaProducerProperties 类
            producer:
              sync: true # 是否同步发送消息,默认为 false 异步。

server:
  port: 18080
| |
| -- |
14.1.3 MySource
创建 MySource 接口,声明名字为 Output Binding。代码如下:
|
public interface MySource {

    @Output("demo01-output")
    MessageChannel demo01Output();

}
| |
| -- |
14.1.4 Demo01Message
创建 Demo01Message 类,示例 Message 消息。代码如下:
|
public class Demo01Message {

    /**
     * 编号
     */
    private Integer id;

    // ... 省略 setter/getter/toString 方法

}
| |
| -- |
14.1.5 Demo01Controller
创建 Demo01Controller 类,提供发送消息的 HTTP 接口。代码如下:
|
@RestController
@RequestMapping("/demo01")
public class Demo01Controller {

    private Logger logger = LoggerFactory.getLogger(getClass());

    @Autowired
    private MySource mySource;

    @GetMapping("/send")
    public boolean send() {
        // 创建 Message
        Demo01Message message = new Demo01Message()
                .setId(new Random().nextInt());
        // 创建 Spring Message 对象
        Message<Demo01Message> springMessage = MessageBuilder.withPayload(message)
                .build();
        // 发送消息
        return mySource.demo01Output().send(springMessage);
    }

}
| |
| -- |
14.1.6 ProducerApplication
创建 ProducerApplication 类,启动生产者的应用。代码如下:
|
@SpringBootApplication
@EnableBinding(MySource.class)
public class ProducerApplication {

    public static void main(String[] args) {
        SpringApplication.run(ProducerApplication.class, args);
    }

}
| |
| -- |
14.1.7 IDEA 配置
通过 IDEA 的「Run/Debug Configurations」配置使用 SkyWalking Agent。如下图所示:
14.2 搭建消费者
创建 labx-14-sc-skywalking-mq-kafka-consumer 项目,作为消费者。
14.2.1 引入依赖
创建 pom.xml 文件中,引入相关依赖。
友情提示:和「14.1 搭建生产者」基本一样,点击 链接 查看。
14.2.2 配置文件
创建 application.yaml 配置文件,添加相关配置。
|
spring:
  application:
    name: demo-consumer-application
  cloud:
    # Spring Cloud Stream 配置项,对应 BindingServiceProperties 类
    stream:
      # Binder 配置项,对应 BinderProperties Map
      #      binders:
      # Binding 配置项,对应 BindingProperties Map
      bindings:
        demo01-input:
          destination: DEMO-TOPIC-01 # 目的地。这里使用 Kafka Topic
          content-type: application/json # 内容格式。这里使用 JSON
          group: demo01-consumer-group # 消费者分组
      # Spring Cloud Stream Kafka 配置项
      kafka:
        # Kafka Binder 配置项,对应 KafkaBinderConfigurationProperties 类
        binder:
          brokers: 127.0.0.1:9092 # 指定 Kafka Broker 地址,可以设置多个,以逗号分隔

server:
  port: ${random.int[10000,19999]} # 随机端口,方便启动多个消费者
| |
| -- |
14.2.3 MySink
创建 MySink 接口,声明名字为 Input Binding。代码如下:
|
public interface MySink {

    String DEMO01_INPUT = "demo01-input";

    @Input(DEMO01_INPUT)
    SubscribableChannel demo01Input();

}
| |
| -- |
14.2.4 Demo01Message
创建 Demo01Message 类,示例 Message 消息。
友情提示:和「14.1.4 Demo01Message」基本一样,点击 链接 查看。
14.2.5 Demo01Consumer
创建 Demo01Consumer 类,消费消息。代码如下:
|
@Component
public class Demo01Consumer {

    private Logger logger = LoggerFactory.getLogger(getClass());

    @StreamListener(MySink.DEMO01_INPUT)
    public void onMessage(@Payload Demo01Message message) {
        logger.info("[onMessage][线程编号:{} 消息内容:{}]", Thread.currentThread().getId(), message);
    }

}
| |
| -- |
14.2.6 ConsumerApplication
创建 ConsumerApplication 类,启动应用。代码如下:
|
@SpringBootApplication
@EnableBinding(MySink.class)
public class ConsumerApplication {

    public static void main(String[] args) {
        SpringApplication.run(ConsumerApplication.class, args);
    }

}
| |
| -- |
14.2.7 IDEA 配置
通过 IDEA 的「Run/Debug Configurations」配置使用 SkyWalking Agent。如下图所示:
14.3 简单测试
使用 ProducerApplication 启动生产者,使用 ConsumerApplication 启动消费者。
① 首先,使用浏览器,访问 http://127.0.0.1:18080/demo01/sent 地址,使用 Kafka Producer 发送一条消息,从而触发 Kafka Consumer 消费一条消息。因为,我们要追踪下该链路。
② 然后,继续使用浏览器,打开 http://127.0.0.1:8080/ 地址,进入 SkyWalking UI 界面。如下图所示: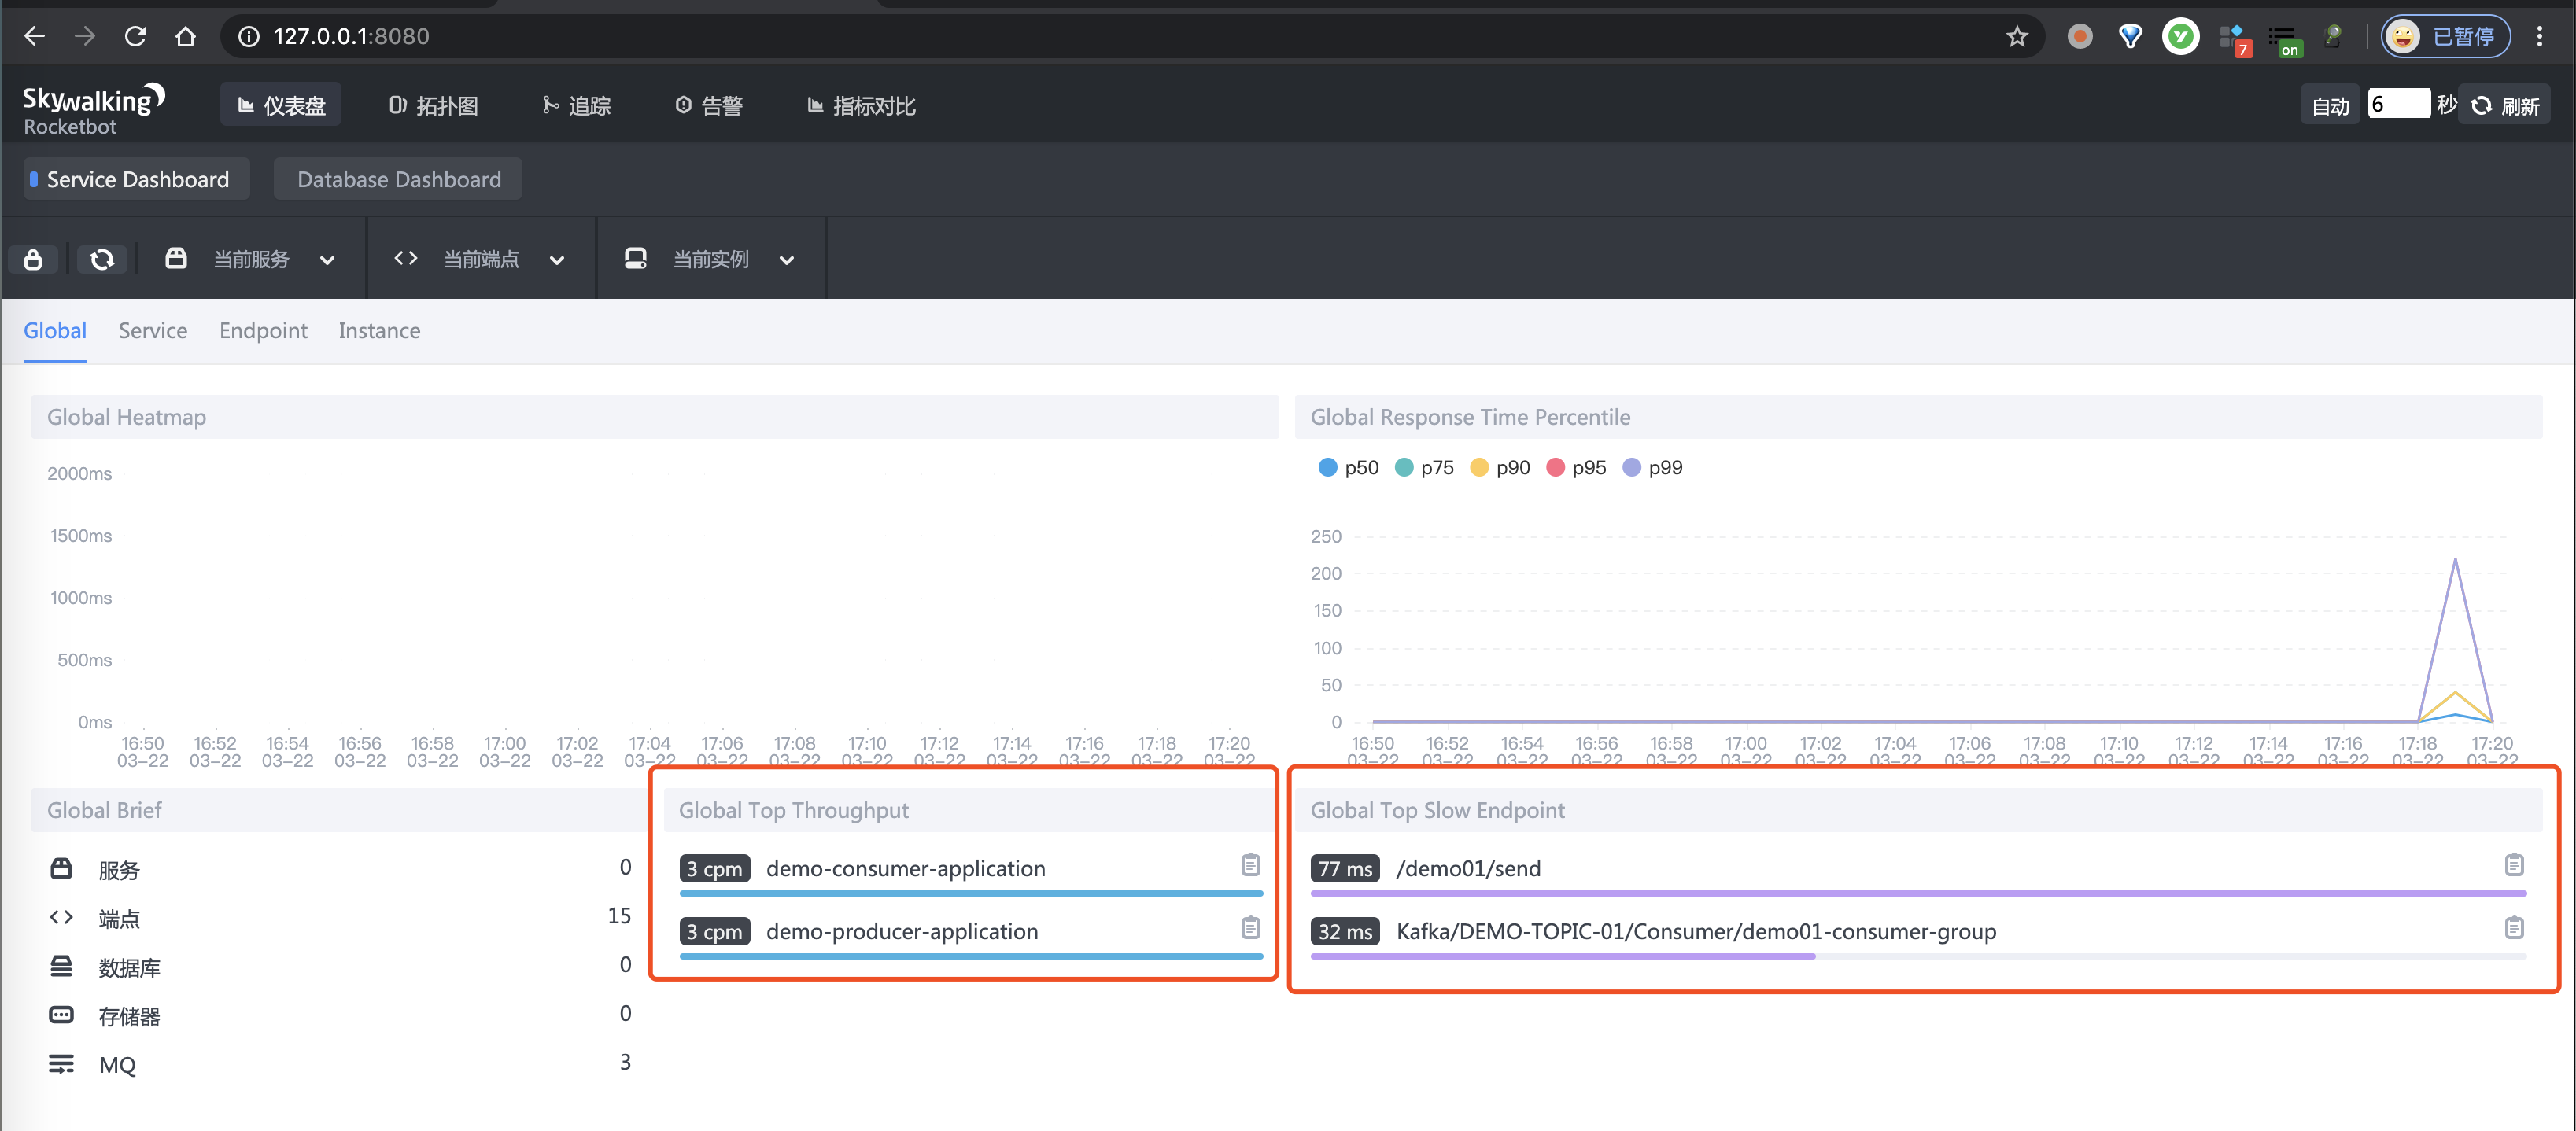
③ 之后,点击「拓扑图」菜单,进入查看拓扑图的界面,可以看到 Kafka Broker 的小方块,以及对应的生产者和消费者。如下图所示: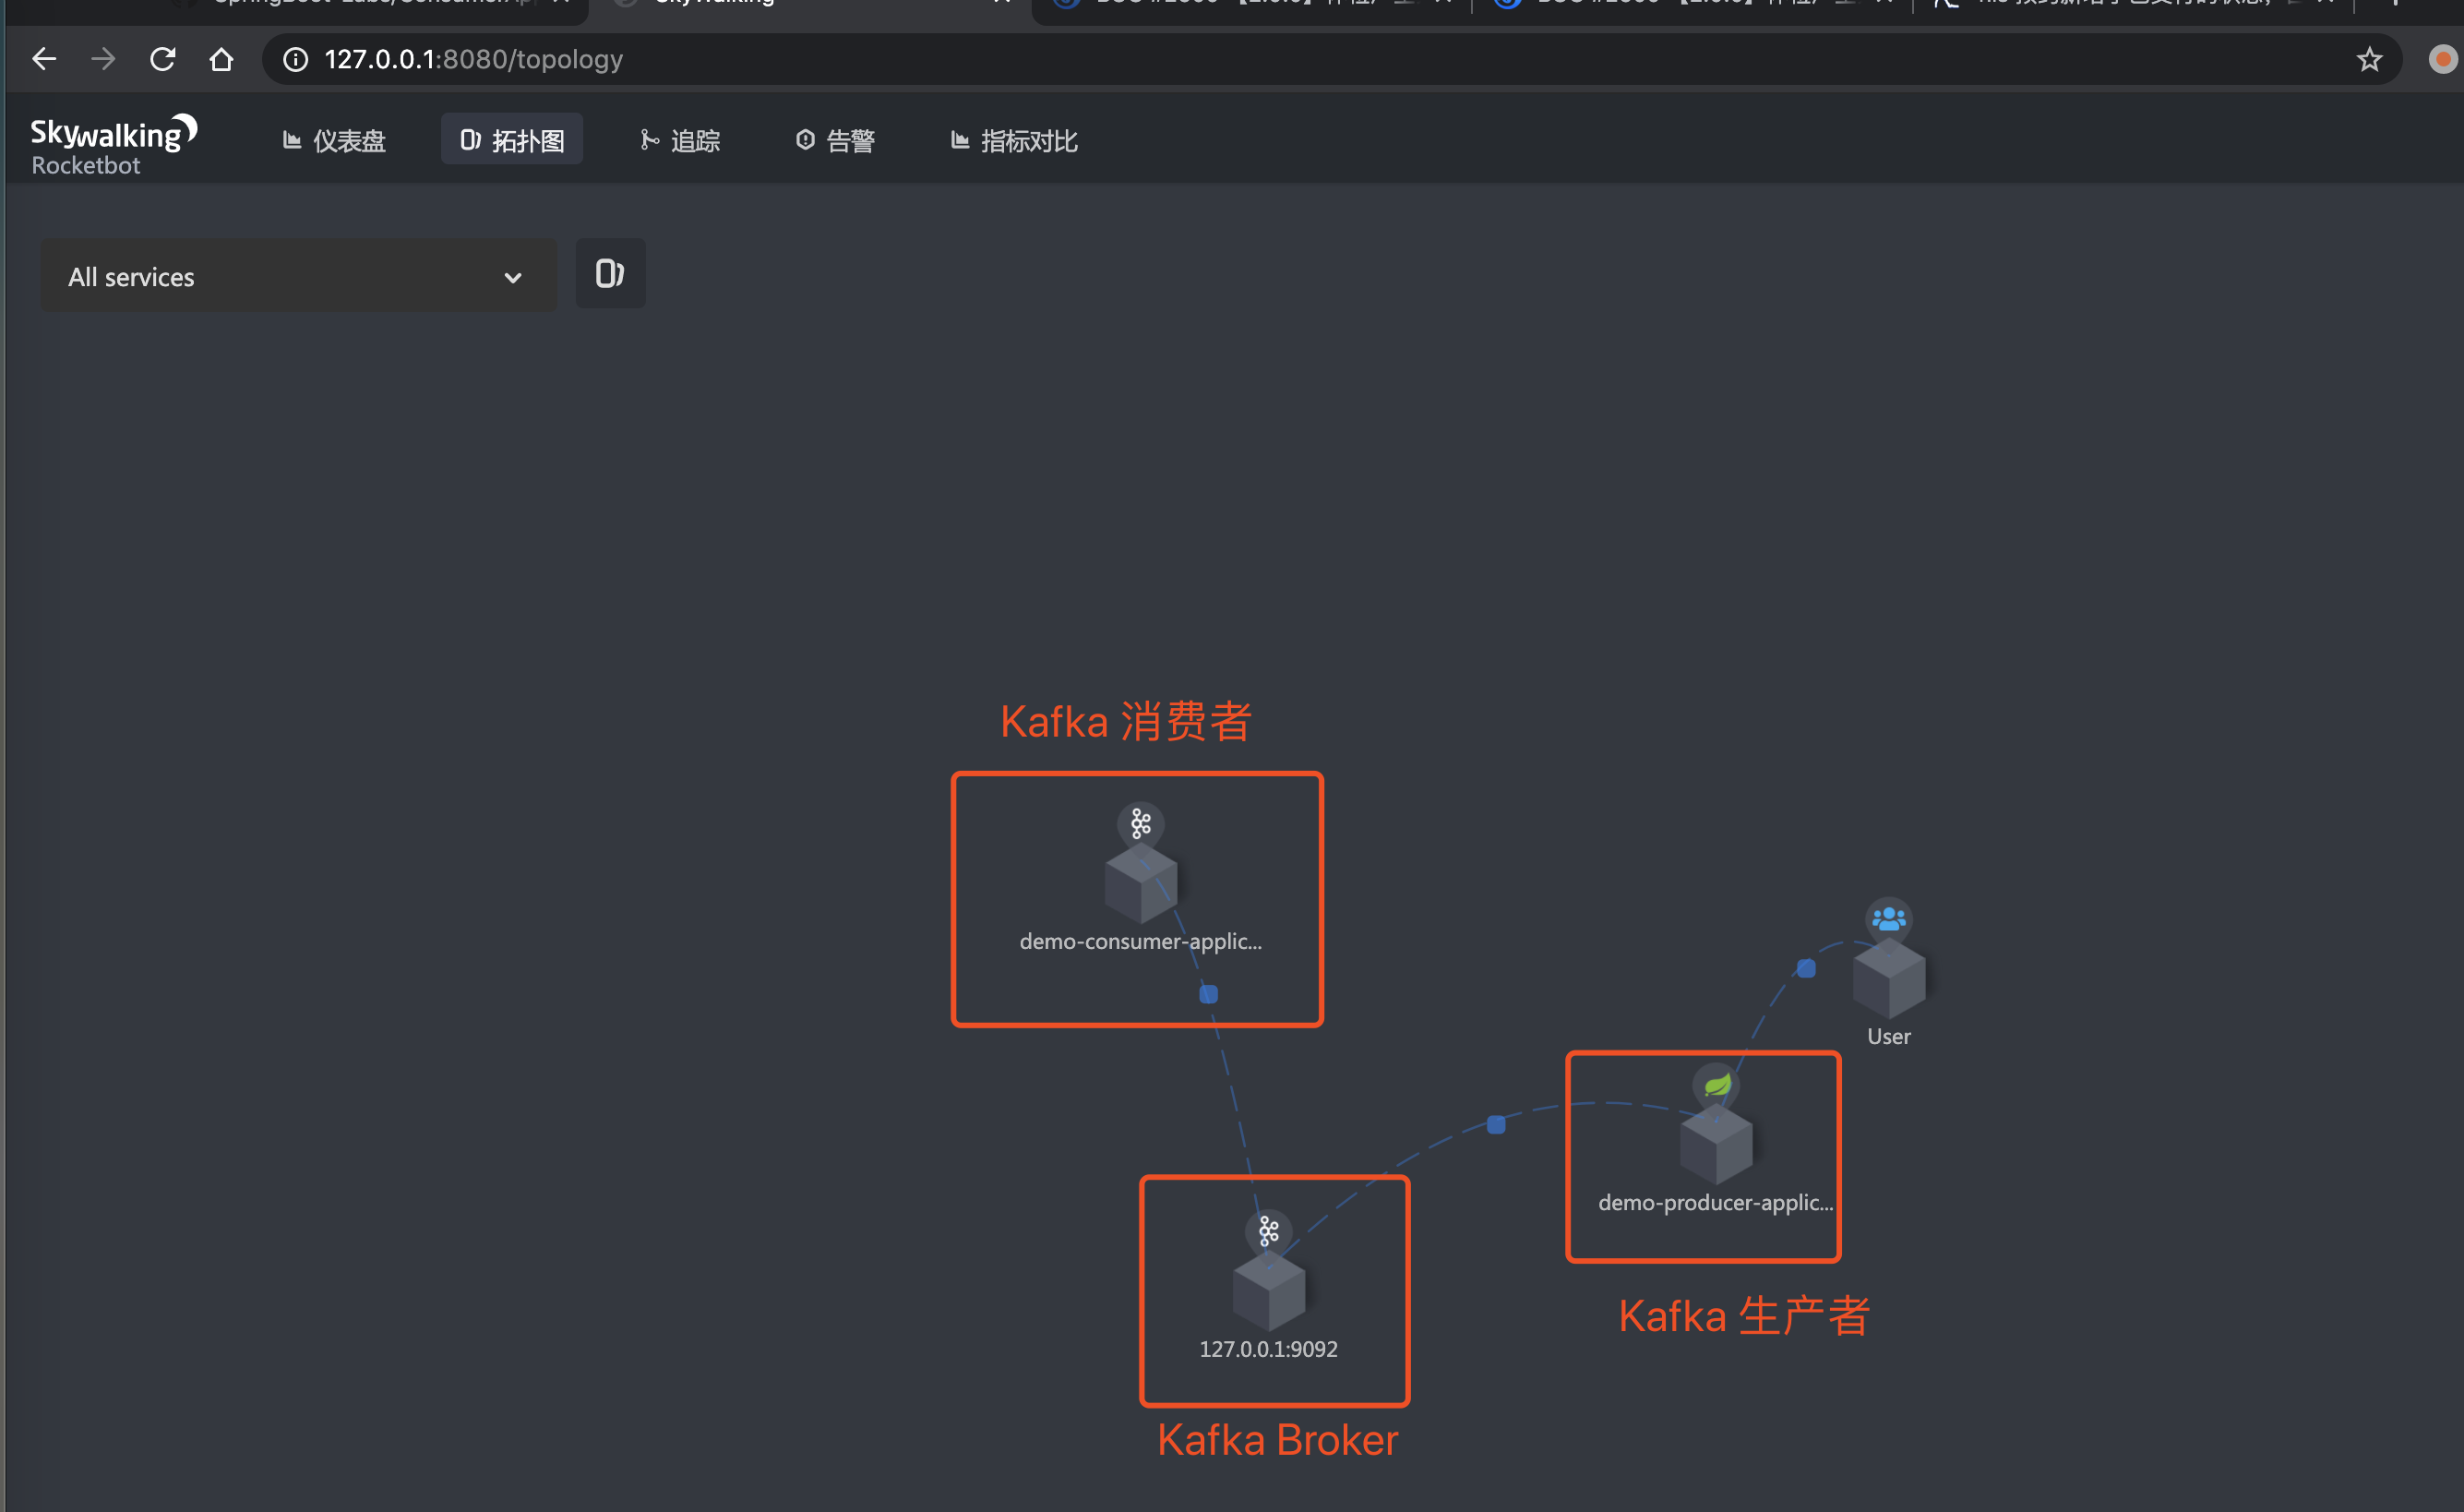
④ 再之后,点击「追踪」菜单,进入查看链路数据的界面。如下图所示: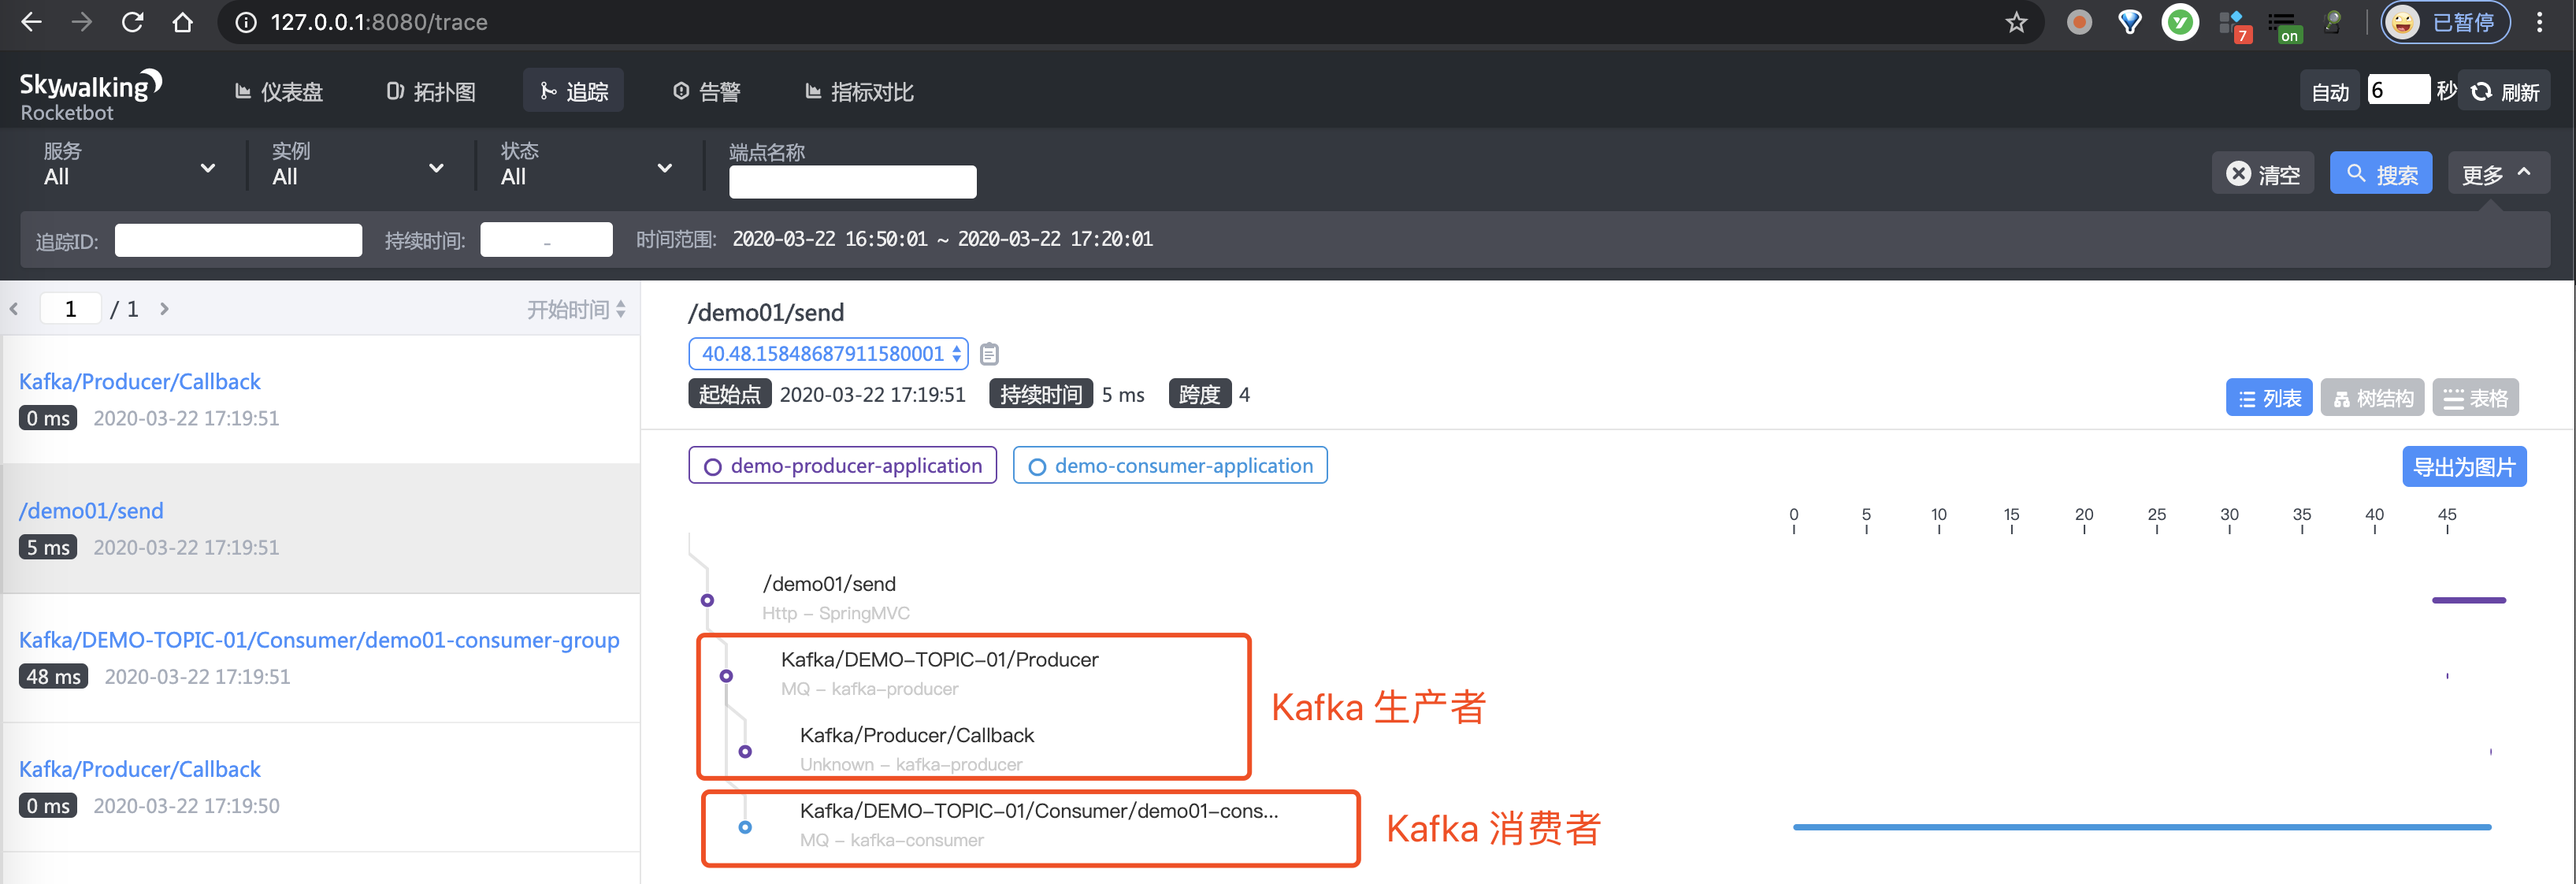
15. ActiveMQ 示例
详见《芋道 Spring Boot 链路追踪 SkyWalking 入门》文章的「11. ActiveMQ 示例」小节。
16. 日志框架示例
详见《芋道 Spring Boot 链路追踪 SkyWalking 入门》文章的「12. 日志框架示例」小节。
17. 自定义追踪方法
详见《芋道 Spring Boot 链路追踪 SkyWalking 入门》文章的「13. 自定义追踪方法」小节。
18. OpenTracing 示例
详见《芋道 Spring Boot 链路追踪 SkyWalking 入门》文章的「14. OpenTracing 示例」小节。
19. Spring 异步任务示例
详见《芋道 Spring Boot 链路追踪 SkyWalking 入门》文章的「15. Spring 异步任务示例」小节。
20. 抽样收集示例
详见《芋道 Spring Boot 链路追踪 SkyWalking 入门》文章的「17. 抽样收集示例」小节。
666. 彩蛋
至此,我们已经完成 Spring Cloud Sleuth 的学习。如下是 Sleuth 相关的官方文档:
另外,想要在 Spring Boot 项目中使用 SkyWalking 作为链路追踪的胖友,可以阅读《芋道 Spring Boot 链路追踪 SkyWalking 入门》文章。
嘻嘻,想要对 SkyWalking 做进一步深入的胖友,欢迎来看艿艿写的《SkyWalking 源码解析》。美滋滋~
标题:如何在Spring Cloud中使用SkyWalking做链路追踪
作者:michael
地址:https://blog.junxworks.cn/articles/2023/11/24/1700805703916.html