SpringCloud OpenFeign详解
1 OpenFeign的使用
今天的代码我们还在之前的示例代码中进行修改,在product-service模块中加入如下依赖
<dependency>
    <groupId>org.springframework.cloud</groupId>
    <artifactId>spring-cloud-starter-openfeign</artifactId>
</dependency>
在product-service模块的启动类上添加@EnableFeignClients注解。
创建UserFeignClient类,内容如下:
import org.springframework.cloud.openfeign.FeignClient;
import org.springframework.web.bind.annotation.GetMapping;
import org.springframework.web.bind.annotation.PathVariable;

@FeignClient(value = "user-service")
public interface UserFeignClient {
    @GetMapping(value = "/user/{name}")
    String getByName(@PathVariable String name);
}
在这个模块的启动类中注入UserFeignClient并创建一个接口,如下
@Resource
private UserFeignClient userFeignClient;

@GetMapping(value = "/product/user/{name}/feign")
public String getUserByNameFromFeign(@PathVariable String name) {
    return userFeignClient.getByName(name);
}
至此我们通过OpenFeign调用其他服务的示例就完成了,大家可以自行测试,效果会和之前的示例一致。
OpenFeign封装了http客户端,让我们像调用本地方法的方式调用远程服务。
2 OpenFeign的原理
通过上面的示例可以看出,我们使用OpenFeign可以很方便的调用一个http接口。那么OpenFeign是如何实现帮我们实现这些功能的呢?我们在下面内容中将通过查看源码的方式来学习下其工作原理。
使用OpenFeign我们需要在服务的启动类上添加@EnableFeignClients注解,这个注解的源码如下:
package org.springframework.cloud.openfeign;

import java.lang.annotation.Documented;
import java.lang.annotation.ElementType;
import java.lang.annotation.Retention;
import java.lang.annotation.RetentionPolicy;
import java.lang.annotation.Target;

import org.springframework.context.annotation.Import;

@Retention(RetentionPolicy.RUNTIME)
@Target(ElementType.TYPE)
@Documented
@Import(FeignClientsRegistrar.class)
public @interface EnableFeignClients {

    String[] value() default {};

    String[] basePackages() default {};

    Class<?>[] basePackageClasses() default {};

    Class<?>[] defaultConfiguration() default {};

    Class<?>[] clients() default {};

}
这个注解上会通过@Import引入FeignClientsRegistrar,这个类实现了ImportBeanDefinitionRegistrar,在Spring容器启动时会加载这个类中的registerBeanDefinitions方法,这个方法的逻辑如下:
public void registerBeanDefinitions(AnnotationMetadata metadata, BeanDefinitionRegistry registry) {
    registerDefaultConfiguration(metadata, registry);
    // 注册feign客户端
    registerFeignClients(metadata, registry);
}
这个主要看registerFeignClients方法,其逻辑如下:
public void registerFeignClients(AnnotationMetadata metadata, BeanDefinitionRegistry registry) {

    LinkedHashSet<BeanDefinition> candidateComponents = new LinkedHashSet<>();
    // 获取EnableFeignClients注解的属性
    Map<String, Object> attrs = metadata.getAnnotationAttributes(EnableFeignClients.class.getName());
    // clients属性中配置的类
    final Class<?>[] clients = attrs == null ? null : (Class<?>[]) attrs.get("clients");
    if (clients == null || clients.length == 0) {
        // 获取需要扫描包路径下有FeignClient注解的类
        ClassPathScanningCandidateComponentProvider scanner = getScanner();
        scanner.setResourceLoader(this.resourceLoader);
        scanner.addIncludeFilter(new AnnotationTypeFilter(FeignClient.class));
        Set<String> basePackages = getBasePackages(metadata);
        for (String basePackage : basePackages) {
            candidateComponents.addAll(scanner.findCandidateComponents(basePackage));
        }
    }
    else {
        for (Class<?> clazz : clients) {
            candidateComponents.add(new AnnotatedGenericBeanDefinition(clazz));
        }
    }

    for (BeanDefinition candidateComponent : candidateComponents) {
        if (candidateComponent instanceof AnnotatedBeanDefinition) {
            // verify annotated class is an interface
            AnnotatedBeanDefinition beanDefinition = (AnnotatedBeanDefinition) candidateComponent;
            AnnotationMetadata annotationMetadata = beanDefinition.getMetadata();
            // FeignClient修饰的类必须是接口
            Assert.isTrue(annotationMetadata.isInterface(), "@FeignClient can only be specified on an interface");
            // 获取FeignClient注解上的属性值
            Map<String, Object> attributes = annotationMetadata
                .getAnnotationAttributes(FeignClient.class.getCanonicalName());

            String name = getClientName(attributes);
            registerClientConfiguration(registry, name, attributes.get("configuration"));
            // 注册feignClient
            registerFeignClient(registry, annotationMetadata, attributes);
        }
    }
}
在上面这段代码中主要的逻辑就是解析出项目可扫描路径下被@FeignClient修饰的接口,然后调用registerFeignClient方法,注入到Spring容器中,其逻辑如下:
private void registerFeignClient(BeanDefinitionRegistry registry, AnnotationMetadata annotationMetadata,
                                 Map<String, Object> attributes) {
    String className = annotationMetadata.getClassName();
    Class clazz = ClassUtils.resolveClassName(className, null);
    ConfigurableBeanFactory beanFactory = registry instanceof ConfigurableBeanFactory
        ? (ConfigurableBeanFactory) registry : null;
    String contextId = getContextId(beanFactory, attributes);
    String name = getName(attributes);
    FeignClientFactoryBean factoryBean = new FeignClientFactoryBean();
    factoryBean.setBeanFactory(beanFactory);
    factoryBean.setName(name);
    factoryBean.setContextId(contextId);
    factoryBean.setType(clazz);
    factoryBean.setRefreshableClient(isClientRefreshEnabled());
    BeanDefinitionBuilder definition = BeanDefinitionBuilder.genericBeanDefinition(clazz, () -> {
        factoryBean.setUrl(getUrl(beanFactory, attributes));
        factoryBean.setPath(getPath(beanFactory, attributes));
        factoryBean.setDecode404(Boolean.parseBoolean(String.valueOf(attributes.get("decode404"))));
        Object fallback = attributes.get("fallback");
        if (fallback != null) {
            factoryBean.setFallback(fallback instanceof Class ? (Class<?>) fallback
                                    : ClassUtils.resolveClassName(fallback.toString(), null));
        }
        Object fallbackFactory = attributes.get("fallbackFactory");
        if (fallbackFactory != null) {
            factoryBean.setFallbackFactory(fallbackFactory instanceof Class ? (Class<?>) fallbackFactory
                                           : ClassUtils.resolveClassName(fallbackFactory.toString(), null));
        }
        return factoryBean.getObject();
    });
    definition.setAutowireMode(AbstractBeanDefinition.AUTOWIRE_BY_TYPE);
    definition.setLazyInit(true);
    validate(attributes);

    AbstractBeanDefinition beanDefinition = definition.getBeanDefinition();
    beanDefinition.setAttribute(FactoryBean.OBJECT_TYPE_ATTRIBUTE, className);
    beanDefinition.setAttribute("feignClientsRegistrarFactoryBean", factoryBean);

    // has a default, won't be null
    boolean primary = (Boolean) attributes.get("primary");

    beanDefinition.setPrimary(primary);

    String[] qualifiers = getQualifiers(attributes);
    if (ObjectUtils.isEmpty(qualifiers)) {
        qualifiers = new String[] { contextId + "FeignClient" };
    }

    BeanDefinitionHolder holder = new BeanDefinitionHolder(beanDefinition, className, qualifiers);
    BeanDefinitionReaderUtils.registerBeanDefinition(holder, registry);

    registerOptionsBeanDefinition(registry, contextId);
}
上面这段代码看着很长,其实不用全部看,这段代码中我们可以看见向容器里注册的是一个FeignClientFactoryBean,当我们从容器中获取对应对象时,会调用这个类中的getObject方法,其逻辑如下:
public Object getObject() {
    return getTarget();
}

<T> T getTarget() {
    FeignContext context = beanFactory != null ? beanFactory.getBean(FeignContext.class)
        : applicationContext.getBean(FeignContext.class);
    Feign.Builder builder = feign(context);

    if (!StringUtils.hasText(url)) {
        if (url != null && LOG.isWarnEnabled()) {
            LOG.warn("The provided URL is empty. Will try picking an instance via load-balancing.");
        }
        else if (LOG.isDebugEnabled()) {
            LOG.debug("URL not provided. Will use LoadBalancer.");
        }
        if (!name.startsWith("http")) {
            url = "http://" + name;
        }
        else {
            url = name;
        }
        url += cleanPath();
        return (T) loadBalance(builder, context, new HardCodedTarget<>(type, name, url));
    }
    if (StringUtils.hasText(url) && !url.startsWith("http")) {
        url = "http://" + url;
    }
    String url = this.url + cleanPath();
    Client client = getOptional(context, Client.class);
    if (client != null) {
        if (client instanceof FeignBlockingLoadBalancerClient) {
            // not load balancing because we have a url,
            // but Spring Cloud LoadBalancer is on the classpath, so unwrap
            client = ((FeignBlockingLoadBalancerClient) client).getDelegate();
        }
        if (client instanceof RetryableFeignBlockingLoadBalancerClient) {
            // not load balancing because we have a url,
            // but Spring Cloud LoadBalancer is on the classpath, so unwrap
            client = ((RetryableFeignBlockingLoadBalancerClient) client).getDelegate();
        }
        builder.client(client);
    }
    Targeter targeter = get(context, Targeter.class);
    return (T) targeter.target(this, builder, context, new HardCodedTarget<>(type, name, url));
}
上面的这段代码中两个分支最后都会调用到ReflectiveFeign.newInstance方法,这个方法的逻辑如下:
public <T> T newInstance(Target<T> target) {
    Map<String, MethodHandler> nameToHandler = targetToHandlersByName.apply(target);
    // 方法和SynchronousMethodHandler对象Map
    Map<Method, MethodHandler> methodToHandler = new LinkedHashMap<Method, MethodHandler>();
    List<DefaultMethodHandler> defaultMethodHandlers = new LinkedList<DefaultMethodHandler>();

    for (Method method : target.type().getMethods()) {
        // 这个方法是Object中的方法,不进行处理
        if (method.getDeclaringClass() == Object.class) {
            continue;
        // 是否为default方法
        } else if (Util.isDefault(method)) {
            DefaultMethodHandler handler = new DefaultMethodHandler(method);
            defaultMethodHandlers.add(handler);
            methodToHandler.put(method, handler);
        } else {
            methodToHandler.put(method, nameToHandler.get(Feign.configKey(target.type(), method)));
        }
    }
    // InvocationHandler对象 ReflectiveFeign.FeignInvocationHandler
    InvocationHandler handler = factory.create(target, methodToHandler);
    T proxy = (T) Proxy.newProxyInstance(target.type().getClassLoader(),
                                         new Class<?>[] {target.type()}, handler);

    for (DefaultMethodHandler defaultMethodHandler : defaultMethodHandlers) {
        defaultMethodHandler.bindTo(proxy);
    }
    return proxy;
}
通过上面的代码我们看到,这里会返回一个通过动态代理创建的代理对象。这部分的调用时序图如下图所示。
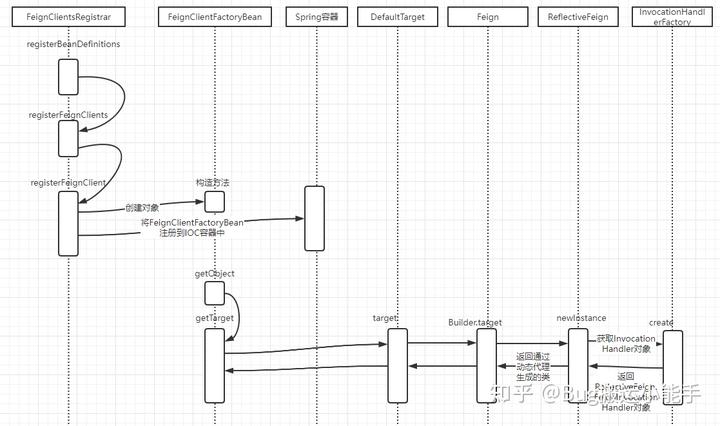
通过上面的代码我们知道我们使用的FeignClient对象是一个代理对象,当我们调用相应的方法时会调用到InvocationHandler.invoke方法中,所以会调用ReflectiveFeign.FeignInvocationHandler.invoke方法,这个方法的逻辑如下:
public Object invoke(Object proxy, Method method, Object[] args) throws Throwable {
    // equals方法
    if ("equals".equals(method.getName())) {
        try {
            Object otherHandler =
                args.length > 0 && args[0] != null ? Proxy.getInvocationHandler(args[0]) : null;
            return equals(otherHandler);
        } catch (IllegalArgumentException e) {
            return false;
        }
    // hashCode方法
    } else if ("hashCode".equals(method.getName())) {
        return hashCode();
    // toString方法
    } else if ("toString".equals(method.getName())) {
        return toString();
    }
	// SynchronousMethodHandler中的invoke方法
    return dispatch.get(method).invoke(args);
}
再往下会调用到SynchronousMethodHandler.invoke、SynchronousMethodHandler.executeAndDecode和FeignBlockingLoadBalancerClient.execute方法,前两个方法的代码这里就不进行粘贴了,第三个方法的逻辑如下:
public Response execute(Request request, Request.Options options) throws IOException {
    final URI originalUri = URI.create(request.url());
    // 获取调用的服务id
    String serviceId = originalUri.getHost();
    Assert.state(serviceId != null, "Request URI does not contain a valid hostname: " + originalUri);
    String hint = getHint(serviceId);
    DefaultRequest<RequestDataContext> lbRequest = new DefaultRequest<>(
        new RequestDataContext(buildRequestData(request), hint));
    Set<LoadBalancerLifecycle> supportedLifecycleProcessors = LoadBalancerLifecycleValidator
        .getSupportedLifecycleProcessors(
        loadBalancerClientFactory.getInstances(serviceId, LoadBalancerLifecycle.class),
        RequestDataContext.class, ResponseData.class, ServiceInstance.class);
    supportedLifecycleProcessors.forEach(lifecycle -> lifecycle.onStart(lbRequest));
    // 通过负载均衡器选择出一个服务
    ServiceInstance instance = loadBalancerClient.choose(serviceId, lbRequest);
    org.springframework.cloud.client.loadbalancer.Response<ServiceInstance> lbResponse = new DefaultResponse(
        instance);
    // 未找到服务节点
    if (instance == null) {
        String message = "Load balancer does not contain an instance for the service " + serviceId;
        if (LOG.isWarnEnabled()) {
            LOG.warn(message);
        }
        supportedLifecycleProcessors.forEach(lifecycle -> lifecycle
                                             .onComplete(new CompletionContext<ResponseData, ServiceInstance, RequestDataContext>(
                                                 CompletionContext.Status.DISCARD, lbRequest, lbResponse)));
        return Response.builder().request(request).status(HttpStatus.SERVICE_UNAVAILABLE.value())
            .body(message, StandardCharsets.UTF_8).build();
    }
    // 真正的请求地址
    String reconstructedUrl = loadBalancerClient.reconstructURI(instance, originalUri).toString();
    Request newRequest = buildRequest(request, reconstructedUrl);
    return executeWithLoadBalancerLifecycleProcessing(delegate, options, newRequest, lbRequest, lbResponse,
                                                      supportedLifecycleProcessors);
}
再往下的逻辑就是调用Feign封装的http请求,这里就不进行粘贴了。这个方法的处理逻辑如下:
- 通过负载均衡器选择出一个服务节点 我使用的SpringCloud版本比较高,这里的负载均衡器不是Ribbon了
- 获取真正的请求地址
- 发起请求并返回结果
3 总结
到这里我们这片关于Spring Cloud OpenFeign的文章就结束了,在这片文章中我们介绍了Spring Cloud OpenFeign的使用及原理。
- 通过
@EnableFeignClients注解导入FeignClientsRegistrar对象,当Spring容器启动时会调用这个类中的registerBeanDefinitions方法,在这里会将@FeignClient修饰的类进行注册。 - 注册到Spring容器中的是一个
FeignClientFactoryBean对象 FeignClientFactoryBean实现了FactoryBean,当我们使用FeignClient时,会调用到这个类中的getObject方法,在这里是通过动态代理创建一个代理对象- Spring Cloud OpenFeign集成了负载均衡器,发送请求前,会先通过负载均衡器选择出一个需要调用的实例
赞同 4添加评论
分享
收藏收起
SpringCloud(二):

在上一篇文章中我们学习了Ribbon,今天的文章中我们学习下Spring Cloud的另一个组件Eureka。通过本文你能了解到如下内容
Eureka是什么Eureka怎么使用Eureka的实现原理
文章中的示例代码可自行到github下载:Spring Cloud Sample
1 Eureka是什么
Eureka是Spring Cloud中的一个注册中心组件,为我们搭建的微服务项目提供服务注册与发现的功能。
大家是否还记得我们在上篇文章中,介绍Ribbon时搭建的示例代码,我们在那个里面没有引入注册中心,客户端需要调用的服务端的地址是写死到配置文件中的?这种方式会存在如下的弊端:
- 服务节点的增加或删减都需要去维护调用方的服务列表
- 服务的某一节点宕机,无法自动感应提出,导致一些请求不可用
注册中心这个组件就为我们很好的解决了上述的问题,通常一个注册中心应当具备如下的功能:
- 服务注册
- 服务列表获取
- 服务列表状态监控
- 自身高可用
2 Eureka的使用
Eureka的使用分为两部分,我们需要自己创建一个server服务,并在其他服务中引入eureka-client。
2.1 服务端搭建
创建eureka-service模块并引入相关依赖:
<dependencies>
    <dependency>
        <groupId>org.springframework.cloud</groupId>
        <artifactId>spring-cloud-starter-netflix-eureka-server</artifactId>
    </dependency>
</dependencies>
创建启动类,内容如下:
@SpringBootApplication
@EnableEurekaServer
public class EurekaServiceApplication {
    public static void main(String[] args) {
        new SpringApplicationBuilder(EurekaServiceApplication.class).web(WebApplicationType.SERVLET).run(args);
    }
}
在application.yml中添加相关配置,内容如下:
server:
  port: 8761
spring:
  application:
    name: eureka-service
  freemarker:
    template-loader-path: classpath:/templates/
    prefer-file-system-access: false

eureka:
  instance:
    hostname: localhost
  client:
    register-with-eureka: true
    fetch-registry: false
    service-url:
      defaultZone: http://${eureka.instance.hostname}:${server.port}/eureka/
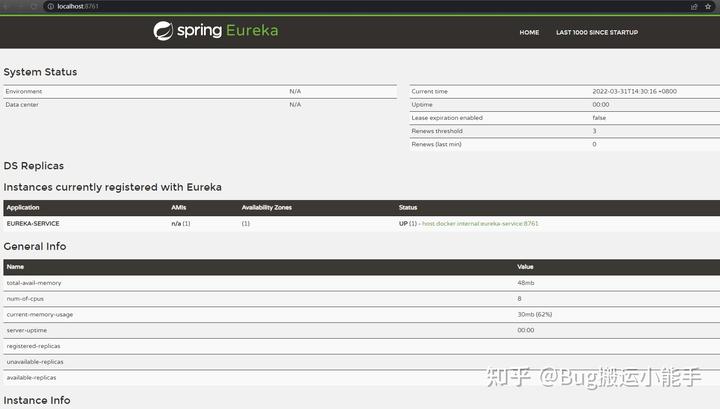
这样我们就搭建完eureka-service了,启动该项目,并访问http://localhost:8761,可以看到如下截图,代表我们搭建成功。
2.2 改造客户端
在user-service中引入如下依赖:
<dependency>
    <groupId>org.springframework.cloud</groupId>
    <artifactId>spring-cloud-starter-netflix-eureka-client</artifactId>
</dependency>
在user-service的配置文件中增加如下配置:
eureka:
  instance:
    # 以ip的形式注册
    prefer-ip-address: true
    # 注册的格式是ip:port
    instance-id: ${spring.cloud.client.ip-address}:${server.port}
  client:
    service-url:
      defaultZone: http://localhost:8761/eureka/
启动user-service,然后刷新eureka-service控制台页面,会看到如下内容,代表user-service成功的注册到Eureka服务中了。

创建product-service模块,引入如下依赖:
<dependencies>
    <dependency>
        <groupId>org.springframework.boot</groupId>
        <artifactId>spring-boot-starter-web</artifactId>
    </dependency>

    <dependency>
        <groupId>org.springframework.cloud</groupId>
        <artifactId>spring-cloud-starter-netflix-eureka-client</artifactId>
    </dependency>
</dependencies>
配置文件内容如下:
server:
  port: 8083
spring:
  application:
    name: product-service
eureka:
  instance:
    # 以ip的形式注册
    prefer-ip-address: true
    # 注册的格式是ip:port
    instance-id: ${spring.cloud.client.ip-address}:${server.port}
  client:
    service-url:
      defaultZone: http://localhost:8761/eureka/
启动类如下:
import org.apache.commons.lang.math.RandomUtils;
import org.springframework.boot.SpringApplication;
import org.springframework.boot.autoconfigure.SpringBootApplication;
import org.springframework.cloud.client.ServiceInstance;
import org.springframework.cloud.client.discovery.DiscoveryClient;
import org.springframework.context.annotation.Bean;
import org.springframework.web.bind.annotation.GetMapping;
import org.springframework.web.bind.annotation.PathVariable;
import org.springframework.web.bind.annotation.RestController;
import org.springframework.web.client.RestTemplate;

import javax.annotation.Resource;
import java.util.List;

@RestController
@SpringBootApplication
public class ProductServiceApplication {
    @Resource
    private RestTemplate restTemplate;

    @Resource
    private DiscoveryClient discoveryClient;

    public static void main(String[] args) {
        SpringApplication.run(ProductServiceApplication.class, args);
    }

    @Bean
    public RestTemplate restTemplate() {
        return new RestTemplate();
    }

    @GetMapping(value = "/product/user/{name}")
    public String getUserByName(@PathVariable String name) {
        // 从注册中心中获取服务列表
        List<ServiceInstance> instanceList = discoveryClient.getInstances("user-service");
        // 随机获取一个服务
        int index = RandomUtils.nextInt(instanceList.size());
        ServiceInstance serviceInstance = instanceList.get(index);
        // 拼接请求URL
        String url = "http://" + serviceInstance.getHost() + ":" + serviceInstance.getPort() + "/user/" + name;
        // 发起调用
        return restTemplate.getForObject(url, String.class);
    }
}
至此我们的案例就编写完了,我们在调用方中从注册中心中获取服务列表随机获取一个服务进行调用。
3 Eureka的原理
在上面的内容中,我们对Eureka的使用进行了简单的介绍,通过示例我们可以发现Eureka包括server和client两部分,使用Eureka的服务结构如下图所示
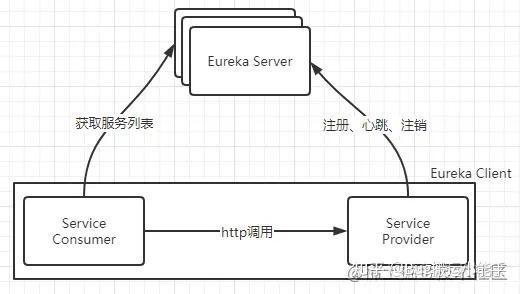
- Eureka Server是一个单独的项目,需要我们进行开发并进行部署,支持集群
- 服务提供者和服务消费者都属于Eureka Client
- 服务提供者提供方启动时会将自己的信息注册到Eureka Server中,同时会定时向Eureka Server进行交互(告知存活)
- 服务消费者会从Eureka Server中获取服务提供方的信息,然后通过一个的策略选择出一个服务者进行远程调用
3.1 Eureka Server
Eureka Server是Eureka的服务端,在这个模块中提供了服务的维护,并对外提供了一些Rest API供客户端进行访问,启动该项目时,会加载加载如下两个类
EurekaServerAutoConfigurationSpring Boot的自动装配,这个类是个配置类,主要做的工作是将相关的对象放入Spring容器中EurekaServerInitializerConfiguration这个类实现了SmartLifecycle接口,当Spring容器创建完成后会调用这个类中的start()方法
Eureka Server对服务的维护逻辑在PeerAwareInstanceRegistry类中实现的,Eureka Server启动时创建的对象如下:
@Bean
public PeerAwareInstanceRegistry peerAwareInstanceRegistry(ServerCodecs serverCodecs) {
  this.eurekaClient.getApplications(); // force initialization
  // org.springframework.cloud.netflix.eureka.server
  return new InstanceRegistry(this.eurekaServerConfig, this.eurekaClientConfig, serverCodecs, this.eurekaClient,
      this.instanceRegistryProperties.getExpectedNumberOfClientsSendingRenews(),
      this.instanceRegistryProperties.getDefaultOpenForTrafficCount());
}
这个对象的类图如下:
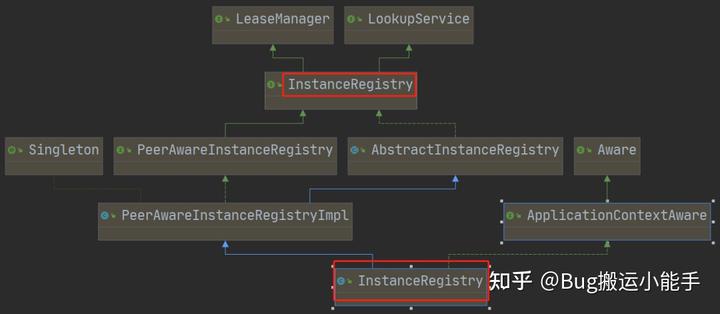
LeaseManager中定义了一个服务在Eureka Server中的基本操作,包含的方法如下:
register服务注册cancel服务删除 当客户端停止服务时调用该逻辑renew客户端向服务端发送心跳evict服务端剔除超时未发送心跳的服务
这些逻辑主要在AbstractInstanceRegistry类中实现的,PeerAwareInstanceRegistryImpl在其基础上实现了Eureka Server服务节点的数据同步功能,org.springframework.cloud.netflix.eureka.server.InstanceRegistry类又增加了一个ApplicationContext.publishEvent操作。
服务信息在Eureka Server中是使用的Map结构存储的,是AbstractInstanceRegistry.registry属性,其定义如下:
private final ConcurrentHashMap<String, Map<String, Lease<InstanceInfo>>> registry
            = new ConcurrentHashMap<String, Map<String, Lease<InstanceInfo>>>();
外层Map的key是应用名称,即我们在配置文件中使用spring.application.name指定的值,内层Map的key是应用实例id,可以使用eureka.instance.instance-id进行指定,服务实例的信息会存储到InstanceInfo对象中并包装成一个Lease对象。
服务注册逻辑
服务注册的逻辑在InstanceRegistry.register方法中,其逻辑如下:
public void register(final InstanceInfo info, final boolean isReplication) {
    // 打印日志并发送一个事件
    handleRegistration(info, resolveInstanceLeaseDuration(info), isReplication);
    // 调用父类中的实现
    super.register(info, isReplication);
}

public void register(final InstanceInfo info, final boolean isReplication) {
    int leaseDuration = Lease.DEFAULT_DURATION_IN_SECS;
    if (info.getLeaseInfo() != null && info.getLeaseInfo().getDurationInSecs() > 0) {
        leaseDuration = info.getLeaseInfo().getDurationInSecs();
    }
    // 调用父类中的实现
    super.register(info, leaseDuration, isReplication);
    // 同步Eureka Server中其他节点
    replicateToPeers(Action.Register, info.getAppName(), info.getId(), info, null, isReplication);
}
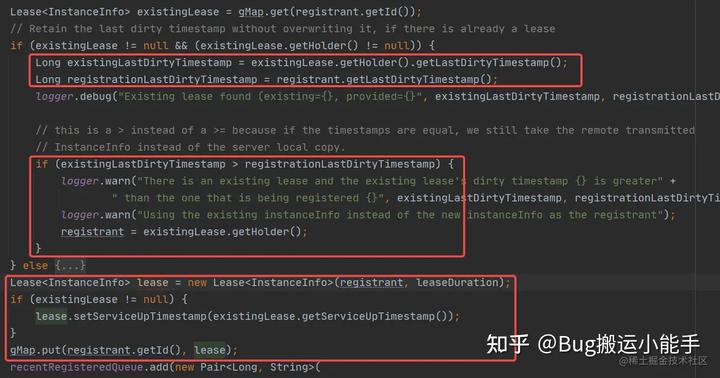
AbstractInstanceRegistry中的逻辑我就不进行粘贴了,逻辑比较简单哈,当服务节点已经存在时会比较两个InstanceInfo.lastDirtyTimestamp属性,这个属性是在服务节点的状态变更时会进行更新,这个值越大代表其版本越高,只有当存在的信息该属性小时才会进行覆盖,代码截图如下:
处理完数服务节点注册逻辑后会调用replicateToPeers方法,将收到的注册节点同步到其他节点,源码如下:
private void replicateToPeers(Action action, String appName, String id,
                              InstanceInfo info ,
                              InstanceStatus newStatus, boolean isReplication) {
    Stopwatch tracer = action.getTimer().start();
    try {
        // 是集群间的复制操作
        if (isReplication) {
            numberOfReplicationsLastMin.increment();
        }
        // 如果服务节点不存在 或者是集群间的复制  无需进行操作
        if (peerEurekaNodes == Collections.EMPTY_LIST || isReplication) {
            return;
        }
		// 获取集群中的所有节点
        for (final PeerEurekaNode node : peerEurekaNodes.getPeerEurekaNodes()) {
            // 无需同步给自己
            if (peerEurekaNodes.isThisMyUrl(node.getServiceUrl())) {
                continue;
            }
            // 同步到集群节点
            replicateInstanceActionsToPeers(action, appName, id, info, newStatus, node);
        }
    } finally {
        tracer.stop();
    }
}
handleRegistration中的逻辑如下:
private void handleRegistration(InstanceInfo info, int leaseDuration, boolean isReplication) {
    log("register " + info.getAppName() + ", vip " + info.getVIPAddress() + ", leaseDuration " + leaseDuration
        + ", isReplication " + isReplication);
    publishEvent(new EurekaInstanceRegisteredEvent(this, info, leaseDuration, isReplication));
}

private void publishEvent(ApplicationEvent applicationEvent) {
    this.ctxt.publishEvent(applicationEvent);
}
在上面代码中看到发布了事件,但在源码中并没有找到消费这些事件的地方,这应该是Spring Cloud留给使用者扩展使用的吧。
cancle、renew的逻辑这里就不进行粘贴了,大家自行查看即可。
超时服务剔除
超时任务的剔除是通过一个定时任务来执行的,这个定时任务是在EurekaServerInitializerConfiguration.start方法中进行创建的,从这个方法跟进源码,会调用到AbstractInstanceRegistry.postInit方法,其源码如下:
protected void postInit() {
    renewsLastMin.start();
    if (evictionTaskRef.get() != null) {
        evictionTaskRef.get().cancel();
    }
    evictionTaskRef.set(new EvictionTask());
    evictionTimer.schedule(evictionTaskRef.get(),
                           // 默认为60000ms  可以通过eureka.server.evictionIntervalTimerInMs进行配置
                           serverConfig.getEvictionIntervalTimerInMs(),
                           serverConfig.getEvictionIntervalTimerInMs());
}
在EvictionTask这个类中会调用evict方法对超时的服务节点进行剔除。是否允许剔除服务的判断在isLeaseExpirationEnabled方法中,这个方法的逻辑如下:
public boolean isLeaseExpirationEnabled() {
    // 未开启自我保护   允许剔除
    if (!isSelfPreservationModeEnabled()) {
        // The self preservation mode is disabled, hence allowing the instances to expire.
        return true;
    }
    return numberOfRenewsPerMinThreshold > 0 && getNumOfRenewsInLastMin() > numberOfRenewsPerMinThreshold;
}
在上面代码中的numberOfRenewsPerMinThreshold的计算逻辑如下:
// 期望接收到的心跳数量 * (60 / 30) * 0.85
// 期望接收到的心跳数量会随着服务的注册和移除进行变更
this.numberOfRenewsPerMinThreshold = (int) (this.expectedNumberOfClientsSendingRenews
                * (60.0 / serverConfig.getExpectedClientRenewalIntervalSeconds())
                * serverConfig.getRenewalPercentThreshold());
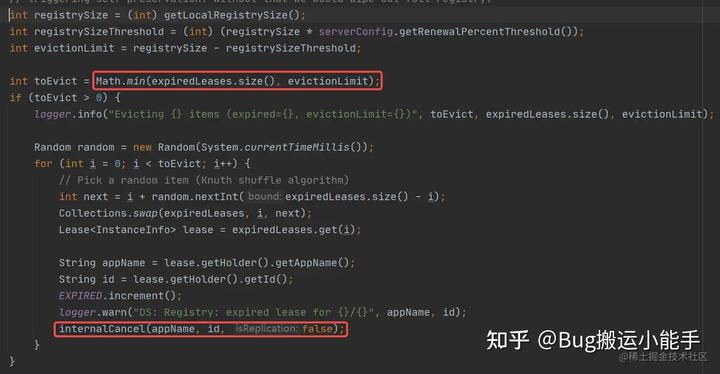
这里并不会将所有超时的服务删除,而是最多删除注册服务的0.15,源码逻辑入下图:
集群间的数据同步
Eureka Server集群间的数据同步有集群运行中和节点启动时,集群运行中时当某个节点接收到服务注册、取消和心跳请求后,会调用集群中其他节点的相应接口进行数据同步,这部分逻辑我们在上面已经介绍过。Eureka Server启动时会调用到PeerAwareInstanceRegistry.syncUp方法,大家可以从EurekaServerInitializerConfiguration.start方法进行查找,该方法的逻辑如下:
public int syncUp() {
    // Copy entire entry from neighboring DS node
    int count = 0;

    for (int i = 0; ((i < serverConfig.getRegistrySyncRetries()) && (count == 0)); i++) {
        if (i > 0) {
            try {
                Thread.sleep(serverConfig.getRegistrySyncRetryWaitMs());
            } catch (InterruptedException e) {
                logger.warn("Interrupted during registry transfer..");
                break;
            }
        }
        Applications apps = eurekaClient.getApplications();
        for (Application app : apps.getRegisteredApplications()) {
            for (InstanceInfo instance : app.getInstances()) {
                try {
                    if (isRegisterable(instance)) {
                        register(instance, instance.getLeaseInfo().getDurationInSecs(), true);
                        count++;
                    }
                } catch (Throwable t) {
                    logger.error("During DS init copy", t);
                }
            }
        }
    }
    return count;
}
3.2 Eureka Client
Eureka Client是Eureka的服务端,封装了通Eureka Server交互的逻辑。源码的入口我们主要从如下两个类中进行查找:
EurekaClientAutoConfiguration配置类,用于容器启动时将一些对象放入容器中EurekaAutoServiceRegistration容器加载完成后会调用这个类中的start方法
EurekaAutoServiceRegistration.start方法的逻辑如下:
public void start() {
    // only set the port if the nonSecurePort or securePort is 0 and this.port != 0
    if (this.port.get() != 0) {
        if (this.registration.getNonSecurePort() == 0) {
            this.registration.setNonSecurePort(this.port.get());
        }

        if (this.registration.getSecurePort() == 0 && this.registration.isSecure()) {
            this.registration.setSecurePort(this.port.get());
        }
    }
    if (!this.running.get() && this.registration.getNonSecurePort() > 0) {

        this.serviceRegistry.register(this.registration);

        this.context.publishEvent(new InstanceRegisteredEvent<>(this, this.registration.getInstanceConfig()));
        this.running.set(true);
    }
}
上面的逻辑会调用到EurekaServiceRegistry.register方法,其逻辑如下:
public void register(EurekaRegistration reg) {
    maybeInitializeClient(reg);

    if (log.isInfoEnabled()) {
		// 省略打印日志
    }
    // 设置状态
  reg.getApplicationInfoManager().setInstanceStatus(reg.getInstanceConfig().getInitialStatus());

    reg.getHealthCheckHandler()
        .ifAvailable(healthCheckHandler -> reg.getEurekaClient().registerHealthCheck(healthCheckHandler));
}
继续跟踪上面设置状态的代码,最终会发现会调用到StatusChangeListener.notify方法,跟踪这个类的创建会发现创建逻辑在DiscoveryClient.initScheduledTasks方法中进行的创建的,代码如下:
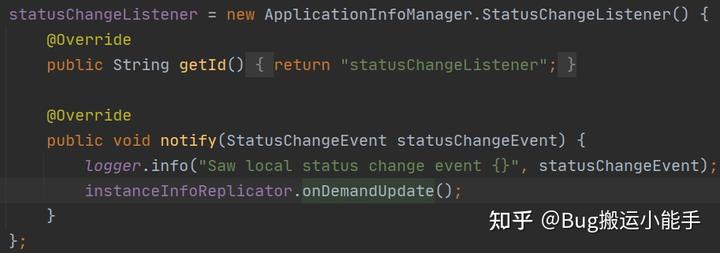
通过上面的代码我们可以知道notify方法会调用instanceInfoReplicator.onDemandUpdate方法,继续跟进源码,在这里会调用InstanceInfoReplicator.run方法,该方法的逻辑如下:
public void run() {
    try {
        discoveryClient.refreshInstanceInfo();

        Long dirtyTimestamp = instanceInfo.isDirtyWithTime();
        if (dirtyTimestamp != null) {
            // 调用Eureka server的注册请求
            discoveryClient.register();
            instanceInfo.unsetIsDirty(dirtyTimestamp);
        }
    } catch (Throwable t) {
        logger.warn("There was a problem with the instance info replicator", t);
    } finally {
        Future next = scheduler.schedule(this, replicationIntervalSeconds, TimeUnit.SECONDS);
        scheduledPeriodicRef.set(next);
    }
}
在往下的逻辑就是调用Eureka Server的注册请求,将自身注册到服务中心中。
同样在DiscoveryClient.initScheduledTasks方法中会启动一个定时向Eureka Server发送心跳的任务,默认每隔30s发送一次。
同时在这个方法中也会开启一个cacheRefreshTask的任务,这个任务的作用是在客户端维护一个服务列表,服务启动时会全量的同步一份,之后会每隔30s查询一下增量数据。之后用户客户端获取服务列表。
这里的源码我就不大篇幅的粘贴了,知道入口和主要的逻辑其他的大家自行跟着源码查看即可。
4 总结
今天的文章到这里就结束了,希望大家通过这片文章能够了解Eureka的使用及其工作原理。
- Eureka的架构包括Server和Client两部分
- Eureka Server对外提供了服务注册、取消、续期...接口
- Eureka Server会定时扫描没有续期的服务并进行剔除
- Eureka Server中的某个节点收到客户端的注册、取消、续期接口会同步到集群中的其他节点,这里的数据同步并不保证强一致性,AP
- Eureka Server节点启动时会先从其他节点进行一次服务列表的全量同步
- Eureka Client在启动时会将自身注册到服务端
- Eureka Client会启动一个定时任务定时向服务端发送心跳
- Eureka Client也会在本地存储一份服务列表,并定时从服务端同步服务列表
转自https://www.zhihu.com/column/c_1505607129699979264
标题:SpringCloud OpenFeign详解
作者:michael
地址:https://blog.junxworks.cn/articles/2023/11/14/1699931473732.html
