Junx-ep实现部分更新表字段的方法
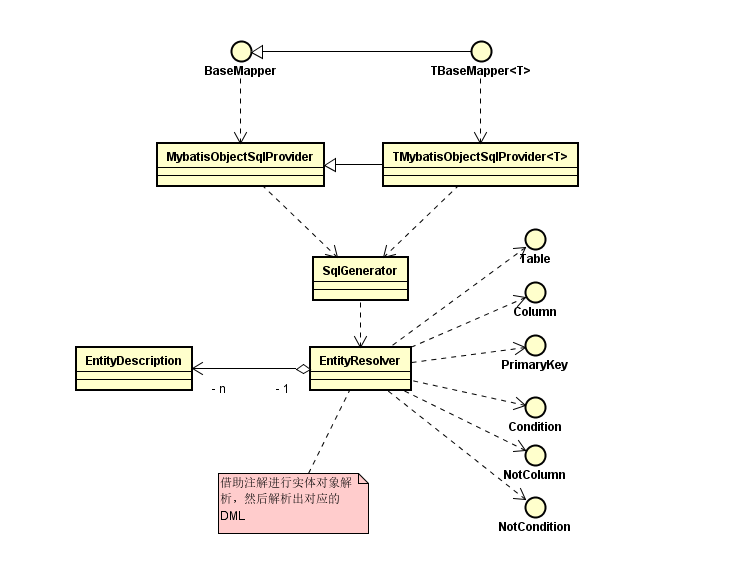
Junx-ep的ORM框架是基于mybatis来实现的,封装了BaseMapper(支持泛型的TBaseMapper)接口,以及一系列用于解析sql的注解,代码结构如下:

任何Java对象只要满足EntityResolver的解析注解条件,都能被解析成对应的DML,代码样例如下:
package io.github.junxworks.ep.demo.modules.table.entity;

import io.github.junxworks.ep.core.orm.annotations.Table;
import io.github.junxworks.ep.core.orm.annotations.PrimaryKey;
import io.github.junxworks.ep.core.orm.annotations.Column;
import java.util.Date;

/**
 * <p>Entity Class</p>
 * <p>Table: d_student</p>
 *
 * @since 2021-3-29 20:35:22 Generated by JunxPlugin
 */

@Table(tableName = "d_student", tableComment = "")
public class DStudent {

	@PrimaryKey
	@Column(name = "id", type = "BIGINT", length = "19", nullable = "false", comment = "编号")
	private Long id;

	@Column(name = "status", type = "TINYINT", length = "3", nullable = "true", comment = "状态")
	private Byte status;

	@Column(name = "create_user", type = "BIGINT", length = "19", nullable = "true", comment = "创建人编号")
	private Long createUser;

	@Column(name = "create_time", type = "TIMESTAMP", length = "19", nullable = "true", comment = "创建日期")
	private Date createTime;

	@Column(name = "update_user", type = "BIGINT", length = "19", nullable = "true", comment = "修改人编号")
	private Long updateUser;

	@Column(name = "update_time", type = "TIMESTAMP", length = "19", nullable = "true", comment = "修改日期")
	private Date updateTime;

	@Column(name = "student_name", type = "VARCHAR", length = "20", nullable = "true", comment = "姓名")
	private String studentName;

	@Column(name = "student_no", type = "VARCHAR", length = "20", nullable = "true", comment = "学号")
	private String studentNo;

	@Column(name = "birthday", type = "TIMESTAMP", length = "19", nullable = "true", comment = "生日")
	private Date birthday;

	public Long getId() {
		return this.id;
	}

	public void setId(Long id) {
		this.id = id;
	}

	public Byte getStatus() {
		return this.status;
	}

	public void setStatus(Byte status) {
		this.status = status;
	}

	public Long getCreateUser() {
		return this.createUser;
	}

	public void setCreateUser(Long createUser) {
		this.createUser = createUser;
	}

	public Date getCreateTime() {
		return this.createTime;
	}

	public void setCreateTime(Date createTime) {
		this.createTime = createTime;
	}

	public Long getUpdateUser() {
		return this.updateUser;
	}

	public void setUpdateUser(Long updateUser) {
		this.updateUser = updateUser;
	}

	public Date getUpdateTime() {
		return this.updateTime;
	}

	public void setUpdateTime(Date updateTime) {
		this.updateTime = updateTime;
	}

	public String getStudentName() {
		return this.studentName;
	}

	public void setStudentName(String studentName) {
		this.studentName = studentName;
	}

	public String getStudentNo() {
		return studentNo;
	}

	public void setStudentNo(String studentNo) {
		this.studentNo = studentNo;
	}

	public Date getBirthday() {
		return this.birthday;
	}

	public void setBirthday(Date birthday) {
		this.birthday = birthday;
	}
}
因此业务功能开发在创建数据库映射实体对象的时候,可以根据前端功能来进行创建,正常情况下,每张数据库表都应该有一个全字段映射的实体对象,如上所示DStudent,映射到数据库的表是d _student,另外可以根据前端编辑模型,创建一个新的模型映射关系,如DStudentUpdateModel,其中保留的字段就是前端可以编辑的字段,拿User管理的编辑模型举例,代码如下
package io.github.junxworks.ep.demo.modules.table.entity;

import java.util.Date;

/**
 * <p>Entity Class</p>
 * <p>Table: d_student</p>
 *
 * @since 2021-3-29 20:35:22 Generated by JunxPlugin
 */

public class DStudentUpdateModel {

	private Long id;

	private String studentName;

	private String studentNo;

	private Date birthday;

	private Long updateUser;

	private Date updateTime;

	public Long getId() {
		return this.id;
	}

	public void setId(Long id) {
		this.id = id;
	}

	public Long getUpdateUser() {
		return this.updateUser;
	}

	public void setUpdateUser(Long updateUser) {
		this.updateUser = updateUser;
	}

	public Date getUpdateTime() {
		return this.updateTime;
	}

	public void setUpdateTime(Date updateTime) {
		this.updateTime = updateTime;
	}

	public String getStudentName() {
		return this.studentName;
	}

	public void setStudentName(String studentName) {
		this.studentName = studentName;
	}

	public String getStudentNo() {
		return studentNo;
	}

	public void setStudentNo(String studentNo) {
		this.studentNo = studentNo;
	}

	public Date getBirthday() {
		return this.birthday;
	}

	public void setBirthday(Date birthday) {
		this.birthday = birthday;
	}
}
其他不在编辑范围内的字段,直接删除即可,这样在使用BaseMapper基础接口进行字段更新的时候,不存在的字段不会受到数据更新的影响。
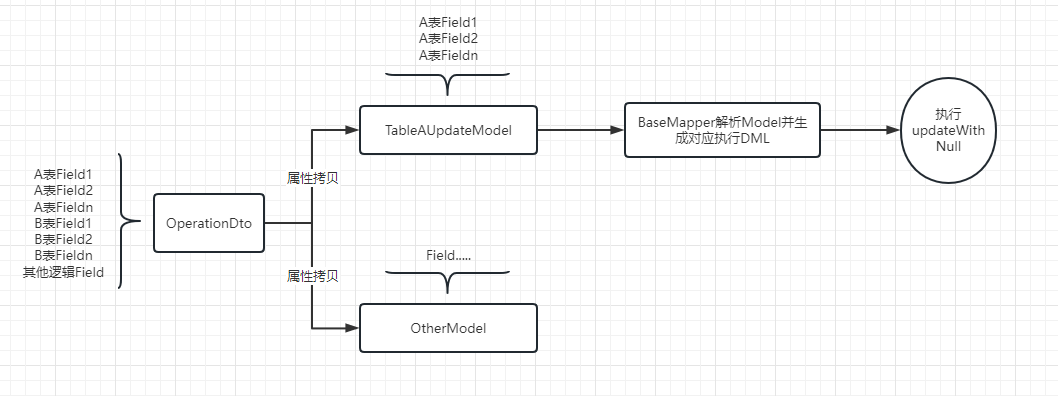
下面看整个数据从前端到后端传递的逻辑

Service类中,从前端入参OperationDto中,拷贝属性到TableAUpdateModel中,这些属性就是前端操作中可编辑的A表的属性,然后利用BaseMapper的解析功能,将其解析成对应的DML语句,执行的时候调用BaseMapper的updateWithNull方法,这样就可以方便的更新表数据,如果采用非模型映射的方式来做,则需要挨个字段去判断然后再设置,非常繁琐,如下代码所示(mybatis-plus):
LambdaUpdateWrapper<OilUser> userUpdateWrapper = new LambdaUpdateWrapper<>();
            userUpdateWrapper.set(OilUser::getUsername, user.getUsername());
            userUpdateWrapper.set(OilUser::getNickName, user.getNickName());
            userUpdateWrapper.set(OilUser::getTel, user.getTel());
            userUpdateWrapper.set(OilUser::getEmail, user.getEmail());
            if (!StringUtils.isEmpty(user.getPassword())) {
                userUpdateWrapper.set(OilUser::getPassword, passwordEncoder.encode(user.getPassword()));
            }
            userUpdateWrapper.eq(OilUser::getId, user.getId());
            oilUserMapper.update(null, userUpdateWrapper);
这种实现方式在调整数据库字段的时候,不仅需要调整dto、entity、vo实体,还需要去调整java代码,非常繁琐而且容易出错,让代码可维护性变差,而且很多时候会遇到字段很多的表,这么写让代码的可读性变差。
下面是采用Junx-ep实现部分更新的代码,请参考updateWithModel方法:
	@Transactional
	public int updateStudent(Student student) {
		//更新用户基本信息
		StudentPO po= studentConvert.convertToPO(student);
		return epUserDomainRepository.updateWithModel(po, DStudentUpdateModel.class);
	}
从代码量、可读性和可维护性上来看,junx-ep的方式要好很多。
标题:Junx-ep实现部分更新表字段的方法
作者:michael
地址:https://blog.junxworks.cn/articles/2023/01/12/1673495051041.html