springboot(2.4.1)源代码分析一
序
用springboot很长时间了,一直没有研读其代码,spring的东西都很精品,值得去学习,很多思想层面的逻辑,值得去精读,后面就一边画UML类图一边读代码,把整个逻辑记录下来,以便以后查阅。
设计理念
约定优于配置(Convention Over Configuration),又称为按约定编程,是一种软件设计范式,旨在减少软件开发人员需要做决定的数量,执行起来简单而又不失灵活。Spring Boot的核心设计完美的遵从了此范式。SpringBoot的功能从细节到整体都是基于“约定优于配置”开发的,从基础框架的搭建、配置文件、中间件的集成、内置容器以及其生态中各种starters,无不遵从此设计范式。Starter作为SpringBoot的核心功能之一,基于自动配置代码提供了自动配置模块及依赖,让软件变得简单、易用。
整体架构
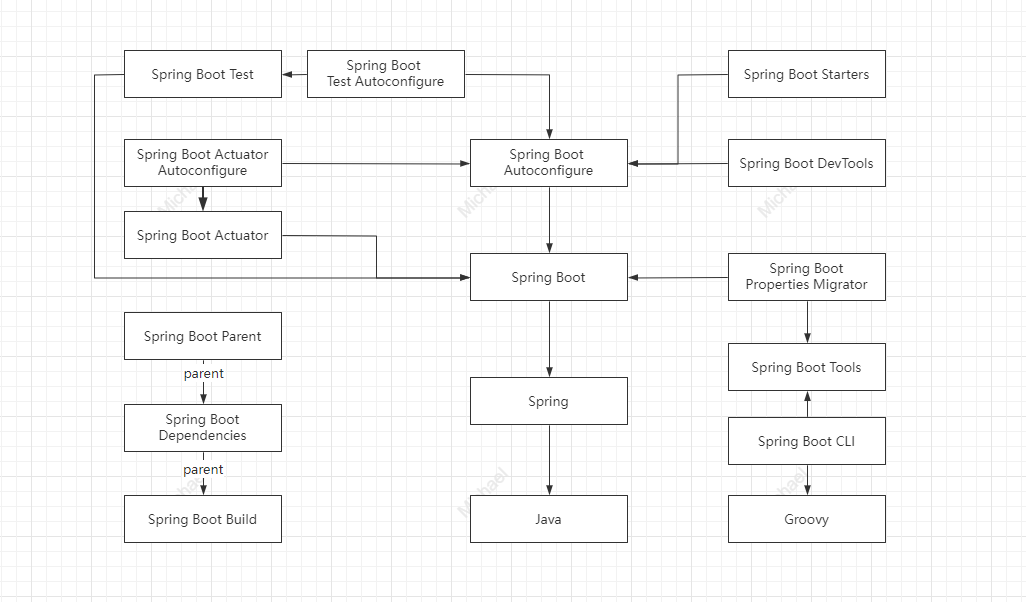
springboot的相关包介绍:
- spring-boot:SpringBoot的核心代码,也是入口类SpringApplication类所在的包。
- spring-boot-actuator:提供应用程序的监控、统计、管理及自定义等相关功能。
- spring-boot-actuator-autoconfigure:针对actuator提供的自动配置功能。
- spring-boot-autoconfigure:Spring Boot自动配置核心功能,默认集成了多种常见框架的自动配置类等。
- spring-boot-cli:命令工具,提供快速搭建项目原型、启动服务、执行Groovy脚本等功能。
- spring-boot-dependencies:依赖和插件的版本信息。
- spring-boot-devtools:开发者工具,提供热部署、实时加载、禁用缓存等提升开发效率的功能。
- spring-boot-docs:参考文档相关内容。
- spring-boot-parent:spring-boot-dependencies的子模块,其他模块的父模块。
- spring-boot-properties-migrator:Spring Boot2.0版本新增的模块,支持升级版本配置属性的迁移。
- spring-boot-starters:Spring Boot以预定义的方式集成了其他应用的starter集合。
- spring-boot-test:测试功能相关代码。
- spring-boot-test-autoconfigure:测试功能自动配置相关代码。
- spring-boot-tools:Spring Boot工具支持模块,包含Ant、Maven、Gradle等构件工具。
springboot源代码架构图:
spring-boot整体概览
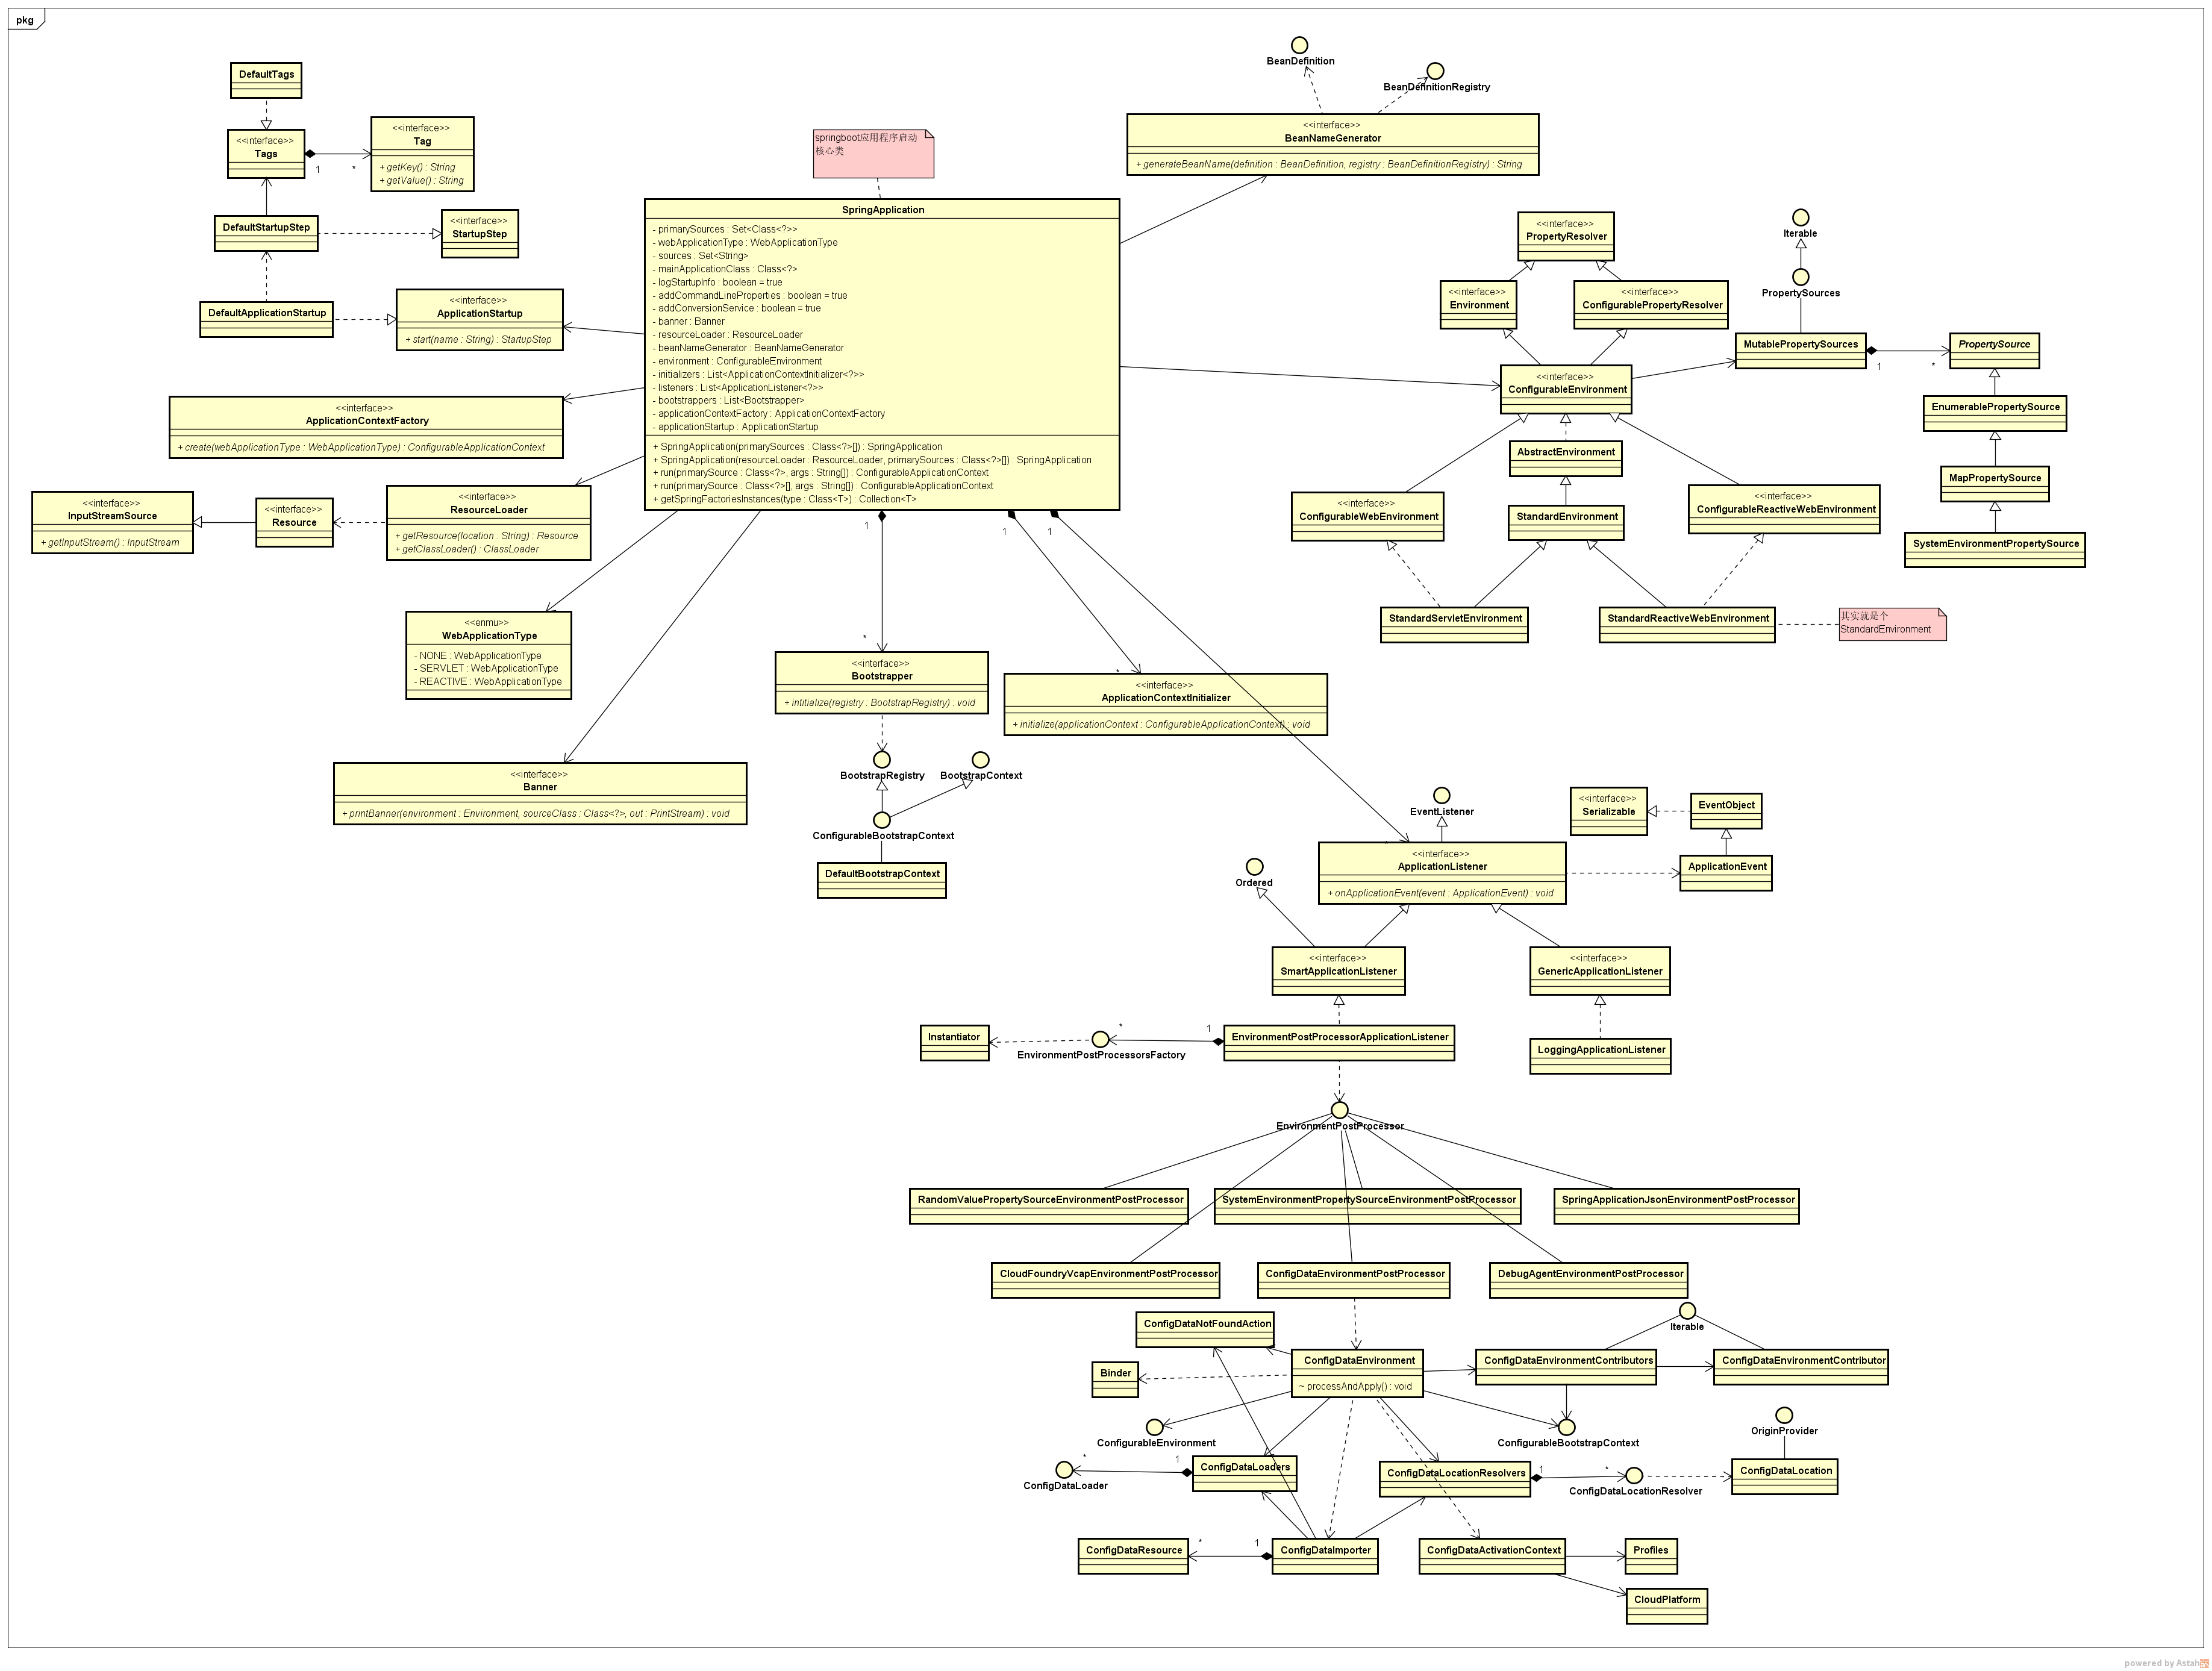
springboot包含了很多组件,可以看到整个springboot的启动入口,就是SpringApplication的run方法,所以先从这个方法入口,去看内部启动逻辑是咋样的。
1、SpringApplication对象初始化逻辑
@EnableSQLFilter //开启防SQL注入
@EnableXSSFilter //开启防XSS攻击
@EnableDynamicDataSource //开启EP数据源配置
@EnableGlobalExceptionHandler //开启全局异常捕获
@EnableEPSys //开启EP基础系统,含人员管理、菜单管理等基础功能,其他模块注解要在这个注解下面
@EnableEPScheduler //开启EP定时任务,需要事先开启EP基础系统
@EnableEPFS //开启文件服务器
@MapperScan(basePackages = { "io.github.junxworks.ep.*" }, annotationClass = Mapper.class) //io.github.junxworks.ep是ep的mapper扫苗,还可以添加项目自身的mapper扫描,如com.xxx.ccc.mapper
@SpringBootApplication(exclude = { DataSourceAutoConfiguration.class })
public class Application {
	static {
		try {
			IPUtils.initializeServerIP();//如果ip合法,则把IP设置到系统环境变量中,注册到zookeeper的时候会使用到
		} catch (Exception e) {
			throw new BaseRuntimeException(e);
		}
	}

	public static void main(String[] args) {
		SpringApplication.run(Application.class, args);
	}
}
从上面可以看到,整个springboot启动的时候,入口就是SpringApplication.run(Application.class, args)这个方法,我们先看看springboot启动的核心步骤:
- 根据项目的classpath创建一个合适的ApplicationContext。
- 注册一个CommandLinePropertySource,以spring properties的方式对外暴露命令行参数。
- 刷新application context上下文,加载所有单例bean。
- 触发所有CommandLineRunner的bean实例。
下面看看springboot是怎么实现这些步骤的:
启动入口
public static ConfigurableApplicationContext run(Class<?>[] primarySources, String[] args) {
		return new SpringApplication(primarySources).run(args);
	}
SpringApplication对象的初始化
public SpringApplication(ResourceLoader resourceLoader, Class<?>... primarySources) {
		this.resourceLoader = resourceLoader; //默认null
		Assert.notNull(primarySources, "PrimarySources must not be null");
		this.primarySources = new LinkedHashSet<>(Arrays.asList(primarySources));
		this.webApplicationType = WebApplicationType.deduceFromClasspath(); //根据classpath中的几个关键class,来判断当前的webapplication是属于哪个类型
		this.bootstrappers = new ArrayList<>(getSpringFactoriesInstances(Bootstrapper.class)); //初始化Bootstrapper
		setInitializers((Collection) getSpringFactoriesInstances(ApplicationContextInitializer.class)); //初始化ApplicationContextInitializer
		setListeners((Collection) getSpringFactoriesInstances(ApplicationListener.class));//初始化ApplicationListener
		this.mainApplicationClass = deduceMainApplicationClass();//推断主application类,这里是通过打印RuntimeException的栈帧的方式来寻找主application类的,逻辑很简单
	}
上面这段代码逻辑比较简单,就是初始化一些关键资源,其中比较重要的一个方法就是getSpringFactoriesInstances(Class
private <T> Collection<T> getSpringFactoriesInstances(Class<T> type, Class<?>[] parameterTypes, Object... args) {
		ClassLoader classLoader = getClassLoader(); //这里默认是java的AppClassLoader
		Set<String> names = new LinkedHashSet<>(SpringFactoriesLoader.loadFactoryNames(type, classLoader));//根据产品class类型,加载工厂类名
		List<T> instances = createSpringFactoriesInstances(type, parameterTypes, classLoader, args, names); //根据工厂类名,初始化工厂示例
		AnnotationAwareOrderComparator.sort(instances); //根据实例的优先级顺序排个序
		return instances;
	}
这里加载工厂类的核心逻辑代码值得看一下,可能后面很多场景能用上:
private static Map<String, List<String>> loadSpringFactories(ClassLoader classLoader) {
		Map<String, List<String>> result = cache.get(classLoader);//根据classloader对象做的缓存
		if (result != null) {
			return result;
		}

		result = new HashMap<>();
		try {
			Enumeration<URL> urls = classLoader.getResources(FACTORIES_RESOURCE_LOCATION); //找到有META-INF/spring.factories文件的资源(jar包)
			while (urls.hasMoreElements()) {
				URL url = urls.nextElement();
				UrlResource resource = new UrlResource(url);
				Properties properties = PropertiesLoaderUtils.loadProperties(resource);//这里的resource有很多,spring-boot-2.4.1.jar、spring-boot-autoconfigure-2.4.1.jar、spring-beans-5.3.2.jar等等
				for (Map.Entry<?, ?> entry : properties.entrySet()) {
					String factoryTypeName = ((String) entry.getKey()).trim();
					String[] factoryImplementationNames =
							StringUtils.commaDelimitedListToStringArray((String) entry.getValue());
					for (String factoryImplementationName : factoryImplementationNames) {
						result.computeIfAbsent(factoryTypeName, key -> new ArrayList<>())
								.add(factoryImplementationName.trim());
					}
				}
			}

			// Replace all lists with unmodifiable lists containing unique elements
			result.replaceAll((factoryType, implementations) -> implementations.stream().distinct()
					.collect(Collectors.collectingAndThen(Collectors.toList(), Collections::unmodifiableList)));
			cache.put(classLoader, result);
		}
		catch (IOException ex) {
			throw new IllegalArgumentException("Unable to load factories from location [" +
					FACTORIES_RESOURCE_LOCATION + "]", ex);
		}
		return result;
	}
代码逻辑很简单,就是找到各个jar包里面的META-INF/spring.factories文件,然后解析成一个Map<String, unmodifiableList<String>>放到缓存里面去,其中用到的lambda表达式,可以去学习学习,代码写得非常简洁。
下面取一小段spring-boot-2.4.1.jar中的META-INF/spring.factories配置作为示例,看看spring里面都是怎么配置工厂类的(前面配置的是工厂接口,后面是实现类):
# Logging Systems
org.springframework.boot.logging.LoggingSystemFactory=\
org.springframework.boot.logging.logback.LogbackLoggingSystem.Factory,\
org.springframework.boot.logging.log4j2.Log4J2LoggingSystem.Factory,\
org.springframework.boot.logging.java.JavaLoggingSystem.Factory

# PropertySource Loaders
org.springframework.boot.env.PropertySourceLoader=\
org.springframework.boot.env.PropertiesPropertySourceLoader,\
org.springframework.boot.env.YamlPropertySourceLoader

# ConfigData Location Resolvers
org.springframework.boot.context.config.ConfigDataLocationResolver=\
org.springframework.boot.context.config.ConfigTreeConfigDataLocationResolver,\
org.springframework.boot.context.config.StandardConfigDataLocationResolver

# ConfigData Loaders
org.springframework.boot.context.config.ConfigDataLoader=\
org.springframework.boot.context.config.ConfigTreeConfigDataLoader,\
org.springframework.boot.context.config.StandardConfigDataLoader

# Run Listeners
org.springframework.boot.SpringApplicationRunListener=\
org.springframework.boot.context.event.EventPublishingRunListener

# Error Reporters
org.springframework.boot.SpringBootExceptionReporter=\
org.springframework.boot.diagnostics.FailureAnalyzers

# Application Context Initializers
org.springframework.context.ApplicationContextInitializer=\
org.springframework.boot.context.ConfigurationWarningsApplicationContextInitializer,\
org.springframework.boot.context.ContextIdApplicationContextInitializer,\
org.springframework.boot.context.config.DelegatingApplicationContextInitializer,\
org.springframework.boot.rsocket.context.RSocketPortInfoApplicationContextInitializer,\
org.springframework.boot.web.context.ServerPortInfoApplicationContextInitializer
......
另外AnnotationAwareOrderComparator.sort(instances);这段代码是根据实例的优先级排序,这里值得一看,很多地方都用到了,底层实现有两个逻辑寻找order参数:
- org.springframework.core.OrderComparator中,如果class本身有实现Odered这个接口,那么优先取接口返回的order参数
@Nullable
	protected Integer findOrder(Object obj) {
		return (obj instanceof Ordered ? ((Ordered) obj).getOrder() : null);
	}
- org.springframework.core.annotation.AnnotationAwareOrderComparator中,如果class没有实现Order接口,那么就根据Odered注解的值去取order参数
@Nullable
	private Integer findOrderFromAnnotation(Object obj) {
		AnnotatedElement element = (obj instanceof AnnotatedElement ? (AnnotatedElement) obj : obj.getClass());
		MergedAnnotations annotations = MergedAnnotations.from(element, SearchStrategy.TYPE_HIERARCHY);
		Integer order = OrderUtils.getOrderFromAnnotations(element, annotations);
		if (order == null && obj instanceof DecoratingProxy) {
			return findOrderFromAnnotation(((DecoratingProxy) obj).getDecoratedClass());
		}
		return order;
	}
- 如果都没有找到order的值,则默认order优先级最低Ordered.LOWEST_PRECEDENCE
到这里,SpringApplication对象初始化逻辑已经完成,初始化了primarySources、webApplicationType、bootstrappers、initializers、listeners以及mainApplicationClass。
2、SpringApplication对象run逻辑
run逻辑是整个springboot启动的初始化核心逻辑
public ConfigurableApplicationContext run(String... args) {
		StopWatch stopWatch = new StopWatch();//这个对象是用来记录各个task执行的时间偏移量的,感觉有点类似io.github.junxworks.junx.core.tracker.Tracker
		stopWatch.start();
		DefaultBootstrapContext bootstrapContext = createBootstrapContext(); //创建引导上下文,待ApplicationContext初始化完成后,这个对象会关闭
		ConfigurableApplicationContext context = null;
		configureHeadlessProperty(); //设置服务器进入java.awt.headless=true,这个headless模式传说可以提高服务器性能,不知道真假,非GUI模式建议开启这种模式
		SpringApplicationRunListeners listeners = getRunListeners(args); //生成SpringApplicationRunListener对象,核心逻辑还是上面提到的getSpringFactoriesInstances的逻辑
		listeners.starting(bootstrapContext, this.mainApplicationClass); //监听者模式广播服务器启动,代码逻辑参考【2.1】
		try {
			ApplicationArguments applicationArguments = new DefaultApplicationArguments(args);
			ConfigurableEnvironment environment = prepareEnvironment(listeners, bootstrapContext, applicationArguments);
			configureIgnoreBeanInfo(environment);
			Banner printedBanner = printBanner(environment);
			context = createApplicationContext();
			context.setApplicationStartup(this.applicationStartup);
			prepareContext(bootstrapContext, context, environment, listeners, applicationArguments, printedBanner);
			refreshContext(context);
			afterRefresh(context, applicationArguments);
			stopWatch.stop();
			if (this.logStartupInfo) {
				new StartupInfoLogger(this.mainApplicationClass).logStarted(getApplicationLog(), stopWatch);
			}
			listeners.started(context);
			callRunners(context, applicationArguments);
		}
		catch (Throwable ex) {
			handleRunFailure(context, ex, listeners);
			throw new IllegalStateException(ex);
		}

		try {
			listeners.running(context);
		}
		catch (Throwable ex) {
			handleRunFailure(context, ex, null);
			throw new IllegalStateException(ex);
		}
		return context;
	}
springboot启动时候是采用事件驱动模式来做的,分成了很多节点,为啥要通过事件驱动来做这块?因为解耦,为框架提供了最大的灵活性。这里有一个关键的类SpringApplicationRunListeners,一个监听者集合,springboot启动的事件都是靠这货(默认org.springframework.boot.context.event.EventPublishingRunListener)发布出去的,下面看看springboot启动时候的事件触发。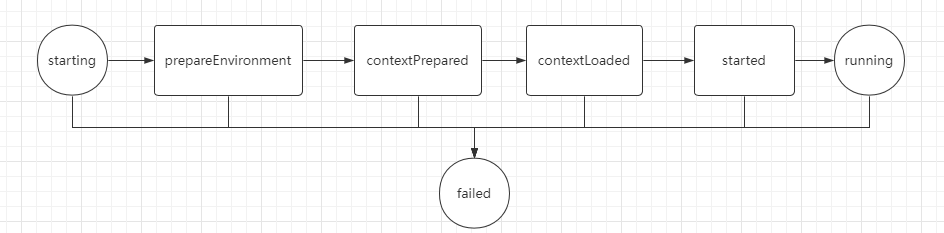
由于篇幅限制,在后面的文章中继续读各个启动阶段的逻辑。
标题:springboot(2.4.1)源代码分析一
作者:michael
地址:https://blog.junxworks.cn/articles/2021/06/16/1623834183931.html